...
...
Once testing against the staging repo version has been completed (see above ![]() ) and the project has determined that the artifact in the staged repository is ready for release, the project team can use the new-for-2019 self-release process. For details on
) and the project has determined that the artifact in the staged repository is ready for release, the project team can use the new-for-2019 self-release process. For details on
Releasing a Java/maven artifact
- Find the Jenkins stage job that created the release candidate. Look among its output logs for the file with the name: staging-repo.txt.gz, it will have a URL like this:
- Create a new release yaml file in the directory "releases/" at the repo root.
- The file name should be anything, but most projects use a pattern like "release-maven.yaml". An example of the content appears below.
- The file content has the project name, the version to release, and the log directory you found above, altho in abbreviated form.
- Create a new change set with just the new file, commit to git locally and submit the change set to Gerrit.
- After the verify job succeeds, a project committer should merge the change set. This will tag the repository with the version string AND release the artifact.
Example release yaml file content:
...
---
distribution_type: maven
version: 1.0.0
project: example-project
log_dir: example-project-maven-stage-master/17/
After the release merge job runs to completion, the jar files should appear in the Nexus2 release repository.
Releasing a Docker artifact
For a Docker image the release yaml file must list the desired release tag and the existing container tags. Example release yaml file content:
...
---
distribution_type: container
container_release_tag: 1.0.0
container_pull_registry: nexus.o-ran-sc.org:10003
container_push_registry: nexus.o-ran-sc.org:10002
project: test
ref: b95b07641ead78b5082484aa8a82c900f79c9706
containers:
    - name: test-backend
      version: 1.0.0-20190806T184921Z
    - name: test-frontend
      version: 1.0.0-20190806T184921Z
After the release merge job runs to completion, the container images should appear in the Nexus3 release registry.
Releasing a Python package
For a Python package the release yaml file must list the log directory, python version and more. Example release yaml file content:
...
---
distribution_type: pypi
log_dir: ric-plt-lib-rmr-python-pypi-merge-master/1
pypi_project: rmr
python_version: '3.7'
version: 1.0.0
project: myproject
If you use a valid decimal value anywhere (like 3.7 above), put it in single quotes so it can be parsed as a string, not a number.
After the release merge job runs to completion, the packages should appear in the https://pypi.org index.
Releasing a PackageCloud DEB/RPM package
The self-release process for PackageCloud is in active development as of December 2019. Until it is ready, write a ticket at https://jira.linuxfoundation.org/servicedesk
Every sonar analysis job consists of these steps:
- compile source (except for interpreted languages like python, of course)
- run tests to generate coverage statistics
- analyze source code with sonar scanner
- gather coverage stats with sonar scanner
- publish code analysis and test stats to SonarCloud.io
build-wrapper-dump.json, which can be consumed by the Sonar scanner.
Examples from the O-RAN-SC project RMR:
- Repository https://gerrit.o-ran-sc.org/r/admin/repos/ric-plt/lib/rmr
- Job configuration https://gerrit.o-ran-sc.org/r/gitweb?p=ci-management.git;a=blob;f=jjb/ric-plt-lib-rmr/ric-plt-lib-rmr.yaml
- Sonar report https://sonarcloud.io/dashboard?id=o-ran-sc_ric-plt-lib-rmr-c
...
go-acc $(go list ./... | grep -vE '(/tests|/enums)' )Examples from the O-RAN-SC project Alarm:
- Repository https://gerrit.o-ran-sc.org/r/admin/repos/ric-plt/alarm-go
- Job configuration https://gerrit.o-ran-sc.org/r/gitweb?p=ci-management.git;a=blob;f=jjb/ric-plt-alarm-go/ric-plt-alarm-go.yaml
- Sonar report (pending)
...
<plugin>
  <groupId>org.jacoco</groupId>
  <artifactId>jacoco-maven-plugin</artifactId>
  <version>0.8.4</version>
  <executions>
    <execution>
      <id>default-prepare-agent</id>
      <goals>
        <goal>prepare-agent</goal>
      </goals>
    </execution>
    <execution>
      <id>default-report</id>
      <phase>prepare-package</phase>
      <goals>
        <goal>report</goal>
      </goals>
    </execution>
  </executions>
</plugin>
target/jacoco.exec, which can be consumed by the Sonar scanner.
Examples from the O-RAN-SC project Dashboard:
- Repository https://gerrit.o-ran-sc.org/r/admin/repos/portal/ric-dashboard
- Job configuration https://gerrit.o-ran-sc.org/r/gitweb?p=ci-management.git;a=blob;f=jjb/portal-ric-dashboard/portal-ric-dashboard.yaml
- Sonar report https://sonarcloud.io/dashboard?id=o-ran-sc_portal-ric-dashboard
Blast
...
deps=
  pytest
  coverage
  pytest-cov
...
commands =
  pytest --cov dir-name --cov-report xml --cov-report term-missing --cov-report html --cov-fail-under=70
  coverage xml -i
https://nexus3.o-ran-sc.org/#browse/browse:docker.staging (make sure not to log in. Otherwise the link does not work). Go to correct image in the tree (note that the latest o-ran-sc components are below the top-level folder "o-ran-sc" and the same component under the same name directly on top level is some outdated version not relevant anymore). and then open the subtree "tags", e.g., o-ran-sc → ric-plt-submgr → tags → ...). There should be at least one version under the tag subtree (e.g. this link for the near-RT RIC subscription manager image: https://nexus3.o-ran-sc.org/#browse/browse:docker.staging:v2%2Fo-ran-sc%2Fric-plt-submgr%2Ftags). If not, then there's no staging image in the staging repo for this component. Alternatively use this curl command: "curl -X GET https://nexus3.o-ran-sc.org:10004/v2/o-ran-sc/ric-plt-submgr/tags/list" (replace the part in bold with the correct component obtained via "curl -X GET https://nexus3.o-ran-sc.org:10004/v2/_catalog" (not sure if this shows components that do not currently have a tag)).
If there's no tag version in the staging repository, we will need to re-run a "merge job" as per "remerge" in the previous section "Triggering Jenkins jobs from Gerrit". This was done e.g. in this review https://gerrit.o-ran-sc.org/r/c/ric-plt/submgr/+/4526 for the subscription manager.
Once testing against the staging repo version has been completed (see above ![]() ) and the project has determined that the artifact in the staged repository is ready for release, the project team can use the new-for-2019 self-release process. For details on
) and the project has determined that the artifact in the staged repository is ready for release, the project team can use the new-for-2019 self-release process. For details on
Releasing a Java/maven artifact
- Find the Jenkins stage job that created the release candidate.
- Go to Jenkins and select the tab for the product to release.
- Find the link for the "<product>-maven-stage-master" job and click it.
- From the list of jobs, find the number for the job that created the artifact to release, the date of the run can be of help here.
- Put the number at the end of the "log_dir" value seen in the example below.
- Alternative way to find Jenkins stage job.
- Look among its output logs for the file with the name: staging-repo.txt.gz, it will have a URL like this:
- https://logs.acumos.org/production/vex-yul-acumos-jenkins-1/common-dataservice-maven-dl-stage-master/4/staging-repo.txt.gz
- Create a new/update existing release yaml file in the directory "releases/" at the repo root.
- The file name should be anything, but most projects use a pattern like "release-maven.yaml". An example of the content appears below.
- The file content has the project name, the version to release, and the log directory you found above, altho in abbreviated form.
- Create a new change set with just the new file, commit to git locally and submit the change set to Gerrit.
- After the verify job succeeds, a project committer should merge the change set. This will tag the repository with the version string AND release the artifact.
Example release yaml file content:
--- |
After the release merge job runs to completion, the jar files should appear in the Nexus2 release repository.
Releasing a Docker artifact
For a Docker image the release yaml file must list the desired release tag and the existing container tags. Example release yaml file content:
--- distribution_type: container container_release_tag: 1.0.0 container_pull_registry: nexus.o-ran-sc.org:10003 container_push_registry: nexus.o-ran-sc.org:10002 project: test |
After the release merge job runs to completion, the container images should appear in the Nexus3 release registry.
Releasing a Python package
For a Python package the release yaml file must list the log directory, python version and more. Example release yaml file content:
--- |
If you use a valid decimal value anywhere (like 3.7 above), put it in single quotes so it can be parsed as a string, not a number.
After the release merge job runs to completion, the packages should appear in the https://pypi.org index.
Releasing a PackageCloud DEB/RPM package
2020-Dec-14: There is a process that involves the keyword "stage-release" (see section "Triggering Jenkins jobs from Gerrit" above) to publish packages to packagecloud. This works with two merges. First one with updates to ci/package-tag.yaml and ci/control. Merge that change and after merging add a comment with only the keyword "stage-release". After this create a second review for an updated "releases/*.yaml" with correct version, log_dir and ref with commit hash. Submit that change for merging as well. This will do the actual moving of the package from the staging directory in packagecloud to the release directory. A bit of information on this is also available in section "PackageCloud Release Files" from this LF guide: link.
OLD notes: The self-release process for PackageCloud is in active development as of December 2019. Until it is ready, write a ticket at https://jira.linuxfoundation.org/servicedesk
Every sonar analysis job consists of these steps:
- compile source (except for interpreted languages like python, of course)
- run tests to generate coverage statistics
- analyze source code with sonar scanner
- gather coverage stats with sonar scanner
- publish code analysis and test stats to SonarCloud.io
build-wrapper-dump.json, which can be consumed by the Sonar scanner.
Examples from the O-RAN-SC project RMR:
- Repository https://gerrit.o-ran-sc.org/r/admin/repos/ric-plt/lib/rmr
- Job configuration https://gerrit.o-ran-sc.org/r/gitweb?p=ci-management.git;a=blob;f=jjb/ric-plt-lib-rmr/ric-plt-lib-rmr.yaml
- Sonar report https://sonarcloud.io/dashboard?id=o-ran-sc_ric-plt-lib-rmr-c
More details about configuration, building for scanning, and specific file and/or directory exclusion in C/C++ repositories is provided on the Configure Sonar for C/C++ page.
go-acc $(go list ./... | grep -vE '(/tests|/enums)' ) |
Examples from the O-RAN-SC project Alarm:
- Repository
Execution of the build via tox (really just tests) should create the output file coverage.xml, which can be consumed by the Sonar scanner.
Examples from the O-RAN-SC project A1:
- Repository https://gerrit.o-ran-sc.org/r/admin/repos/ric-plt/a1
- Job configuration https://gerrit.o-ran-sc.org/r/admin/repos/ric-plt/e2mgr
- Job configuration https://gerrit.o-ran-sc.org/r/gitweb?pgitweb?p=ci-management.git;a=blob;f=jjb/ric-plt-a1e2mgr/ric-plt-a1e2mgr.yaml;hb=refs/heads/master
- Sonar report: https://sonarcloud.io/dashboard?id=o-ran-sc_ric-plt-a1
...
<plugin> |
...
<artifactId>jacoco-maven-plugin</artifactId> |
...
<version>0.8.4</version> |
...
<executions> |
...
...
<execution> |
...
|
...
|
...
<id>default-prepare-agent</id> |
...
...
|
...
<goals> |
...
...
|
...
|
...
<goal>prepare-agent</goal> |
...
...
|
...
</goals> |
...
...
</execution> |
...
...
<execution> |
...
...
|
...
<id>default-report</id> |
...
...
|
...
<phase>prepare-package</phase> |
...
...
|
...
<goals> |
...
...
|
...
|
...
<goal>report</goal> |
...
...
|
...
</goals> |
...
...
</execution> |
...
</executions> |
Then the Jenkins job needs to be updated, see the following commit for an example: https://gerrit.o-ran-sc.org/r/c/ci-management/+/2446.
- In Eclipse, right click on the project and select "SonarLint → Bind to SonarQube or SonarCloud...".
- In the dialog, press the "New" button.
- Make sure the "sonarcloud" radio button is selected and press "Next".
- If you do not have a token generated in SonarCloud, press the "Generate token" button. Otherwise you can reuse yor token.
- Follow the instructions in the web page you are redirected to to generate the token.
- Paste the token in to the "Token:" box and press "Next".
- In the "Organization:" box, type "o-ran-sc" and press "Next".
- Press "Next".
- Press "Finish".
- Select "Window → Show View → Other..." and then "SonarLint bindings".
- In the view, doubleclick the new binding.
- In the dialog, Press "Add", select the project to bind, press "Ok", and press "Next".
- Type your project's name. When it show up in the result list, select it and press "Finish".
Now Sonar issues should show up in your code.
Note! At the moment there is a bug that show up if Lombok is used in the code. To see when a fix is released, follow this link Lombok issue.
All jobs in the Jenkins server are generated from Jenkins Job Builder (JJB) templates. The templates are maintained in this project's ci-management git repository. The templates use features from the Linux Foundation Global JJB as well as features custom to this project.
- Project view. This causes a tab to appear on the Jenkins server that groups all jobs for the repository together.
- Info file verifier. This checks changes to the repository's INFO.yaml file.
- Verify and merge jobs. These check submitted changes, and depend on the implementation language of the code in that repository.
- Sonar job to analyze static code and gather unit-test coverage statistics.
- Release job to promote an artifact from a staging repository to a release repository.
After creating or modifying a YAML file, submit the change to Gerrit where it will be verified and can be reviewed. Only the LF Release Engineering team can merge changes to the ci-management repository.
| Code Block |
|---|
ci-management/jenkins-config/clouds/openstack/cattle/ |
| Code Block |
|---|
jjb-deploy your-job-name* |
The argument is a simple shell-style globbing pattern to limit the scope. This example should create all jobs that start with the prefix "your-job-name".
...
target/jacoco.exec, which can be consumed by the Sonar scanner.
Examples from the O-RAN-SC project Dashboard:
- Repository https://gerrit.o-ran-sc.org/r/admin/repos/portal/ric-dashboard
- Job configuration https://gerrit.o-ran-sc.org/r/gitweb?p=ci-management.git;a=blob;f=jjb/portal-ric-dashboard/portal-ric-dashboard.yaml
- Sonar report https://sonarcloud.io/dashboard?id=o-ran-sc_portal-ric-dashboard
Configure
deps= |
commands = |
Execution of the build via tox (really just tests) should create the output file coverage.xml, which can be consumed by the Sonar scanner.
Examples from the O-RAN-SC project A1:
- Repository https://gerrit.o-ran-sc.org/r/admin/repos/ric-plt/a1
- Job configuration https://gerrit.o-ran-sc.org/r/gitweb?p=ci-management.git;a=blob;f=jjb/ric-plt-a1/ric-plt-a1.yaml
- Sonar report https://sonarcloud.io/dashboard?id=o-ran-sc_ric-plt-a1
Configure
Configure
[testenv:clm] # use pip to report dependencies with versions whitelist_externals = sh commands = sh -c 'pip freeze > requirements.txt' |
<plugin>
<groupId>org.sonarsource.scanner.maven</groupId>
<artifactId>sonar-maven-plugin</artifactId>
<version>${sonar-maven-plugin.version}</version>
</plugin>
<plugin>
  <groupId>org.jacoco</groupId>
<artifactId>jacoco-maven-plugin</artifactId>
<version>0.8.4</version>
<executions>
<execution>
<id>default-prepare-agent</id>
<goals>
<goal>prepare-agent</goal>
</goals>
</execution>
<execution>
<id>default-report</id>
<phase>prepare-package</phase>
<goals>
<goal>report</goal>
</goals>
</execution>
  </executions>
</plugin>
Then the Jenkins job needs to be updated, see the following commit for an example: https://gerrit.o-ran-sc.org/r/c/ci-management/+/2446.
- In Eclipse, right click on the project and select "SonarLint → Bind to SonarQube or SonarCloud...".
- In the dialog, press the "New" button.
- Make sure the "sonarcloud" radio button is selected and press "Next".
- If you do not have a token generated in SonarCloud, press the "Generate token" button. Otherwise you can reuse yor token.
- Follow the instructions in the web page you are redirected to to generate the token.
- Paste the token in to the "Token:" box and press "Next".
- In the "Organization:" box, type "o-ran-sc" and press "Next".
- Press "Next".
- Press "Finish".
- Select "Window → Show View → Other..." and then "SonarLint bindings".
- In the view, doubleclick the new binding.
- In the dialog, Press "Add", select the project to bind, press "Ok", and press "Next".
- Type your project's name. When it show up in the result list, select it and press "Finish".
Now Sonar issues should show up in your code.
Note! At the moment there is a bug that show up if Lombok is used in the code with a version below 1.18.12. If you have this problem, download Lombok version 1.18.12 or higher and repeat the installation procedure described here, https://howtodoinjava.com/automation/lombok-eclipse-installation-examples/.
All jobs in the Jenkins server are generated from Jenkins Job Builder (JJB) templates. The templates are maintained in this project's ci-management git repository. The templates use features from the Linux Foundation Global JJB as well as features custom to this project.
- Project view. This causes a tab to appear on the Jenkins server that groups all jobs for the repository together.
- Info file verifier. This checks changes to the repository's INFO.yaml file.
- Verify and merge jobs. These check submitted changes, and depend on the implementation language of the code in that repository.
- Sonar job to analyze static code and gather unit-test coverage statistics.
- Release job to promote an artifact from a staging repository to a release repository.
After creating or modifying a YAML file, submit the change to Gerrit where it will be verified and can be reviewed. Only the LF Release Engineering team can merge changes to the ci-management repository.
When creating new types of jobs follow these steps (see IT-25277 support case):
- Adding a jobs yaml file
- Making sure `mvn-settings` is set.
- Creating a support request to create jenkins credentials (As pointed by `mvn-settings`)
- Adding the set of settings files that point to jenkins credentials.
| Code Block |
|---|
ci-management/jenkins-config/clouds/openstack/cattle/ |
| Code Block |
|---|
jjb-deploy your-job-name* |
The argument is a simple shell-style globbing pattern to limit the scope. This example should create all jobs that start with the prefix "your-job-name".
| Code Block |
|---|
[job_builder]
ignore_cache=True
keep_descriptions=False
recursive=True
update=jobs

[jenkins]
query_plugins_info=False
url=https://jenkins.o-ran-sc.org/sandbox
user=your-sandbox-user-name
password=your-sandbox-api-token |
Test a job in the sandbox
After pushing a job to the sandbox, either via the Jenkins `` job or directly, you can run the job on the code in your repository, usually the master branch, to test the job. Follow this procedure:
- Go to https://jenkins.o-ran-sc.org/sandbox/ and click the log in link top right. You need special credentials for this, as discussed above.
- Find your job in the "All" view and click on it
- On the job page, find the link on the left "Build with Parameters" and click on it
- Check the parameters, then click the Build button.
You can also test a job on a Gerrit change set that has not yet been merged. Follow this procedure:
- In Gerrit, find your change set, click the icon with three dots at the top right, pick Download Patch
- In the dialog-like thing that appears, copy the text that appears in the Checkout box (just click on the icon at the right). It looks like this:
- git fetch "https://gerrit.o-ran-sc.org/r/your/repo" refs/changes/62/2962/1 && git checkout FETCH_HEAD
- You need just this part: refs/changes/62/2962/1
- In the dialog-like thing that appears, copy the text that appears in the Checkout box (just click on the icon at the right). It looks like this:
- As described above, log in to the Jenkins sandbox, find your job, click Build with Parameters
- On the job parameters page, find these fields:
- GERRIT_BRANCH
- GERRIT_REFSPEC
- Paste the refs/changes/62/2962/1 part you copied from Gerrit into BOTH fields
- Click the Build button
Jenkins Build Minion Labels and Images
Jenkins build minions are OpenStack virtual machines. The software, the number of cores, amount of virtual memory and amount of disk memory are determined by files in directory
centos7-builder-1c-1g ubuntu1804-builder-2c-2g.cfg |
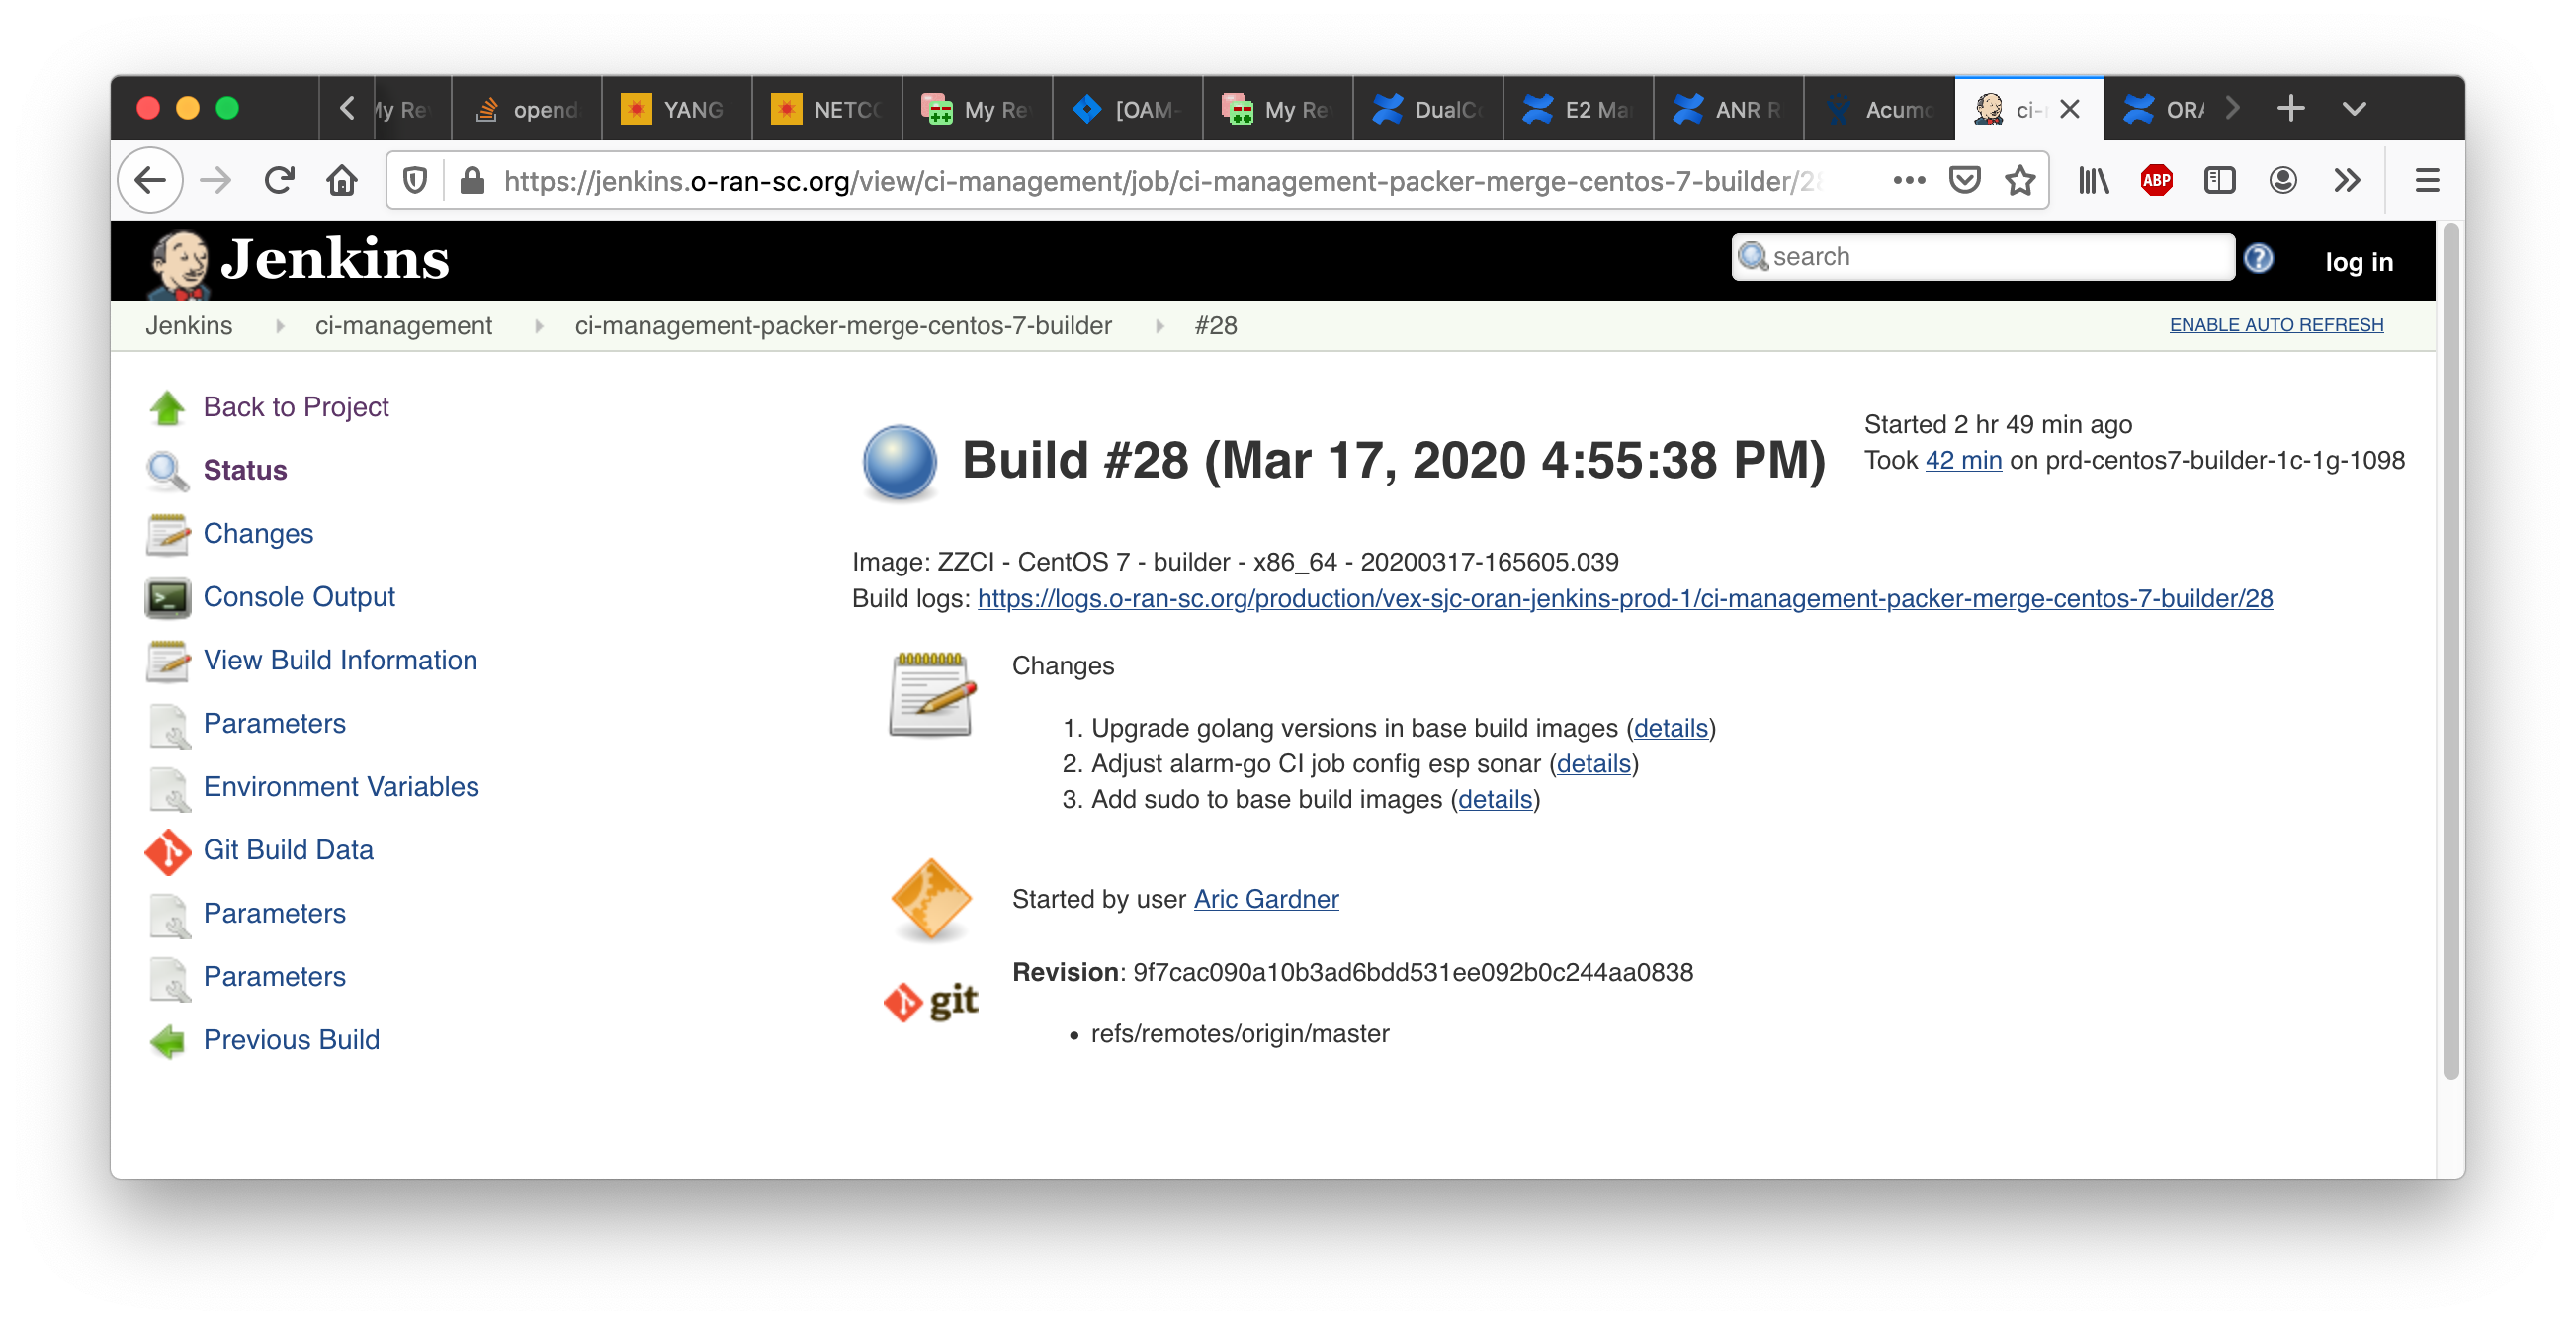
https://jenkins.o-ran-sc.org/view/ci-management/job/ci-management-packer-merge-centos-7-builder/
https://jenkins.o-ran-sc.org/view/ci-management/job/ci-management-packer-merge-centos-7-docker/
https://jenkins.o-ran-sc.org/view/ci-management/job/ci-management-packer-merge-ubuntu-18.04-builder/
https://jenkins.o-ran-sc.org/view/ci-management/job/ci-management-packer-merge-ubuntu-18.04-docker/
These jobs are NOT triggered automatically if a change is made to a supporting file such as an Ansible role definition. Regular project members cannot launch these jobs manually, only the LF #RelEng team has the privilege. One way to avoid writing a ticket is to find a previously merged commit to a file in the packer area and post the the usual Jenkins comment "remerge" on it, but this is not foolproof.
Upon completion of a job the job page shows the image name that was built, a long string starting "ZZCI" and ending with a timestamp, see the screenshot below. Copy that string (very carefully!) into the appropriate config file, submit as a gerrit change set, and wait for merge. Then the new image will be available for use with the specified build node label.