Table of Contents
Subpages
Introduction
This wiki is meant to detail the approach and steps taken to automate the deployment and testing of the O-RAN-SC SMO package based on ONAP including validating sample use cases.
Driver
Automation is key nowadays and deployment and testing needs to be repeatable and portable.
In order to achieve a certain level of automation with the O-RAN-SC software we took the following steps :
- Create a simple deployment method, reusing the work that was done by ONAP : see SMO package (https://jira.onap.org/browse/REQ-887)
- Reuse existing testing automation tools that were successfully used in ONAP : see Python-SDK (https://python-onapsdk.readthedocs.io/en/master/)
- Extend the deployment mechanics to provide a self contained, portable setup that can validate sample use cases on various type of deployment (called "flavors")
The End goal is to provide the community with a mean to deploy the SMO and its test environment with a minimum set of requirements, ultimately this setup can be used on a lab to automatically validate code changes and report issues directly in code review tools.
The setup as pictured in this wiki, is by no means closed, it can be easily extended thanks to the flexibility of all the tools that were chosen.
SMO Package based on ONAP
The SMO package is accessible on ORAN gerrit in the "it/dep" repo: https://gerrit.o-ran-sc.org/r/gitweb?p=it/dep.git;a=tree;f=smo-install;h=2e4539d6c3c2e2a274d1913c89df371c956f0793;hb=HEAD
It's based on the ONAP OOM repository because it is used as a git submodule. The ONAP charts are used unchanged nor redefined but instead obviously configured by using the helm override mechanism.
The ORAN charts are defined mainly for Non-RTRIC part but others charts could be added later.
The tests charts defined contains helm charts for network simulators (DU/RU/Topology server), jenkins or python SDK tests.
The chart museum is used to store the HELM charts built locally (as the ONAP and ORAN charts are currently not available remotely)
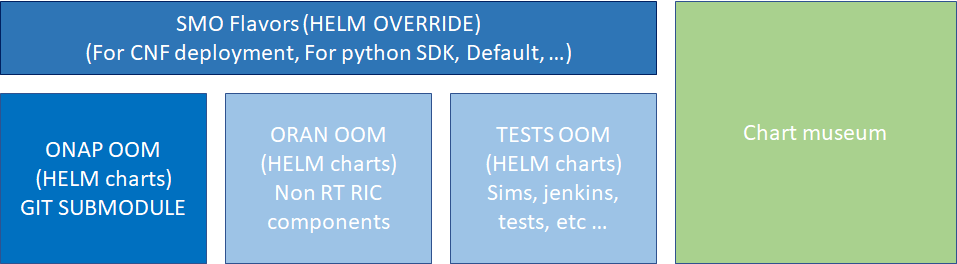
The SMO package contains some scripts to setup the node, install the smo/jenkins, start simulators, uninstall, etc ....
These scripts have been split into 3 different layers but depending of your setup, some scripts can be skipped.
- Layer 0: Setup the node (microk8s, helm, chartmuseum, tests tools, etc ...)
- Layer 1: Build the helm charts and upload them to chart museum
- Layer 2: Deploy SMO with specific flavors, deploy network simulators, deploy CI/CD tool, etc ...
Architecture
The picture below describes the environment from a high level and the various entities that are deployed with this setup
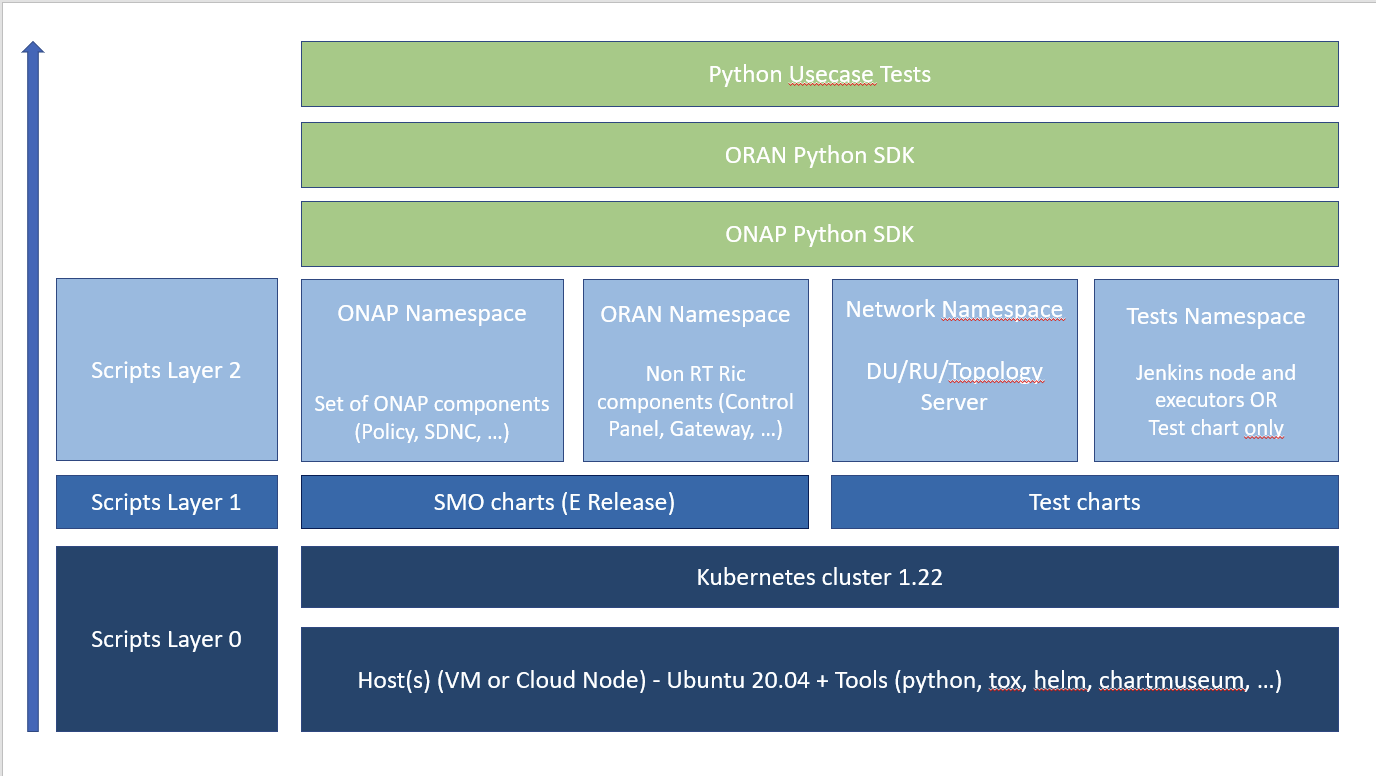
The basis is a standard VM or node running a recent Ubuntu release where a Kubernetes cluster is setup (that cluster can also be remote if needed as long as it is accessible from the host VM)
The deployment layout is explained in the readme file of the repository but in a nutshell it is composed of :
- helm charts to deploy the
- SMO, the simulators
- a dedicated embedded jenkins instance
- an Helm Chart repository to store locally useful charts for the setup
- utility scripts to help setup the environments from a basic Ubuntu VM or node
- a set of Python SDK tests cases that are executed
The Jenkins instance will act as a Meta executor to orchestrate the deployment and execute the set of tests.
This layout provides all the needed configuration for the embedded Jenkins instance to interact with the cluster and connect to remote repositories
Deployment guide
Minimum Requirements
The target deployment environment is quite flexible thanks to the chart configurations and options.
The minimum setup requires :
1 VM or host with
- 6 or more CPU cores
- 20 G of RAM
- 60G of disk (mostly used to store container images
- Ubuntu 20.04 LTS (under test using 18.04 LTS)
Prerequisites
Be sure your user account has enough privileges to execute the commands that are listed below, some may imply to grant your user sudo privileges or manipulate users/groups so that these can be executed.
$ cat /etc/os-release
NAME="Ubuntu"
VERSION="18.04.6 LTS (Bionic Beaver)"
ID=ubuntu
ID_LIKE=debian
PRETTY_NAME="Ubuntu 18.04.6 LTS"
VERSION_ID="18.04"
HOME_URL="https://www.ubuntu.com/"
SUPPORT_URL="https://help.ubuntu.com/"
BUG_REPORT_URL="https://bugs.launchpad.net/ubuntu/"
PRIVACY_POLICY_URL="https://www.ubuntu.com/legal/terms-and-policies/privacy-policy"
VERSION_CODENAME=bionic
UBUNTU_CODENAME=bionic
$ git --version
git version 2.17.1
Installation
Download the IT/dep repository from gerrit at the following location :
$ mkdir workspace && cd workspace
$ git clone --recurse-submodules https://gerrit.o-ran-sc.org/r/it/dep.git
$ cd dep
Note that you need to add the recurse sub modules flag as some parts are git submodules pointing to existing related charts (ONAP)
The installation is quite straight forward, several utility scripts are available from the repository to allow the user to setup all/some of the components independently
Please have a look at the embedded readme file located under dep/smo-install, it provides a full description of the content and how to setup various flavors of the environment
User guide
This section describes how to access and use the setup that has been deployed, it allows the user to configure, run and analyze tests results on O-RAN-SC package, it can also serve as a validation tool for incoming code changes
1) accessing
Once the system is boot strapped, a new namespace called 'test' should appear on your Kubernetes environment.
you should be able to access the jenkins instance by opening a browser to :
http://<your k8s host>:32080/
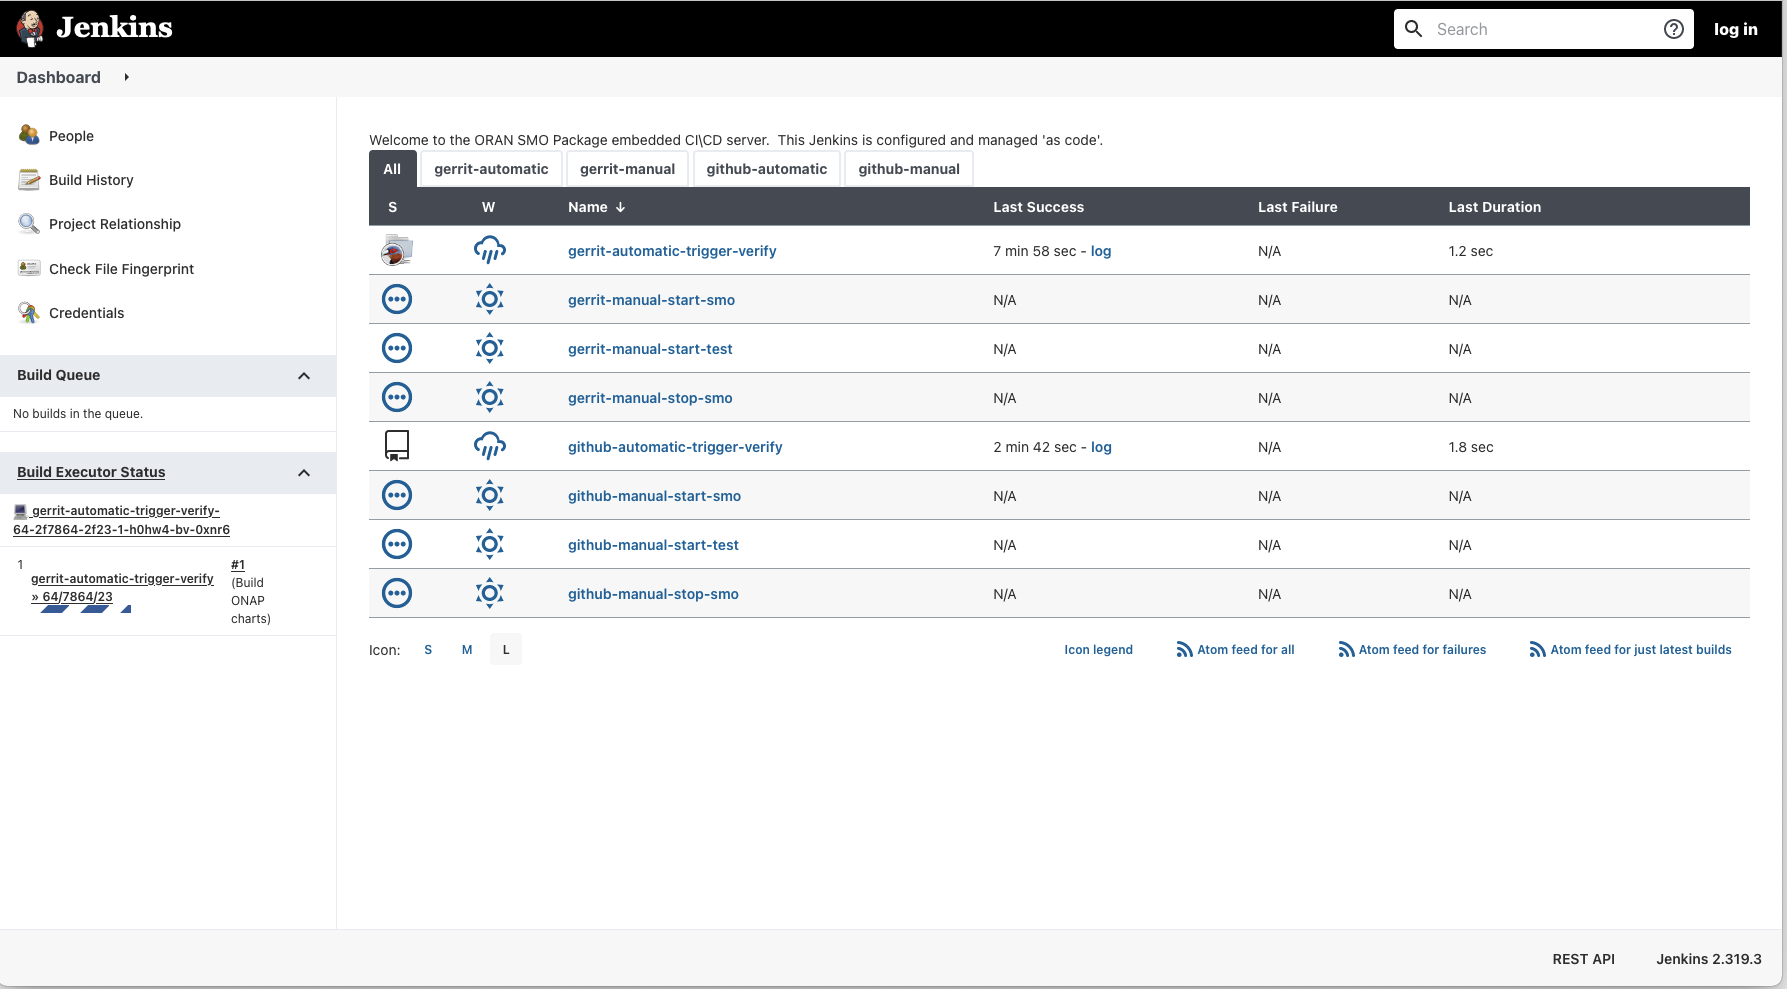
All Jobs are auto provisioned by the deployment to be able to :
- Connect to a remote repository (sample for Github and Gerrit provided)
- Auto discover branches and open pull requests / Gerrit reviews
- Download changes from the repository, build deploy and tests
- It is also possible to manually trigger Start / Stop / Test the SMO package (Job with the Manual keyword in the name)
It is possible to login to the Jenkins instance (to see/modify the configuration) by using the default login/password (test/test) - this can be overriden in overrides files (see above at installation part)
2) Running the tests
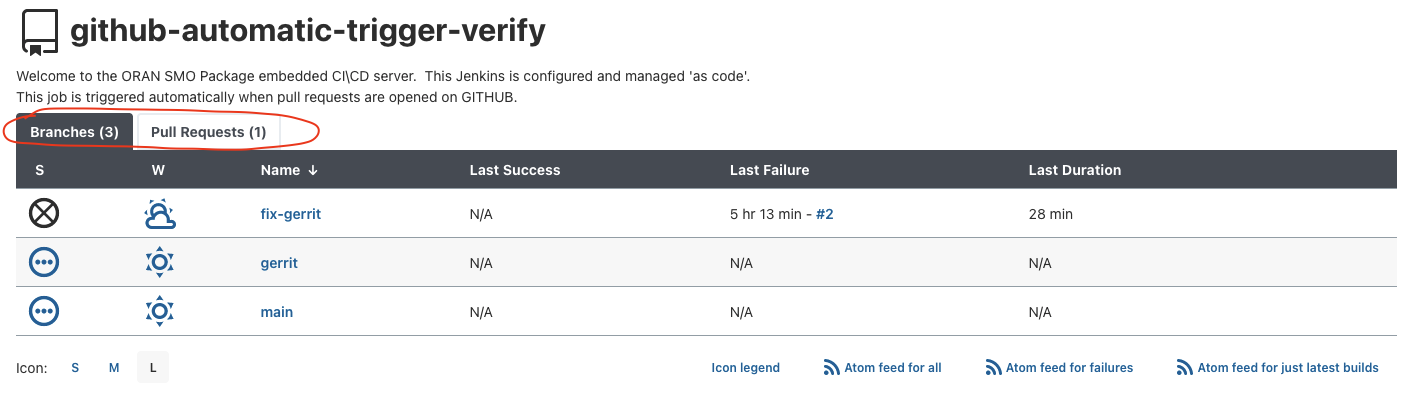
To execute the tests, there are 2 options :
1) Auto Scheduled checks
configure the access to the github/gerrit repositories and let the system scan for available branches, you can see what has been retrieved by clicking on the "-verify" jobs.
Once the access to the repositories is configured, new jobs will be automatically created to validate available branches, they can be triggered by launching the jobs
OR
Jobs are going to be created automatically on Gerrit reviews(gerrit) / Pull Requests (github) and will check for new changes automatically, or can be launched manually
see jobs below
2) Manual startup
A set of jobs is automatically created to allow for a manual startup (regardless of branches or current activity on the repository), they can be accessed from the main dashboard or using the tabbed view
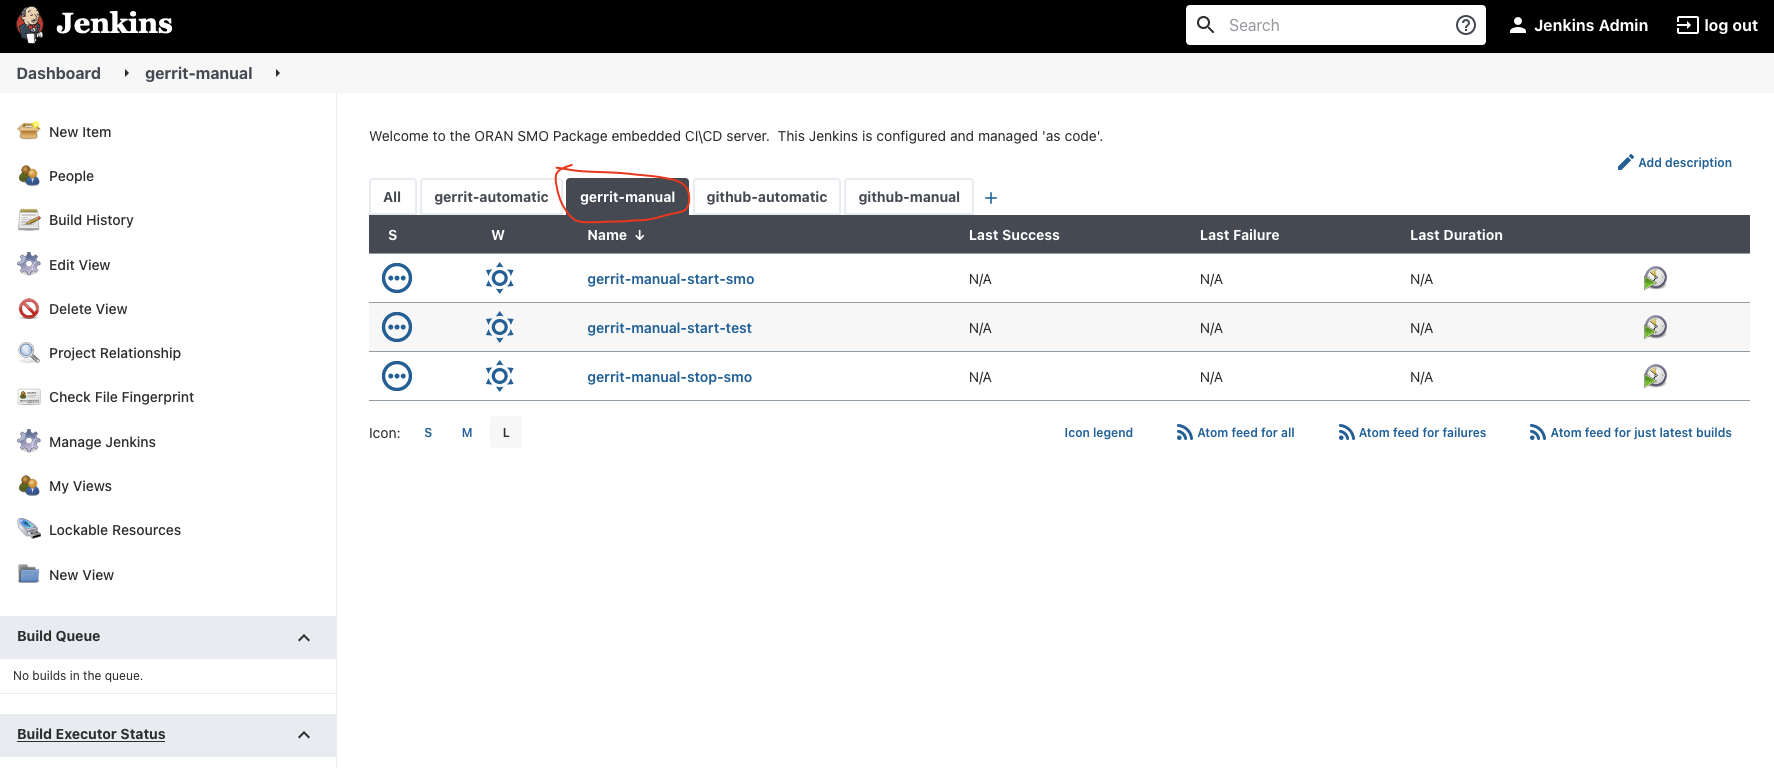
In order to execute the manual jobs, you need to be logged in (test user or the user defined in the override files at installation
when running a manual job, you can provide the branch which will be pulled from the repository and the location of the override files (Flavor) which defines which components and tests will be run
Once the tests are executed, you can follow the pipeline execution through the Jenkins UI

Logs/results can be accessed through the workspace available in the job execution UI, execution history, trends and step details can also be accessed through Jenkins interface
3) Understanding the tests
There are 2 sets of tests being run by the tool :
Unit tests
They are typically used to validate the ORAN SDK methods at a unit level, every time a new method is added to the ORAN SDK it must be validated by a simple unit test.
The pyTest framework is used to execute them.
Integration tests
These tests make use the ONAP/ORAN Python SDK to validate specific SMO usecases. They can initialize, provision, verify, trigger, etc ... the different ONAP/ORAN components started by the SMO package. They need to be executed within the Kubernetes cluster or directly on a Kubernetes node as the tests need access to the virtual networks created by the kubernetes cluster.
4) Python SDK tests and how to add/enhance tests
Demo Recording
Plan:
- What is the SMO package
 .xdp_smo-package1.mp4.xdp_smo-package2.mp4.xdp_smo-package3.mp4
- What is ONAP Python SDK
- What is ORAN Python SDK
- How to execute the SMO usecase tests
- SMO Nomad/ephemeral CICD jenkins
15 Comments
zhuang miao
Hi Team:
There are some problems when I want to install the network simulators, my environment is Ubuntu 20.04 with 50GB Memory, 10VCPU, 98GB of disk space. I install following the commonds under Quick Installation on blank node. when it seems all pods in "onap" and "nonrtric" namespaces are well up & running, I execute the install script "./dep/smo-install/scripts/layer-2/2-install-simulators.sh", when it finished. Checking the simulators status: two du, four ru and topology-server ending statuses are "ImagePullBackOff". I use "kubectl describe pod -n network" command to seek further information about this. The rpc error: code =NotFound desc(more detail you can get from the image below), I don`t know how to pull the right image to push the network simulators installation. Hope you can give me some solutions to solve this problem,.
Much thanks!
Cheng-Yu Huang
Hi, I'm also a new user here, and I ran into the same problem as you.
I go to check the repository manager and search for the given image tags, the version (1.4.3) isn't exist on the repository. My solution is to change the image tag to another version (for example, 1.5.0) and it works for me.
zhuang miao
Hi,Cheng-Yu
I try to solve it according to your method, I read the "./layer-2/2-install-simulators.sh" and try to find how to change the image tag to another version. The two ".yaml" files mentioned do not seem to contain relevant version information. Also "../sub-scripts/install-simulators.sh" just contain one command to install without obvious version information. Could you give me more details about how to change the image version?
Thanks.
Cheng-Yu Huang
Hi, zhunag miao
The script "./layer-2/2-install-simulators.sh" will create a new namespace "network" on your cluster and install helm chart from local chart museum. If you pull the helm chart which was installed by the script, you can set the image tag in values.yaml file in each sub-charts manually.
1. Download the chart
```
helm pull local/ru-du-simulators --untar
```
2. Modify the image tags
For example, change the image tag on du:
```
vim ru-du-simulators/charts/du-simulator/values.yaml
```
```
# ru-du-simulators/charts/du-simulator/values.yaml
...
image:
repository: 'nexus3.o-ran-sc.org:10004/o-ran-sc'
name: nts-ng-o-ran-du
tag: 1.5.0 # which version you want to use
pullPolicy: IfNotPresent
...
```
also edit the following files to change the image tag of ru, topology-server:
3. Upgrade the helm chart
```
helm upgrade -n network oran-simulator ./ru-du-simulators
```
To learn more about helm you can visit their official documents at here.
Xue Gao
Hello zhuang miao and Cheng-Yu Huang, actually you should override the image version from the network-sipulators-override.yaml (under smo-install/helm-override/default) file instead of in the values.yaml file for each component.
Inside the network-sipulators-override.yaml file, you will see settings for each component under the network namespace. You just need to add the value you want under the corresponding component. The value you have set in this override.yaml file, will replace the default settings in the values.yaml when deploy the components. After updating the value in the override.yaml file, you don't need to rebuild the helm chart, only redeploy will make it work.
zhuang miao
Xue GaoThanks for your information. In fact, during the period when I was dealing with this problem, my ONAP service could not work suddenly, some pods could`t running and status turned into "crashloopback"(more detail you can get from the image below), and one pod under nonrtric also turned into "crashloopback" called "oru-app-8db46d4cf-ht5xs". I tried to restart my machine for several times, those pods are always in crashloopback status. I'm not sure how this problem came out, so I may not be able to provide more information about this problem. After receiving your solutions to the previous problems, I run uninstall-all.sh and hope this problem can be solved by reinstallation.
But i have encountered new problems, before started, i add the du-simulators corresponding value to network-simulators-override.yaml, then i follow the step under the quick installation on blank node until “2-install-oran.sh”, finally, it was successfully to create strimzi-system and nonrtric namespace with pods in them(oru-app-8db46d4cf-ht5xs had in init status more than two hours with 5 times restart, it seems won`t be well up). The onap namespace is created, but there is no resources in onap. I check the output when running 2-install-oran.sh, it seems that caused by this message: Error: unknown command "deploy" for "helm". but i can`t get useful information about the deploy command for helm, i also tried some times to reinstall onap, but all failed end with unknown command "deploy". But it works when i first install In august. I checked my helm version is v3.5.4. I hope you can provide me with some information on how to solve these problems, for which I am very grateful.
zhuang miao
Hi team:
I have reseted my vm and reinstall follow the quick install on blank node in “https://gerrit.o-ran-sc.org/r/gitweb?p=it/dep.git;a=blob_plain;f=smo-install/README.md;hb=refs/heads/master”
I think I have aready complete the previous steps, I will provide some information for you to check.(The full log is too long, so it is some key information I think)
When build-all-charts, basically all charts are failed first and then success is deployed blow, is this normal?
When run 2-install-oran.sh, some pods under onap always in initialization state. I use "kubectl describe pod -n onap" to confirm their status. Both of them in the "pending" status, I check the image blow, my server is able to access the "nexus3.onap.org", but they have init for over four hours.
When I check the pods under the onap, many pods just have different tails. Can I regard them as the same? because several pods finally reach the completed state. However, even if they are regarded as the same pod, many pods still fail to initialize.
Could you check my installation steps and information and provide me with some solutions to carry on install, much thanks.
Xue Gao
Hello zhuang miao
Based on the image you have posted, the building process seems to be Ok. It says "0 charts failed", which means it is not failed.
The installation procedure is for sure not normal. If the pod is in "init" status and is pending because it is waiting for other pod, probably one of the AAF or DB pod did not start successfully. Then you have to identify which pod they are waiting for and check in details why that pod didn't start.
You can also try stop oran with script and restart it. If the same error still occur, please try to upgrade to the latest version, redo the build and restart oran using script. Please let me know if you still have problems.
zhuang miao
Hello Xue Gao
I run "uninstall-nonrtric.sh" and "uninstall-onap.sh" to uninstall the onap, and rerun the "2-install-oran.sh". After a period of time, it seems all pods in "onap" and "nonrtric" namespaces are well up & running. When I check the pods under the onap, one pods just have different tails and those pods finally reach the completed state. Can I regard them as the same one?
When i install the network namespace, I specified the image version using the method you mentioned earlier, it works to me.
All in all, after i restarted the oran, no more errors occured and all the pods works. Thanks a lot for your information and help.
Xue Gao
Glad to know it is working
Rani Borusu
Hello Xue Gao
I am trying to deploy onap using install-onap script (oran-deployment/scripts/sub-scripts/install-onap.sh) from script folder and seeing onap-strimzi-entity-operator not found.Below is the logs of onap script.
Output of install onap script:
release "onap" deployed
release "onap-strimzi" deployed
waiting for onap-strimzi-entity-operator to be deployed
onap-strimzi-entity-operator not found. Retry 1/60
onap-strimzi-entity-operator not found. Retry 2/60
onap-strimzi-entity-operator not found. Retry 3/60
onap-strimzi-entity-operator not found. Retry 4/60
-----
onap-strimzi-entity-operator not found. Retry 58/60
onap-strimzi-entity-operator not found. Retry 59/60
onap-strimzi-entity-operator not found. Retry 60/60
Error: plugin "deploy" exited with error
helm.go:81: [debug] plugin "deploy" exited with error
could you please let me know if any steps i am missing to install before onap or provide some guidance to resolve above above.
Thanks,
Rani
Xue Gao
Hi Rani Borusu , based on your logs, it seems the deployment of onap-strimzi failed. Strimzi is needed for ONAP component, so it has to be successfully running first.
The detailed steps to deploy strimzi and Onap component can be found in install-onap.sh, under folder scripts/sub-scripts. Could you please try to run the command manually to deploy strimzi and verify why it failed?
Rani Borusu
Thank you Xue Gao for quick reply.
I opened install-onap.sh and ran strimzi install command manually. Now I am seeing below error.
command :
helm install strimzi-kafka-operator local/strimzi-kafka-operator --namespace strimzi-system --version 0.28.0 --set watchAnyNamespace=true --create-namespace
Logs:
install.go:142: [debug] CRD kafkamirrormaker2s.kafka.strimzi.io is already present. Skipping.
client.go:122: [debug] creating 1 resource(s)
install.go:142: [debug] CRD kafkarebalances.kafka.strimzi.io is already present. Skipping.
Error: rendered manifests contain a resource that already exists. Unable to continue with install: ClusterRole "strimzi-cluster-operator-namespaced" in namespace "" exists and cannot be imported into the current release: invalid ownership metadata; annotation validation error: key "meta.helm.sh/release-name" must equal "strimzi": current value is "strimzi-kafka-operator"
helm.go:81: [debug] ClusterRole "strimzi-cluster-operator-namespaced" in namespace "" exists and cannot be imported into the current release: invalid ownership metadata; annotation validation error: key "meta.helm.sh/release-name" must equal "strimzi": current value is "strimzi-kafka-operator"
could you please guide on this. Thank you.
Regards,
Rani
zhuang miao
Hi team:
After i successfully installed the server, i tried to run the PNF registration demo.
When I want to register my physical device to server, it seems that I can't register successfully due to the lack of some key information.
my device try to register from serverIP and 8443 port with Https protocol, after my device sent SYN, server response RST,ACK, looks like he was rejected.
But after i run “./dep/smo-install/scripts/layer-2/2-install-simulators.sh”, It seems that the internal simulated ru has successfully registered from 4443 with https.
Could you please provide me with some information about how I can register my device externally or where can i get those information, for example:IP, port number, protocol or other information that I have not considered.
Thanks.
zhuang miao
Hi team:
I try to use this server(onap jakarta release version: 2.3.0) to verify some SON related functions, such as 5G OOF SON(onap related doc: Jakarta Use Cases — onap master documentation)
It seems that the server cannot continue without the corresponding environment which demo need.
I want to ask whether the server supports the son function, or where I can get more information about verifying the function?
Thank.