| Table of Contents |
|---|
JIRA Ticket
| Jira | ||||||||||
|---|---|---|---|---|---|---|---|---|---|---|
|
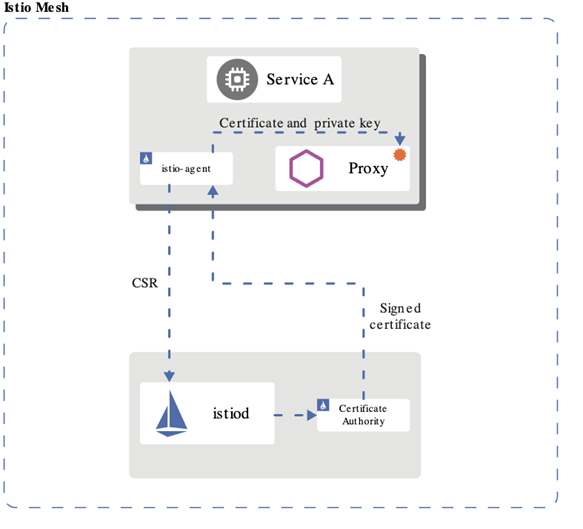
ISTIO
Istio is a service mesh which provides a dedicated infrastructure layer that you can add to your applications. It adds capabilities like observability, traffic management, and security, without adding them to your own code.
...
| Code Block | ||||
|---|---|---|---|---|
| ||||
apiVersion: "security.istio.io/v1beta1"
kind: "PeerAuthentication"
metadata:
  name: "default"
  namespace: "istio-system"
spec:
  mtls:
mode: STRICT |
JWT
JSON Web Token (JWT) is an open standard (RFC 7519) that defines a compact and self-contained way for securely transmitting information between parties as a JSON object.
...
| Code Block | ||||
|---|---|---|---|---|
| ||||
apiVersion: security.istio.io/v1beta1
kind: AuthorizationPolicy
metadata:
  name: httpbin
  namespace: foo
spec:
  selector:
    matchLabels:
      app: httpbin
  rules:
  - from:
    - source:
        requestPrincipals: ["*"]
  - to:
    - operation:
paths: ["/healthz"] |
Use Case
KUBERNETES
K8S RBAC (Role Based Access Control) - supported by default in kubernetes.
K8S Service Account
- Kube use service account (sa) to validate api access
- SAs can be lined to a role via a binding
- A default sa, with no permissions (no bindings), is created in each namespace – pods uses this namespace unless otherwise specified
- Pods can be specified to run with a specific sa
- The helm manger needs a SA with cluster wide permission (to be able to list installed charts etc)
However, during installation the pod running the helm install/upgrade/delete should run with a sa with only namespace permission to ensure not other modification is made to kube objects outside the namespace
K8S RBAC - controlling access to kubernetes resources
- Role and and rolebinding objects defines who (sa, user or group) is allowed to do what in the kubernetes api
- Role object
- Sets permissions on resources in a specific namespace
- ClusterRole object
- Sets permission on non-namespaced resources or across namespaces
- RoleBinding object
- Binds one or more Role or a ClusterRole object(s) to a user, group or service account
- ClusterRoleBinding object
- Binds one or more ClusterRole object(s) to a user, group or service account
- No installation requried – RBAC enabled by default
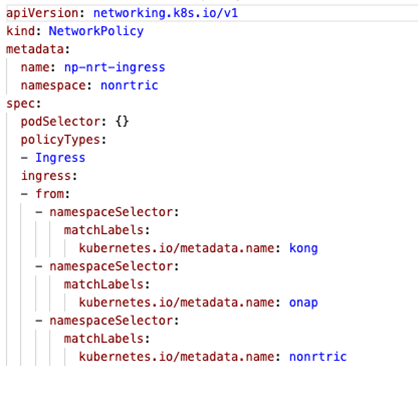
Network Policies
- K8S supports Network Policy objects but a provider need to be install for the polcies to take effect, e.g. Calico
- Network policies can control ingress and/or egress traffic by selecting applicable pods - bacially controlling traffic between pods and/or network endpoints
- Several providers: Calico, Cillium etc
...
- Allow traffic from ns: kong (the gateway), nonrtric and onap
- Deny traffic from any other ns
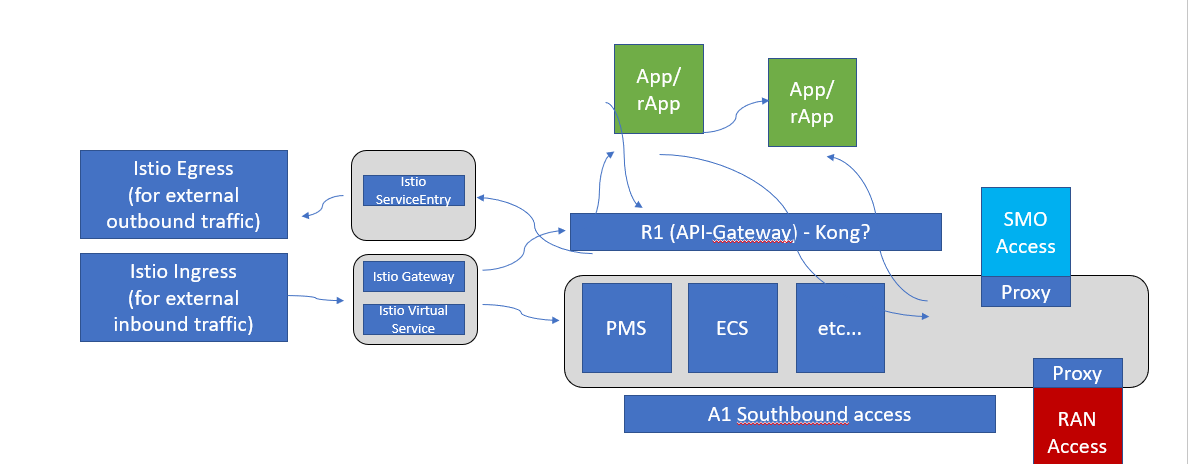
KONG
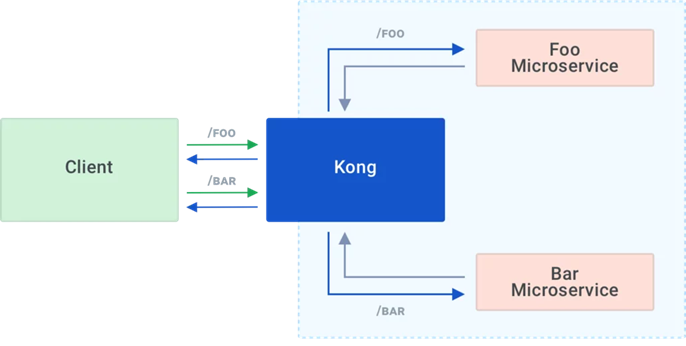
Kong is Orchestration Microservice API Gateway. Kong provides a flexible abstraction layer that securely manages communication between clients and microservices via API. Also known as an API Gateway, API middleware or in some cases Service Mesh.
...
With client-side discovery, the client or API gateway making the request is responsible for identifying the location of the service instance and routing the request to it. The client begins by querying the service registry to identify the location of the available instances of the service and then determines which instance to use. See https://konghq.com/learning-center/microservices/service-discovery-in-a-microservices-architecture/
Kong datastore
Kong uses an external datastore to store its configuration such as registered APIs, Consumers and Plugins. Plugins themselves can store every bit of information they need to be persisted, for example rate-limiting data or Consumer credentials. See https://konghq.com/faqs/#:~:text=PostgreSQL%20is%20an%20established%20SQL%20database%20for%20use,Cassandra%20or%20PostgreSQL%2C%20Kong%20maintains%20its%20own%20cache.
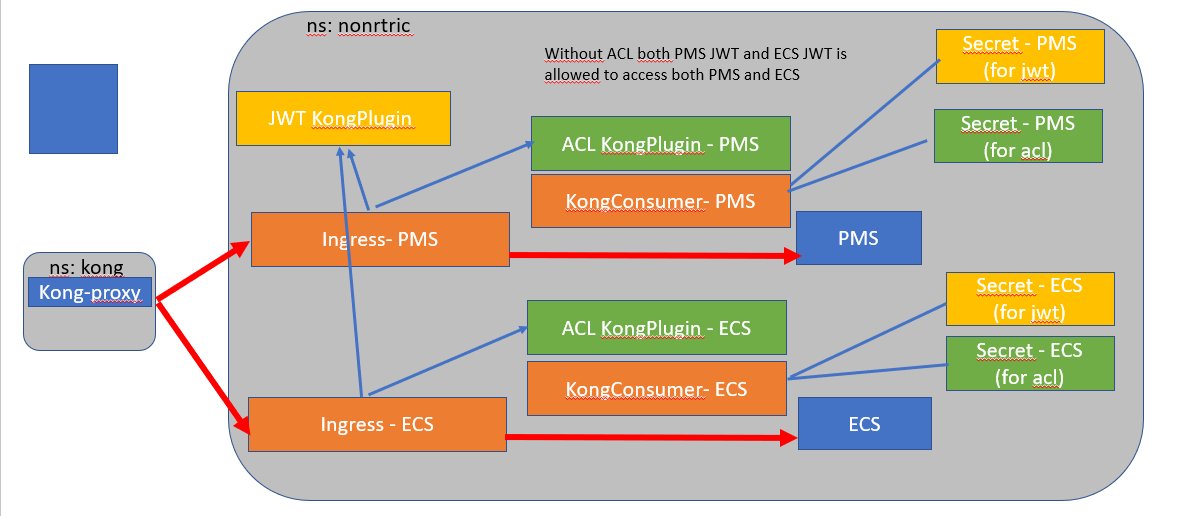
Kong Demo
Demo of Kong gateway access control already available.
...
| Code Block | ||||
|---|---|---|---|---|
| ||||
apiVersion: configuration.konghq.com/v1
kind: KongPlugin
metadata:
  name: app-jwt-kp
  namespace: nonrtric
plugin: jwt
---
apiVersion: v1
kind: Secret
metadata:
  name: pms-jwt-sec
  namespace: nonrtric
type: Opaque
stringData:
  kongCredType: jwt
  key: pms-issuer
  algorithm: RS256
  rsa_public_key: |
    -----BEGIN PUBLIC KEY-----
    MIIBIjANBgkqhkiG9w0BAQEFAAOCAQ8AMIIBCgKCAQEAwetu4+suoz6c7e1kQz7I
    Jmujci8zHpp4qh3nsmEL8e3QOKzMVsLuQPcF8lO1bBoChSA+KMNJ5rEixGWSxClp
    9XroBSgrvjDsKtpPIlBQMnyOUYRSXWnIodmN+7wA72pTxo7JtAypPzRscSgi0OZt
    9dtmv50RLr9Wph5cI+IE9OtgW58OKtdFRGigGHfdUEwrT/MPw2rOU85YRFaEgT/i
    wcuQCe+Zmf2S2gVgK62u51ZFFn2VycJT1LcOt9cdqrSXYZAPfVKnQ/EgYvDdzFL1
    x73JkrrSEP3pfrN4bXOnc7cS/S9Y2qk/I+QCR6a6XKmqk5SnWJSyXvKdYQJrgxJp
    lQIDAQAB
    -----END PUBLIC KEY-----
---
apiVersion: v1
kind: Secret
metadata:
  name: ecs-jwt-sec
  namespace: nonrtric
type: Opaque
stringData:
  kongCredType: jwt
  key: ecs-issuer
  algorithm: RS256
  rsa_public_key: |
    -----BEGIN PUBLIC KEY-----
    MIIBIjANBgkqhkiG9w0BAQEFAAOCAQ8AMIIBCgKCAQEAtminzTtNs5oqPCbg4uC1
    L7MfR3B+uyYvkSKr3NFieRCxp6VhrgodJJXYc3SqXbaTVBkTwU24wG4UvJCnoRQd
    0VhSawtLkN8XNAdCiD831dKUYMJPs43ZY/gO5CHVqUMdSHlp8dn7jNren59dvRRS
    3xC1D3etXuEU01XGuLi/5qJLAKqDbYs3bH1vslTjndg1WTsrkU8GEIT1NphSYg25
    s6rSLTIBfk8FjKquYHw3wYVSQK9rg2mqddJpRWkfZnazMHTmSNjOJpiNb77VLGSx
    9qDbbLjurCl2mAG5Z+w76uKfKGgOo68SU0TL1sPybsKhAoZZg1gF06mvMln5eq5C
    RQIDAQAB
    -----END PUBLIC KEY-----
---
apiVersion: configuration.konghq.com/v1
kind: KongPlugin
metadata:
  name: pms-group-acl-kp
  namespace: nonrtric
plugin: acl
config:
  whitelist: ['pms-group']
---
apiVersion: v1
kind: Secret
metadata:
  name: pms-group-acl-sec
  namespace: nonrtric
type: Opaque
stringData:
  kongCredType: acl
  group: pms-group
---
apiVersion: configuration.konghq.com/v1
kind: KongPlugin
metadata:
  name: ecs-group-acl-kp
  namespace: nonrtric
plugin: acl
config:
  whitelist: ['ecs-group']
---
apiVersion: v1
kind: Secret
metadata:
  name: ecs-group-acl-sec
  namespace: nonrtric
type: Opaque
stringData:
  kongCredType: acl
  group: ecs-group
---
apiVersion: configuration.konghq.com/v1
kind: KongPlugin
metadata:
  name: all-group-acl-kp
  namespace: nonrtric
plugin: acl
config:
  whitelist: ['ecs-group', 'pms-group']
---
apiVersion: configuration.konghq.com/v1
kind: KongConsumer
metadata:
  name: pms-user-kc
  namespace: nonrtric
  annotations:
    kubernetes.io/ingress.class: kong
username: pms-user
credentials:
  - pms-jwt-sec
  - pms-group-acl-sec
---
apiVersion: configuration.konghq.com/v1
kind: KongConsumer
metadata:
  name: ecs-user-kc
  namespace: nonrtric
  annotations:
    kubernetes.io/ingress.class: kong
username: ecs-user
credentials:
  - ecs-jwt-sec
  - ecs-group-acl-sec
---
apiVersion: networking.k8s.io/v1
kind: Ingress
metadata:
  name: r1-pms-ing
  namespace: nonrtric
  annotations:
    konghq.com/plugins: app-jwt-kp,pms-group-acl-kp
    konghq.com/strip-path: "false"
spec:
  ingressClassName: kong
  rules:
  - http:
      paths:
      - path: /a1-policy
        pathType: ImplementationSpecific
        backend:
          service:
            name: policymanagementservice
            port:
              number: 8081
---
apiVersion: networking.k8s.io/v1
kind: Ingress
metadata:
  name: r1-ecs-ing
  namespace: nonrtric
  annotations:
    konghq.com/plugins: app-jwt-kp,ecs-group-acl-kp
    konghq.com/strip-path: "false"
spec:
  ingressClassName: kong
  rules:
  - http:
      paths:
      - path: /data-consumer
        pathType: ImplementationSpecific
        backend:
          service:
            name: enrichmentservice
            port:
              number: 8083
      - path: /data-producer
        pathType: ImplementationSpecific
        backend:
          service:
            name: enrichmentservice
            port:
              number: 8083
---
apiVersion: networking.k8s.io/v1
kind: Ingress
metadata:
  name: r1-echo-ing
  namespace: nonrtric
  annotations:
    konghq.com/plugins: app-jwt-kp,all-group-acl-kp
    konghq.com/strip-path: "true"
spec:
  ingressClassName: kong
  rules:
  - http:
      paths:
      - path: /echo
        pathType: ImplementationSpecific
        backend:
          service:
            name: httpecho
            port:
number: 80 |
ISTIO Demo
- Install ISTIO on minikube using instruction here: Istio Installation - Simplified Learning (waytoeasylearn.com)
cd to the istio directory and install the demo application
kubectl create ns foo
kubectl apply -f <(istioctl kube-inject -f samples/httpbin/httpbin.yaml) -n foo
Create a python script to generate a JWT token using the code from here: https://medium.com/intelligentmachines/istio-jwt-step-by-step-guide-for-micro-services-authentication-690b170348fc . Install python_jwt using pip if it's not already installed.
- Create jwt-example.yaml using the public key generated by the python script: kubectl create
f jwtexamplekubectl create -f jwt-example.yaml
Code Block language yml title jwt-example.yaml apiVersion: "security.istio.io/v1beta1" kind: "RequestAuthentication" metadata: name: "jwt-example" namespace: istio-system spec: selector: matchLabels: istio: ingressgateway jwtRules: - issuer: "ISSUER" jwks: | { "keys":[{"e":"AQAB","kty":"RSA","n":"x_yYl4uW5c6NHOA-bDDh0MThFggBWl-vYJr77b9F1LmAtTlJVM0rL5klTfv2DmlAmD9eZPrWeUOoOGhSpe58XiSAvxyeaOrZhtyUjT3aglrSys0YBsB19ItNGMuoIuzPpWOrdtKwHa9rPbrdc6q7vb93qu2UVaIz-3FJmGFtSA5t8FK_5bZKF-oOzRLwqeVQ3n0Bu_dFDuGeZjQWMZF32QupyA-GF-tDGGriPLy9sutlB1NQyZ4qiSZx5UMxcfLwsWfQxHemdwLeZXWKWNBov8RmbZy2Jz-dwg6XjHBWAjTnCGG9p-bp63nUlnELI3LcEGhGOugZBqcpNT5dEAQ0fQ"}]}
...
Export the JWT token generated by the python script as an environment variable
...
:
export TOKEN="eyJhbGciOiJSUzI1NiIsInR5cCI6IkpXVCJ9.eyJhdWQiOiJBVURJRU5DRSIsImV4cCI6MTYzNzI1NDkxNSwiaWF0IjoxNjM3MjUxOTE1LCJpc3MiOiJJU1NVRVIiLCJqdGkiOiJCcmhDdEstcC00ZTF0RlBrZmpuSmhRIiwibmJmIjoxNjM3MjUxOTE1LCJwZXJtaXNzaW9uIjoicmVhZCIsInJvbGUiOiJ1c2VyIiwic3ViIjoiU1VCSkVDVCJ9.HrQCLPZXf0VkFe7JUVGXq-sHJQhVibqhToG4r63py-iwHWlUL02_WfoWRoxapgqGwImDdSlt1uG8RR-6VMqzWwGlcqBIRhFTG0nmzmtQjnOUs6QAKSUpA3PyWBIYHV0BwZbpo8Zq1Bo-sELy400fU-MCQ_054fSsG7JMBMmrnj8NyJmD2lNN0VSFGO53SPl2tQSVlc9OwAr8Uu0jfLPfUmh6yq43qFuxnVRfBGLLPNOt29aOfAetKLc72qlphtnbDx2a9teP5AIbkIWyIlhTytEnQRCwU4x8gDrEdkrHui4qCtzpl_uoITSwPe3AFsi7gQHB6rJoDj-j2zPc4rUTAA"
...
export INGRESS_HOST=$(minikube ip)
...
export INGRESS_PORT=$(kubectl -n istio-system get service istio-ingressgateway -o jsonpath='{.spec.ports[?(@.name=="http2")].nodePort}')
...
Test the service:
...
curl --header "Authorization: Bearer $TOKEN" $INGRESS_HOST:$INGRESS_PORT/headers -s -o /dev/null -w "%{http_code}\n"
...
You should get a response code of 200
...
Update the token to something invalid
...
The
...
response will be 401
Istio Service JWT Test
istio-test.yaml (uses the default namespace)
...
See the latest version here: istio-test-latest.yaml
Istio with Keycloak
If you are using minikube on Ubuntu WSL you need to run "minikube service keycloak" to see keycloak ui.
...
Retrieve public key using : http(s)://<hostname>/auth/realms/<realm name>
Anchor keycloak keycloak
Enable keycloak with Istio
Setup a new realm, user and client as shown here : https://www.keycloak.org/getting-started/getting-started-kube
...
Note: The iss of the token will differ depending on how you retrieve it. If it's retrieved from within the cluster for URL will start with http://keycloak.default:8080/ otherwise it will be something like : http://192.168.49.2:31560/ (http://(minikube ip): (keycloak service nodePort))
Keycloak database
Keycloak uses the H2 database by default.
...
- Install either postgres or mariadb using these yaml files: postgres.yaml or or mariadb.yaml. These will setup the keycloak db along with the username and password. You just need to change the directory for your persistent storage to an appropiate directory on your host.
Update the keycloak installation script https://raw.githubusercontent.com/keycloak/keycloak-quickstarts/latest/kubernetes-examples/keycloak.yaml
Code Block language yml title Keycloak Environment env: - name: KEYCLOAK_USER value: "admin" - name: KEYCLOAK_PASSWORD value: "admin" - name: PROXY_ADDRESS_FORWARDING value: "true" - name: DB_VENDOR value: "postgres" - name: DB_ADDR value: "postgres" - name: DB_PORT value: "5432" - name: DB_DATABASE value: "keycloak" - name: DB_USER value: "keycloak" - name : DB_PASSWORD value: "keycloak"
...
| Code Block | ||||
|---|---|---|---|---|
| ||||
    spec:
      initContainers:
      - name: init-keycloak
        image: busybox
        command: ['sh', '-c', 'until nc -vz keycloak.default 8080; do echo waiting for keycloak; sleep 2; done;']
      containers:
      - name: a1-policy
        image: hashicorp/http-echo
        ports:
        - containerPort: 5678
        args:
        - -text
- "Hello a1-policy" |
See also: keycloak.yaml
Istio mTLS
Test: Istio / Mutual TLS Migration
...
Change namespace to istio-system to apply mTLS for the entire cluster.
Istio cert manager
https://istio.io/latest/docs/ops/integrations/certmanager/
Go Http Request Handler for Testing
| Anchor | ||||
|---|---|---|---|---|
|
nonrtric-server-go
| Code Block | ||||
|---|---|---|---|---|
| ||||
package main

import (
	"fmt"
	"log"
	"github.com/gorilla/mux"
	"net/http"
	"encoding/json"
	"io/ioutil"
	"strings"
)

func requestHandler(w http.ResponseWriter, r *http.Request) {
	w.Header().Set("Content-Type", "application/json")
	params := mux.Vars(r)
	var id = params["id"]
	var data = params["data"]
	var prefix = strings.Split(r.URL.Path, "/")[1]

    switch r.Method {
                case "GET":
                    if id == "" {
                                fmt.Println( "Received get request for "+ prefix +", params: nil\n")
                                fmt.Fprintf(w, "Response to get request for "+ prefix +", params: nil\n")
                        }else {
                                fmt.Println("Received get request for "+ prefix +", params: id=" + id + "\n")
                                fmt.Fprintf(w, "Response to get request for "+ prefix +", params: id=" + id + "\n")
                        }
                case "POST":
                        body, err := ioutil.ReadAll(r.Body)
                        if err != nil {
                        panic(err.Error())
                        }
                        keyVal := make(map[string]string)
                        json.Unmarshal(body, &keyVal)
                        id := keyVal["id"]
                        data := keyVal["data"]
                        fmt.Println("Received post request for "+ prefix +", params: id=" + id +", data=" + data + "\n")
                        fmt.Fprintf(w, "Response to post request for "+ prefix +", params: id=" + id +", data=" + data + "\n")
                case "PUT":
                        fmt.Println("Received put request for "+ prefix +", params: id=" + id +", data=" + data + "\n")
                        fmt.Fprintf(w, "Response to put request for "+ prefix +", params: id=" + id +", data=" + data + "\n")
                case "DELETE":
                        fmt.Println("Received delete request for "+ prefix +", params: id=" + id + "\n")
                        fmt.Fprintf(w, "Response to delete request for "+ prefix +", params: id=" + id + "\n")
                default:
                        fmt.Println("Received request for unsupported method, only GET, POST, PUT and DELETE methods are supported.")
                        fmt.Fprintf(w, "Error, only GET, POST, PUT and DELETE methods are supported.")
	}
}

func main() {
	router := mux.NewRouter()

	var prefixArray [3]string = [3]string{"/a1-policy", "/data-consumer", "/data-producer"}

	for _, prefix := range prefixArray {
		router.HandleFunc(prefix, requestHandler)
		router.HandleFunc(prefix+"/{id}", requestHandler)
		router.HandleFunc(prefix+"/{id}/{data}", requestHandler)
	}

	log.Fatal(http.ListenAndServe(":8080", router))
} |
...
| Code Block | ||||
|---|---|---|---|---|
| ||||
FROM golang:1.15.2-alpine3.12 as build RUN apk add git RUN mkdir /build ADD . /build WORKDIR /build RUN go get github.com/gorilla/mux RUN go build -o nonrtric-server-go . FROM alpine:latest RUN mkdir /app WORKDIR /app/ # Copy the Pre-built binary file from the previous stage COPY --from=build /build . # Expose port 8080 EXPOSE 8080 # Run Executable CMD ["/app/nonrtric-server-go"] |
Testing
Update AuthorizationPolicy to only allow certain operations:
...
-----------------------------------------------------------------------
Number of Tests: 10, Tests Passed: 10, Tests Failed: 0
Date: 2021-12-06-14:48:33
-----------------------------------------------------------------------
Go Http Client for running inside cluster
| Anchor | ||||
|---|---|---|---|---|
|
nonrtric-client-go
| Code Block | ||||
|---|---|---|---|---|
| ||||
package main

import (
	"fmt"
	"net/http"
	"net/url"
	"encoding/json"
	"time"
	"io/ioutil"
	"math/rand"
	"strings"
	"bytes"
	"strconv"
	"flag"
)

type Jwttoken struct {
	Access_token string
	Expires_in int
	Refresh_expires_in int
	Refresh_token string
	Token_type string
    Not_before_policy int
    Session_state string
    Scope string
  }

var gatewayHost string
var gatewayPort string
var keycloakHost string
var keycloakPort string
var useGateway string
var letters = []rune("abcdefghijklmnopqrstuvwxyzABCDEFGHIJKLMNOPQRSTUVWXYZ")

func randSeq(n int) string {
    b := make([]rune, n)
    for i := range b {
        b[i] = letters[rand.Intn(len(letters))]
    }
    return string(b)
}


func getToken(user string, password string, clientId string, realmName string) string {
    keycloakUrl := "http://"+keycloakHost+":"+keycloakPort+"/auth/realms/"+realmName+"/protocol/openid-connect/token"
	resp, err := http.PostForm(keycloakUrl,
	url.Values{"username": {user}, "password": {password}, "grant_type": {"password"}, "client_id": {clientId}})
	if err != nil {
		fmt.Println(err)
		panic("Something wrong with the credentials or url ")
	}
	defer resp.Body.Close()
	body, err := ioutil.ReadAll(resp.Body)
	var jwt Jwttoken
     json.Unmarshal([]byte(body), &jwt)
	 return jwt.Access_token;
}


func MakeRequest(client *http.Client, prefix string, method string, ch chan<-string) {
	var id = rand.Intn(1000)
	var data = randSeq(10)
	var service = strings.Split(prefix, "/")[1]
	var gatewayUrl = "http://"+gatewayHost+":"+gatewayPort
	var token = ""
	var jsonValue []byte = []byte{}
	var restUrl string = ""
	if strings.ToUpper(useGateway) != "Y" {
		gatewayUrl = "http://"+service+".istio-nonrtric:80"
		//fmt.Println(gatewayUrl)
	}

	if service == "a1-policy" {
		token = getToken("pmsuser", "secret","pmsclient", "pmsrealm")
	 }else{
		token = getToken("icsuser", "secret","icsclient", "icsrealm")
	 }


	if method == "POST" {
		values := map[string]string{"id": strconv.Itoa(id), "data": data}
		jsonValue, _  = json.Marshal(values)
		restUrl = gatewayUrl+prefix
	} else if method == "PUT"  {
		restUrl = gatewayUrl+prefix+"/"+strconv.Itoa(id)+"/"+data
	} else {
		restUrl = gatewayUrl+prefix+"/"+strconv.Itoa(id)
	}

	req, err := http.NewRequest(method, restUrl, bytes.NewBuffer(jsonValue))
	if err != nil {
		fmt.Printf("Got error %s", err.Error())
	}
	req.Header.Set("Content-type", "application/json")
	req.Header.Set("Authorization", "Bearer "+token)

	resp, err := client.Do(req)
	if err != nil {
		fmt.Printf("Got error %s", err.Error())
	}
	defer resp.Body.Close()
	body, _ := ioutil.ReadAll(resp.Body)
	respString := string(body[:])
	if respString == "RBAC: access denied"{
		respString += " for "+service+" "+strings.ToLower(method)+" request\n"
	}
	ch <- fmt.Sprintf("%s", respString)
  }

func main() {
	flag.StringVar(&gatewayHost, "gatewayHost", "192.168.49.2", "Gateway Host")
	flag.StringVar(&gatewayPort, "gatewayPort" , "32162", "Gateway Port")
	flag.StringVar(&keycloakHost, "keycloakHost", "192.168.49.2", "Keycloak Host")
	flag.StringVar(&keycloakPort, "keycloakPort" , "31560", "Keycloak Port")
	flag.StringVar(&useGateway, "useGateway" , "Y", "Connect to services hrough API gateway")
	flag.Parse()

    client := &http.Client{
        Timeout: time.Second * 10,
    }


	ch := make(chan string)
	var prefixArray [3]string = [3]string{"/a1-policy", "/data-consumer", "/data-producer"}
	var methodArray [4]string = [4]string{"GET", "POST", "PUT", "DELETE"}
	for true {
		for _,prefix := range prefixArray{
			for _,method := range methodArray{
				go MakeRequest(client, prefix, method, ch)
			}
		}

		for i := 0; i < len(prefixArray); i++ {
			for j := 0; j < len(methodArray); j++ {
				fmt.Println(<-ch)
			}
		}
		time.Sleep(30 * time.Second)
    }
} |
...
| Code Block | ||||
|---|---|---|---|---|
| ||||
apiVersion: "security.istio.io/v1beta1"
kind: "AuthorizationPolicy"
metadata:
  name: "pms-policy"
  namespace: istio-nonrtric
spec:
  selector:
    matchLabels:
      apptype: nonrtric-pms
  action: ALLOW
  rules:
  - from:
    - source:
        requestPrincipals: ["http://192.168.49.2:31560/auth/realms/pmsrealm/fab53fd0-3315-4e2f-bd17-6984fb7745f2"]
    - source:
        requestPrincipals: ["http://keycloak.default:8080/auth/realms/pmsrealm/fab53fd0-3315-4e2f-bd17-6984fb7745f2"]
    to:
    - operation:
        methods: ["GET", "POST", "PUT", "DELETE"]
        paths: ["/a1-policy*"]
    when:
    - key: request.auth.claims[role]
      values: ["pms_admin"]
  - from:
    - source:
        requestPrincipals: ["http://192.168.49.2:31560/auth/realms/pmsrealm/f96255ec-d553-4c2e-b106-0ed586ccab70"]
    - source:
        requestPrincipals: ["http://keycloak.default:8080/auth/realms/pmsrealm/f96255ec-d553-4c2e-b106-0ed586ccab70"]
    to:
    - operation:
        methods: ["GET"]
        paths: ["/a1-policy*"]
    when:
    - key: request.auth.claims[role]
values: ["pms_viewer"] |
pms_admin role:
Test 1: Testing GET /a1-policy
Received get request for a1-policy, params: nil
...
Test 5: Testing POST /a1-policy
Received post request for a1-policy, params: id=1003, data=abc
pms_viewer role:
Test 1: Testing GET /a1-policy
Received get request for a1-policy, params: nil
...
| Code Block | ||||
|---|---|---|---|---|
| ||||
  rules:
  - to:
    - operation:
        methods: ["GET", "POST", "PUT", "DELETE"]
        paths: ["/a1-policy*"]
    when:
    - key: request.auth.claims[role]
      values: ["pms_admin"]
  - to:
    - operation:
        methods: ["GET"]
        paths: ["/a1-policy*"]
    when:
    - key: request.auth.claims[role]
values: ["pms_viewer"] |
Further details on authorization policies are avaiable here
| Anchor | ||||
|---|---|---|---|---|
|
Istio network policy is enforced at the pod level (in the Envoy proxy), in user-space, (layer 7), as opposed to Kubernetes network policy, which is in kernel-space (layer 4), and is enforced on the host. By operating at application layer, Istio has a richer set of attributes to express and enforce policy in the protocols it understands (e.g. HTTP headers).
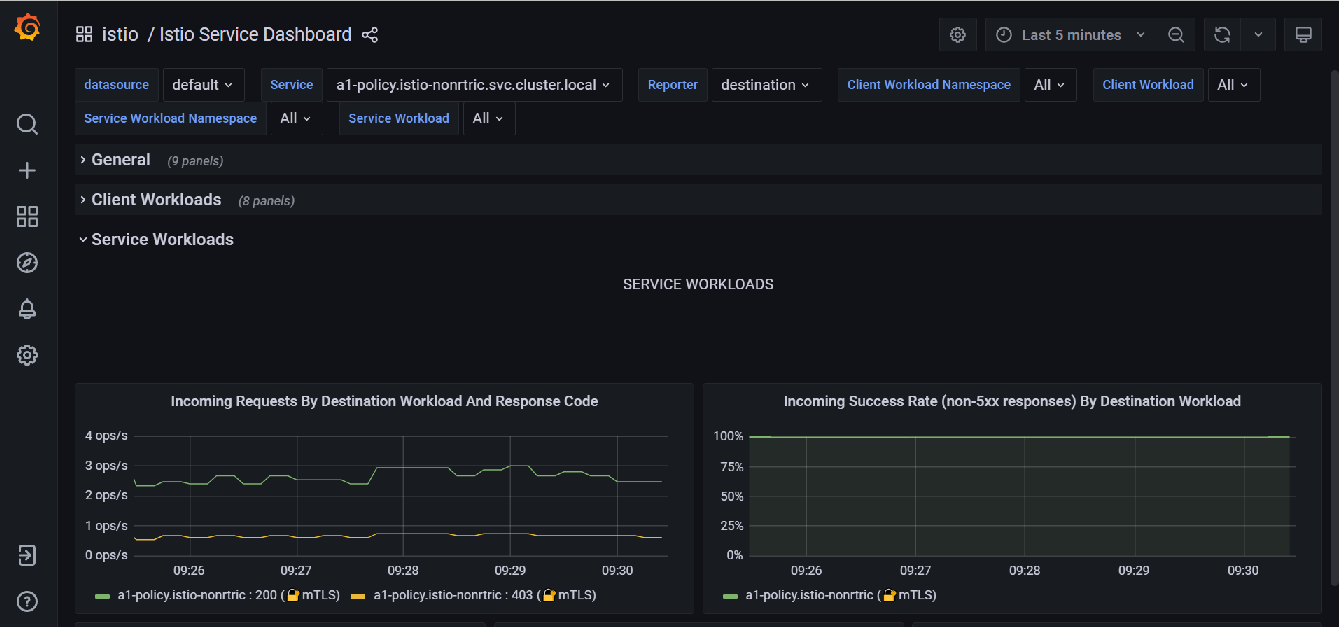
Anchor grafana grafana
Grafana
Istio also comes with grafana, to start it run : istioctl dashboard grafana
...
Select the Istio Service dashboard → service workloads to see the incoming requests
OAuth2 Proxy
Welcome to OAuth2 Proxy | OAuth2 Proxy (oauth2-proxy.github.io)
Calico network policy
https://docs.projectcalico.org/security/calico-network-policy
Calico can be used with Istio to enforce network policies : Enforce Calico network policy using Istio
For example we can limit connections to the keycloak database to only pods using the keycloak service account
You can elasticsearch as a datasource to grafana.
Add the URL for your elasticsearch instance.
Set basic auth to on.
Add your elasticsearch username and password.
Add your index name (e.g. logstash-*)
Set the version to 7.10+
Set Max concurrent shard requests to 1
Save and test.
You data source is now setup.
To view the data being collected, download the grafana elasticseach dashboard and import it.
This does not really work for a single shard instance like the one we are using.
Prometheus
Start the prometheus dashboard by running: istioctl dashboard prometheus
See the following link on Querying Metrics from Prometheus for more information.
You can setup your own dashboard in grafana to view these metrics if the default dashboards don't meet your needs.
You can also insert your own customer metrics into your code: INSTRUMENTING A GO APPLICATION FOR PROMETHEUS
| Code Block | ||||
|---|---|---|---|---|
| ||||
import (
        "github.com/prometheus/client_golang/prometheus"
        "github.com/prometheus/client_golang/prometheus/promhttp"
)
var (
reqDuration = prometheus.NewHistogramVec(prometheus.HistogramOpts{ | ||||
| Code Block | ||||
| ||||
apiVersion: projectcalico.org/v3 kind: GlobalNetworkPolicy metadata: name: postgres spec: selector: app == 'postgres' ingress: - action: Allow source: serviceAccounts: Name: "rapp_http_request_duration_seconds", names Help: ["keycloak"] egress: "Duration of the last request call.", - action: Allow |
Following the example in the link above I installed the test application in a separate namespace (calico-test). Using curl I was able to access the database prior to applying the GlobalNetworkPolicy. After applying the policy the request timed out rather than return a 403 forbidden message.
Logging
...
Buckets: []float64{0.05, 0.1, 0.25, 0.5, 1, 2.5, 5, 10},
        }, []string{"app", "func", "handler", "method", "code"})
        reqBytes = prometheus.NewSummaryVec(prometheus.SummaryOpts{
                Name: "rapp_bytes_summary",
                Help: "Summary of bytes transferred over http",
        }, []string{"app", "func", "handler", "method", "code"})
)

func getToken() string {
               resp := &http.Response{}
        ...
                timer := prometheus.NewTimer(prometheus.ObserverFunc(func(v float64) {
                        reqDuration.WithLabelValues("rapp-jwt-invoker", "getToken", resp.Request.URL.Path, resp.Request.Method,
                                resp.Status).Observe(v)
                }))
                defer timer.ObserveDuration()
                resp, err = http.PostForm(keycloakUrl, url.Values{"client_assertion_type": {client_assertion_type},
                                                                  "client_assertion": {client_assertion}, "grant_type": {"client_credentials"},
                                                                  "client_id": {clientId}, "scope": {scope}})

                if err != nil {
                        fmt.Println(err)
                        panic("Something wrong with the credentials or url ")
                }

                defer resp.Body.Close()
                body, err := ioutil.ReadAll(resp.Body)
                json.Unmarshal([]byte(body), &jwt)
                reqBytes.WithLabelValues("rapp-jwt-invoker", "getToken", resp.Request.URL.Path, resp.Request.Method,
                        resp.Status).Observe(float64(resp.ContentLength))
        ....
}
       ....
func main() {
        prometheus.Register(reqDuration)
        prometheus.Register(reqBytes)
        http.Handle("/metrics", promhttp.Handler())
        go func() {
                http.ListenAndServe(":9000", nil)
        }()
       ....
}
|
Lastly you need to update the scrape_configs section in prometheus.yaml
scrape_configs:
- job_name: rapp
scrape_interval: 10s
metrics_path: /metrics
static_configs:
- targets:
- rapp-jwt-invoker.istio-nonrtric:80
You can then create your own dashboard in grafana using these metrics: rapps-requests.json
OAuth2 Proxy
Welcome to OAuth2 Proxy | OAuth2 Proxy (oauth2-proxy.github.io)
Calico network policy
https://docs.projectcalico.org/security/calico-network-policy
Calico can be used with Istio to enforce network policies : Enforce Calico network policy using Istio
For example we can limit connections to the keycloak database to only pods using the keycloak service account
| Code Block | ||||
|---|---|---|---|---|
| ||||
apiVersion: projectcalico.org/v3
kind: GlobalNetworkPolicy
metadata:
  name: postgres
spec:
  selector: app == 'postgres'
  ingress:
    - action: Allow
      source:
        serviceAccounts:
          names: ["keycloak"]
  egress:
- action: Allow |
Following the example in the link above I installed the test application in a separate namespace (calico-test). Using curl I was able to access the database prior to applying the GlobalNetworkPolicy. After applying the policy the request timed out rather than return a 403 forbidden message.
Logging
| Anchor | ||||
|---|---|---|---|---|
|
Elasticsearch
We can use elasticsearch, kibana and fluentd to aggregate and visualize the kubernetes logs.
You can use the following files to setup a single node ELK stack on minikube
Latest version of files (8.1.2)
- elastic.yaml includes a persistence volume that mounts the /usr/share/elasticsearch/data directory to a host path. This prevents loss of data when the pod is restarted. (You may ned to change the hostPath path value to a directory on your own host)
- Both elastic.yaml and kibana.yaml contain a config map for configuring the component on start up.
- xpack.security.enabled is set to true to enable security.
- This is a single-node minkube setup, you may want to alter this for your own installation.
- elastic-8.1.2.yaml and kibana-8.1.2.yaml use the most up to date images.
- fluentd.yaml combines fluentd-rbac.yaml and fluentd-daemonset.yaml into 1 file and includes certificte configuration for version 8.1.2.
- They all add additional persistent volumes for storing the keys/certificates - please modify these values to suit your own requirements.
Please ensure to create the logging namespace before applying these files.
Once elasticsearch is up and running, log into kibana and create a new index for the logstash-* pipeline.
Once this is done use the discover tab to create a query against your logs:
Select the timeStamp, kubernetes.container_image, log and kuberentes.label.app for you fields
Use the filters input textbox to only show the logs you want → log : Received and kubernetes.container_image : nonrtric-server-go
Change the date field to the last 15 minutes.
Save your query.
This will produce a report like the following:
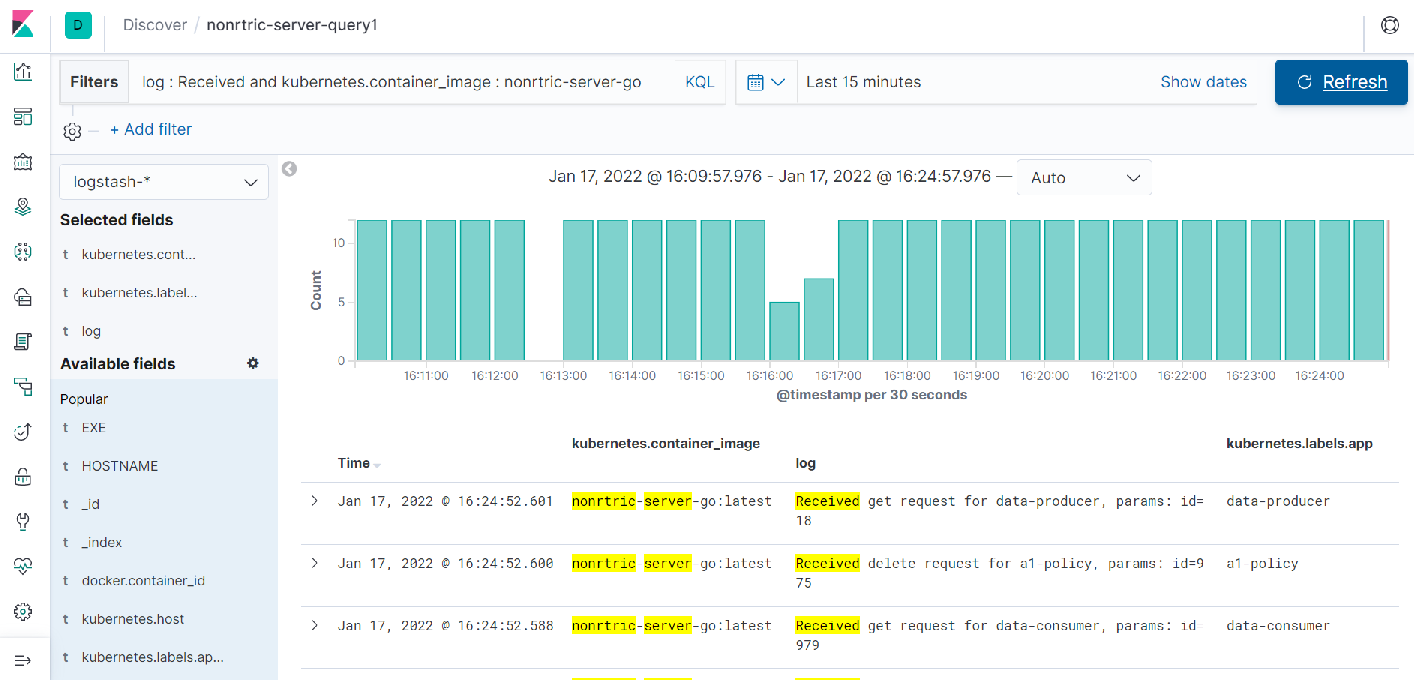
This shows the number of requests made to the nonrtric-server-go.
Go to the visualize tab.
Here you can create different charts to display your data and then add them to a dashboard.
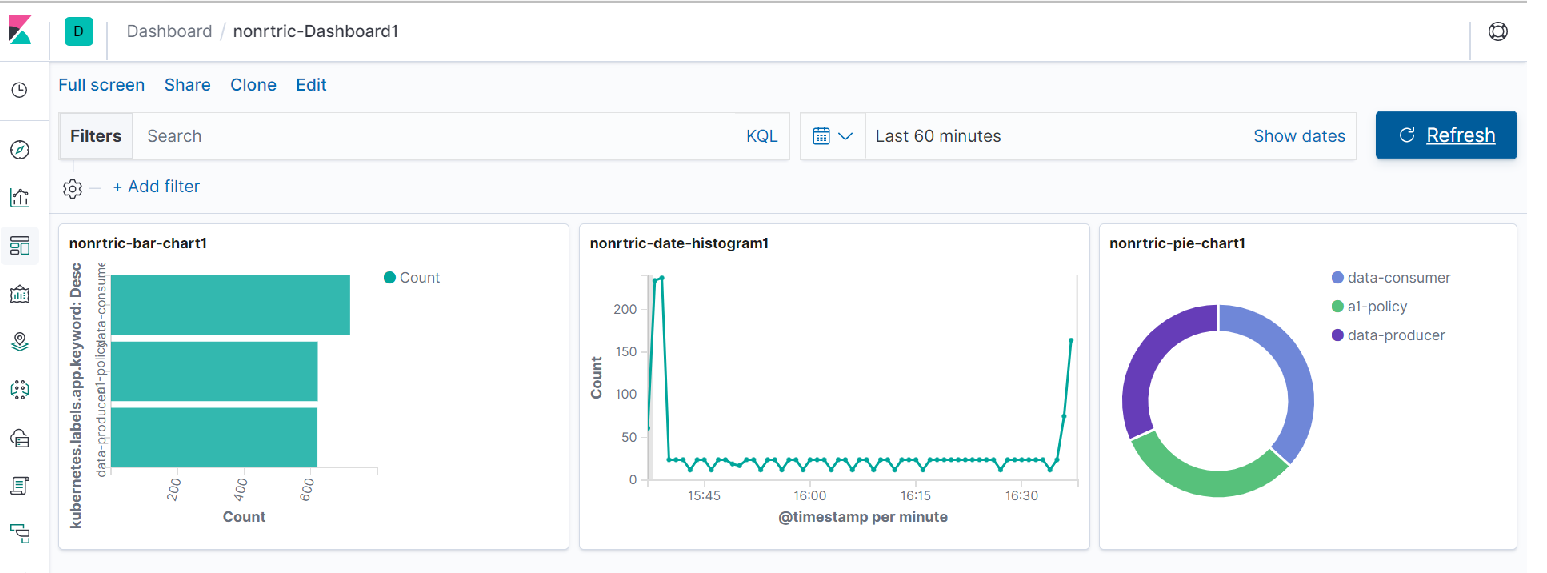
Here you can see 3 graphs, the first one shows the number of requests received by each NONRTRIC componet in he last 60 minutes.
The second one is a histogram showing the total number of requests broken down by timeStamp.
The last one is a pie chart showing the distribution of requests across components.
Click the Dev tools tab to use the elasticsearch console
Run GET /_cat/indices?v to see the list of indices currently in use
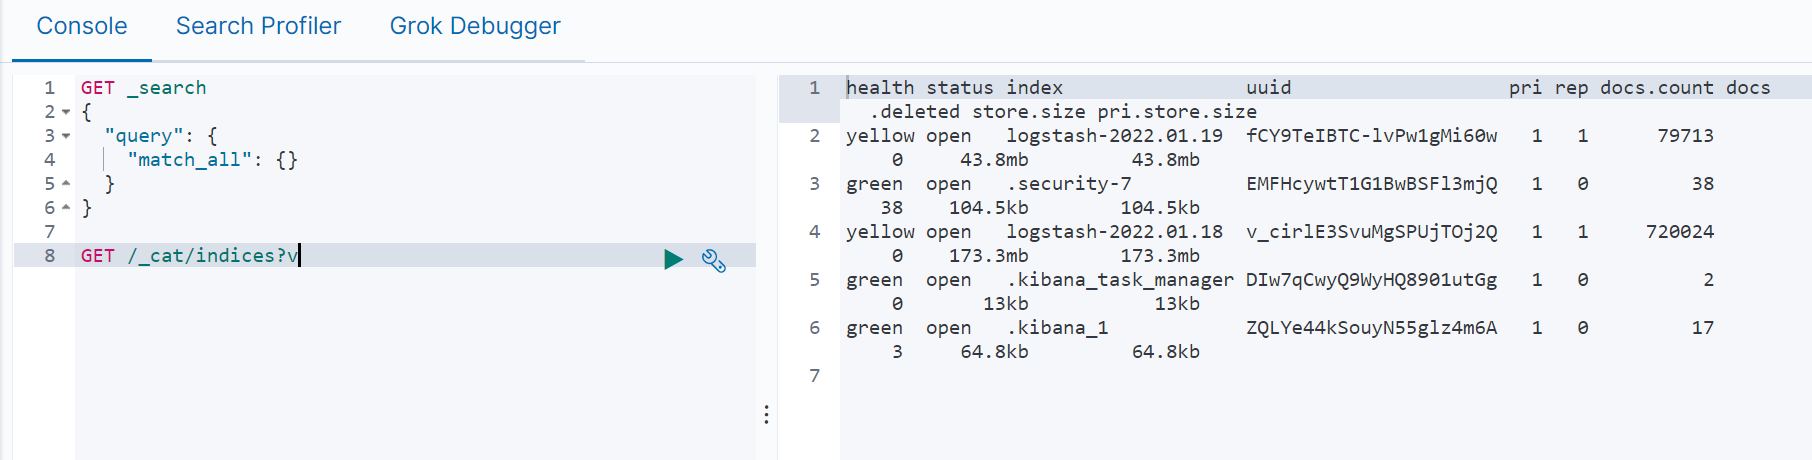
You can delete indices that are no longer required by running the following command:
DELETE /<index name> e.g. DELETE /logstash-2022.01.18
You can create a policy to remove logstash indices older than 1 day
| Code Block | ||||
|---|---|---|---|---|
| ||||
PUT /_ilm/policy/cleanup_policy
{
      "policy": {
        "phases": {
          "hot": {
            "actions": {}
          },
          "delete": {
            "min_age": "1d",
            "actions": { "delete": {} }
          }
        }
      }
}

PUT /logstash-*/_settings
{ "lifecycle.name": "cleanup_policy" }


PUT /_template/logging_policy_template
{
      "index_patterns": ["logstash-*"],
      "settings": { "index.lifecycle.name": "cleanup_policy" }
} |
Elasticsearch SDK
| Code Block | ||||
|---|---|---|---|---|
| ||||
package main

import (
        "bytes"
        "context"
        "encoding/json"
        "fmt"
        "github.com/elastic/go-elasticsearch/esapi"
        "github.com/elastic/go-elasticsearch/v8"
        "io/ioutil"
        "log"
        "os/exec"
        "strings"
)

func main() {
        cmd := exec.Command("minikube", "ip")
        stdout, err := cmd.Output()
        ingressHost := strings.TrimSpace(string(stdout))

        cmd = exec.Command("minikube", "ssh-key")
        stdout, err = cmd.Output()
        ingressKey := strings.TrimSpace(string(stdout))

        // copy ca cert
        cmd = exec.Command("scp", "-i", ingressKey, "docker@"+ingressHost+":/var/elasticsearch/config/certs/ca/ca.crt", "/mnt/c/Users/ktimoney/go/elastic/")
        stdout, err = cmd.Output()

        // get the elasticsearch service nodePort
        cmd = exec.Command("kubectl", "get", "service", "elasticsearch", "-n", "logging",
                "-o", "jsonpath={.spec.ports[?(@.port==9200)].nodePort}")
        stdout, err = cmd.Output()
        secureIngressPort := strings.TrimSpace(string(stdout))

        clusterURLs := []string{"https://" + ingressHost + ":" + secureIngressPort}
        username := "elastic"
        password := "secret"
        cert, _ := ioutil.ReadFile("./ca.crt")

        // client configuration
        cfg := elasticsearch.Config{
                Addresses: clusterURLs,
                Username:  username,
                Password:  password,
                CACert:    cert,
        }
        ctx := context.Background()

        es, err := elasticsearch.NewClient(cfg)
        if err != nil {
                log.Fatalf("Error creating the client: %s", err)
        }
        log.Println(elasticsearch.Version)

        resp, err := es.Info()
        if err != nil {
                log.Fatalf("Error getting response: %s", err)
        }
        defer resp.Body.Close()
        log.Println(resp)

        // Index Query
        indexResp, err := esapi.CatIndicesRequest{Format: "json", Pretty: true}.Do(ctx, es)
        if err != nil {
                return
        }
        indexBody := &indexResp.Body
        defer indexResp.Body.Close()

        fmt.Println(indexResp.String())

        body, err := ioutil.ReadAll(*indexBody)

        var results []map[string]interface{}
        json.Unmarshal(body, &results)
        fmt.Printf("Index: %+v\n", results)
        indexName := fmt.Sprintf("%v", results[len(results)-1]["index"])
        query := `{"query": {"match" : {"log": "token"}},"size": 3}`
        runQuery(es, ctx, indexName, query)
        query = `
                {
                 "query": {
                  "bool": {
                    "must": [
                      { "match": { "kubernetes.container_name": "istio-proxy" }},
                      { "match": { "log": "token" }},
                      { "match": { "kubernetes.labels.app_kubernetes_io/name": "rapp-jwt-invoker" }},
                      { "range": { "@timestamp": { "gte": "now-60m" }}}
                     ]
                   }
                 },"size": 1
                }
        `
        runQuery(es, ctx, indexName, query)
        query = `
                {
                 "query": {
                  "bool": {
                    "must": [
                      { "match": { "kubernetes.container_name": "istio-proxy" }},
                      { "match": { "log": "GET /rapp-jwt-provider" }},
                      { "match": { "kubernetes.labels.app_kubernetes_io/name": "rapp-jwt-provider" }},
                      { "match_phrase": { "tag": "jwt-provider" }},
                      { "range": { "@timestamp": { "gte": "now-60m" }}}
                     ]
                   }
                 },"size": 1
                }
        `
        runQuery(es, ctx, indexName, query)

}

func runQuery(es *elasticsearch.Client, ctx context.Context, indexName string, query string) {
        // Query indexName
        var mapResp map[string]interface{}
        var buf bytes.Buffer
        var b strings.Builder
        b.WriteString(query)
        read := strings.NewReader(b.String())

        // Attempt to encode the JSON query and look for errors
        if err := json.NewEncoder(&buf).Encode(read); err != nil {
                log.Fatalf("Error encoding query: %s", err)

                // Query is a valid JSON object
        } else {
                fmt.Println("\njson.NewEncoder encoded query:", read, "\n")
        }

        // Pass the JSON query to client's Search() method
        searchResp, err := es.Search(
                es.Search.WithContext(ctx),
                es.Search.WithIndex(indexName),
                es.Search.WithBody(read),
                es.Search.WithTrackTotalHits(true),
                es.Search.WithPretty(),
        )

        if err != nil {
                log.Fatalf("Elasticsearch Search() API ERROR:", err)
        }
        defer searchResp.Body.Close()

        // Decode the JSON response and using a pointer
        if err := json.NewDecoder(searchResp.Body).Decode(&mapResp); err != nil {
                log.Fatalf("Error parsing the response body: %s", err)
        }

        // Iterate the document "hits" returned by API call
        for _, hit := range mapResp["hits"].(map[string]interface{})["hits"].([]interface{}) {

                // Parse the attributes/fields of the document
                doc := hit.(map[string]interface{})

                // The "_source" data is another map interface nested inside of doc
                source := doc["_source"]

                // Get the document's _id and print it out along with _source data
                docID := doc["_id"]
                fmt.Println("docID:", docID)
                fmt.Println("_source:", source, "\n")
                // extract the @timestamp field
                timeStamp := fmt.Sprintf("%v", source.(map[string]interface{})["@timestamp"])
                fmt.Println("timeStamp:", timeStamp)
                // extract the tag field
                tag := fmt.Sprintf("%v", source.(map[string]interface{})["tag"])
                fmt.Println("tag:", tag)
                // extract the log field
                k8slog := fmt.Sprintf("%v", source.(map[string]interface{})["log"])
                fmt.Println("log:", k8slog)
        }
        hits := int(mapResp["hits"].(map[string]interface{})["total"].(map[string]interface{})["value"].(float64))
        fmt.Println("Matches:", hits)

} |
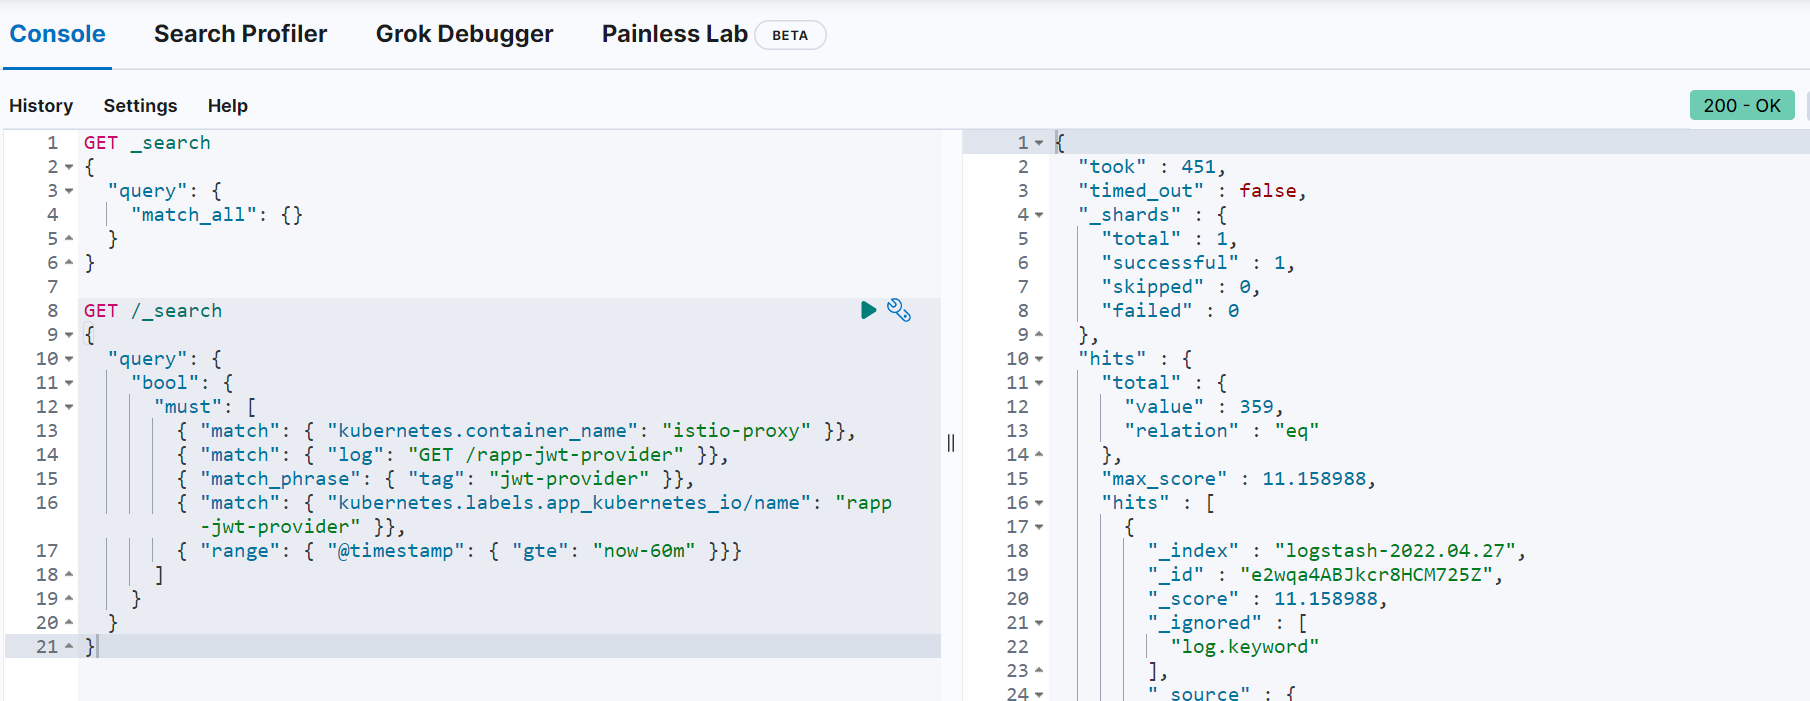
You can run the same query in elasticsearch dev-tools:
Quick Installation Guide
- Download and install istio: istioctl install --set profile=demo
- cd to the samples/addons/ directory and install the dashboards e.g. kubectl create -f kiali.yaml
- Install postgres: istioctl kube-inject -f postgres.yaml | kubectl apply -f - (change the hostPath path value to a path on your host)
- Install keycloak: istioctl kube-inject -f keycloak.yaml | kubectl apply -f -
- Open the keycloak admin console and setup the required realms, users and clients
- Setup the "pms_admin" and "pms_viewer" roles for pmsuser and pmsuser2 respectively.
- Install nonrtric-server-go: docker build -t nonrtric-server-go:latest .
- Create the istio-nonrtric namespace: kubectl create namespace istio-nonrtric
- Enable istio for the istio-nonrtric namespace: kubectl label namespace istio-nonrtric istio-injection=enabled
- Edit the istio-test.yaml so the host ip specified matches yours.
- Also change the userid in the requestPrincipals field to match yours
- Install istio-test.yaml : kubectl create -f istio-test.yaml
- Install nonrtric-client-go: docker build -t nonrtric-client-go:latest .
- Install the test client: istioctl kube-inject -f client.yaml | kubectl apply -f -
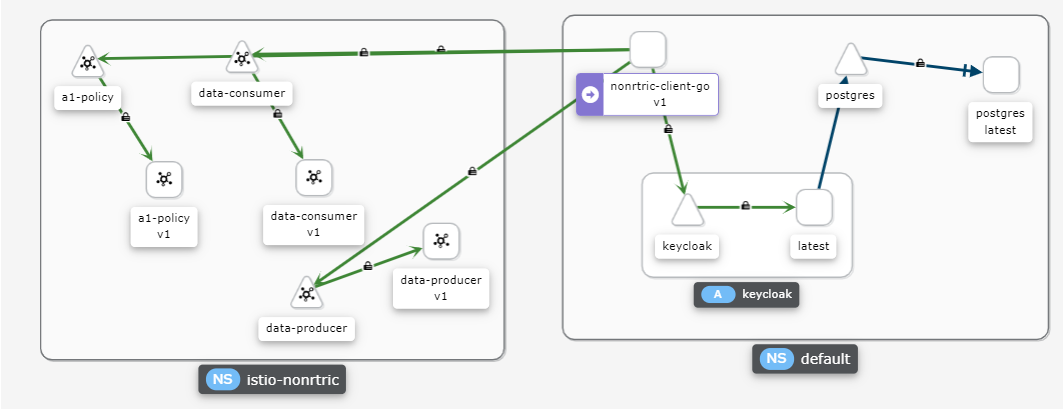
- Open the kiali dashboard to check your services are up and running
- Open the grafana to view the istio dashboard
- Optionally install elasticsearch
ONAP
ONAP Next Generation Security & Logging Architecture
GO Client
Create kubernetes jobs in golang
Building stuff with the Kubernetes API
There is also a helm sdk you can use:
HELM SDK
| Code Block | ||||
|---|---|---|---|---|
| ||||
package main

import (
    "fmt"
    "os"
    "log"
    "k8s.io/cli-runtime/pkg/genericclioptions"
    "k8s.io/client-go/rest"
    "helm.sh/helm/v3/pkg/action"
    "helm.sh/helm/v3/pkg/chart/loader"
)

func main() {
    chartPath := "/tmp/wordpress-12.3.3.tgz"
    chart, err := loader.Load(chartPath)

    releaseName := "wordpress"
    releaseNamespace := "default"

    actionConfig, err := getActionConfig(releaseNamespace)
    if err != nil {
        panic(err)
    }

    listAction := action.NewList(actionConfig)
    releases, err := listAction.Run()
    if err != nil {
        log.Println(err)
    }
    for _, release := range releases {
        log.Println("Release: " + release.Name + " Status: " + release.Info.Status.String())
    }

    iCli := action.NewInstall(actionConfig)
    iCli.Namespace = releaseNamespace
    iCli.ReleaseName = releaseName
    rel, err := iCli.Run(chart, nil)
    if err != nil {

        fmt.Println(err)
    }
   fmt.Println("Successfully installed release: ", rel.Name)
}

func getActionConfig(namespace string) (*action.Configuration, error) {
        actionConfig := new(action.Configuration)
        // Create the rest config instance with ServiceAccount values loaded in them
        config, err := rest.InClusterConfig()
        if err != nil {
        // fallback to kubeconfig
        home, exists := os.LookupEnv("HOME")
        if !exists {
            home = "/root"
        }
        kubeconfigPath := filepath.Join(home, ".kube", "config")
         if envvar := os.Getenv("KUBECONFIG"); len(envvar) >0 {
            kubeconfigPath = envvar
         }
         if err := actionConfig.Init(kube.GetConfig(kubeconfigPath, "", namespace), namespace, os.Getenv("HELM_DRIVER"),
                   func(format string, v ...interface{}) {
                   fmt.Sprintf(format, v)
         }); err != nil {
             panic(err)
         }
        } else {
           // Create the ConfigFlags struct instance with initialized values from ServiceAccount
           var kubeConfig *genericclioptions.ConfigFlags
           kubeConfig = genericclioptions.NewConfigFlags(false)
           kubeConfig.APIServer = &config.Host
           kubeConfig.BearerToken = &config.BearerToken
           kubeConfig.CAFile = &config.CAFile
           kubeConfig.Namespace = &namespace
           if err := actionConfig.Init(kubeConfig, namespace, os.Getenv("HELM_DRIVER"), func(format string, v ...interface{}) {
               fmt.Sprintf(format, v)
           }); err != nil {
               panic(err)
           }
        }
        return actionConfig, nil
} |
The method getActionConfig works for both in-cluster deployments and from the localhost. It determines which one to use by calling the rest.InClusterConfig() function.
GO CLIENT SDK
Here are another couple of programs that demonstrate how to use the go client:
You can also use the client with YAML : job.go
There is also support for istio in client go Istio client-go
ISTIO SDK
| Code Block | ||||
|---|---|---|---|---|
| ||||
package main

import (
    "context"
    "bytes"
    "fmt"
    "os"
    "log"
    "path/filepath"
    k8Yaml "k8s.io/apimachinery/pkg/util/yaml"
    metav1 "k8s.io/apimachinery/pkg/apis/meta/v1"
    clientcmd "k8s.io/client-go/tools/clientcmd"
    versioned "istio.io/client-go/pkg/clientset/versioned"
    v1beta1 "istio.io/client-go/pkg/apis/security/v1beta1"
    securityv1beta1 "istio.io/api/security/v1beta1"
    typev1beta1 "istio.io/api/type/v1beta1"
)

const (
        NAMESPACE = "default"
)

const authorizationPolicyManifest = `
apiVersion: "security.istio.io/v1beta1"
kind: "AuthorizationPolicy"
metadata:
  name: "pms-policy"
  namespace: default
spec:
  selector:
    matchLabels:
      apptype: nonrtric-pms
  action: ALLOW
  rules:
  - from:
    - source:
        principals: ["cluster.local/ns/default/sa/goclient"]
    to:
    - operation:
        methods: ["GET", "POST", "PUT", "DELETE"]
        paths: ["/a1-policy*"]
        hosts: ["a1-policy*"]
        ports: ["8080"]
    when:
    - key: request.auth.claims[role]
      values: ["pms_admin"]
`

func connectToK8s() *versioned.Clientset {
    home, exists := os.LookupEnv("HOME")
    if !exists {
        home = "/root"
    }

    configPath := filepath.Join(home, ".kube", "config")

    config, err := clientcmd.BuildConfigFromFlags("", configPath)
    if err != nil {
        log.Fatalln("failed to create K8s config")
    }

   ic, err := versioned.NewForConfig(config)
   if err != nil {
        log.Fatalf("Failed to create istio client: %s", err)

    return ic
}

func createAuthorizationPolicy(clientset *versioned.Clientset) {
        authClient := clientset.SecurityV1beta1().AuthorizationPolicies(NAMESPACE)

        auth := &v1beta1.AuthorizationPolicy{}
        dec := k8Yaml.NewYAMLOrJSONDecoder(bytes.NewReader([]byte(authorizationPolicyManifest)), 1000)

        if err := dec.Decode(&auth); err != nil {
               fmt.Println(err)
        }

        result, err := authClient.Create(context.TODO(), auth, metav1.CreateOptions{})

        if err!=nil {
                panic(err.Error())
        }

        fmt.Printf("Create Authorization Policy %s \n", result.GetName())
}

func createAuthorizationPolicy2(clientset *versioned.Clientset) {
        authClient := clientset.SecurityV1beta1().AuthorizationPolicies(NAMESPACE)

        auth := &v1beta1.AuthorizationPolicy{
                ObjectMeta: metav1.ObjectMeta{
                        Name: "ics-policy",
                },
                Spec: securityv1beta1.AuthorizationPolicy {
                  Selector: &typev1beta1.WorkloadSelector{
                             MatchLabels: map[string]string{
                             "apptype" : "nonrtric-ics",
                           },
                  },
                  Action: securityv1beta1.AuthorizationPolicy_ALLOW,
                  Rules: []*securityv1beta1.Rule{{
                         From: []*securityv1beta1.Rule_From{{
                              Source: &securityv1beta1.Source{
                                Namespaces : []string{
                                        "default",
                                },
                              },
                         },},
                         To: []*securityv1beta1.Rule_To{{
                              Operation:  &securityv1beta1.Operation{
                                Methods : []string{
                                      "GET", "POST", "PUT", "DELETE",
                                },
                                Paths : []string{
                                      "/data-*",
                                },
                                Hosts : []string{
                                      "data-consumer*", "data-producer*",
                                },
                                Ports : []string{
                                      "8080",
                                },
                              },
                         },},
                  },},
              },
        }

        result, err := authClient.Create(context.TODO(), auth, metav1.CreateOptions{})

        if err!=nil {
                panic(err.Error())
        }

        fmt.Printf("Create Authorization Policy %s \n", result.GetName())
}

func main() {
    clientset := connectToK8s()
    createAuthorizationPolicy(clientset)
    createAuthorizationPolicy2(clientset)
} |
keycloak aslo has a client called gocloak
GOCLOAK SDK
| Code Block | ||||
|---|---|---|---|---|
| ||||
package main

import (
        "github.com/Nerzal/gocloak/v10"
        "context"
        "fmt"
)

func main(){
 client := gocloak.NewClient("http://192.168.49.2:31560")
 ctx := context.Background()
 token, err := client.LoginAdmin(ctx, "admin", "admin", "master")
 if err != nil {
  fmt.Println(err)
  panic("Something wrong with the credentials or url")
 }

 realmRepresentation := gocloak.RealmRepresentation{
  ID: gocloak.StringP("testRealm"),
  Realm: gocloak.StringP("testRealm"),
  DisplayName: gocloak.StringP("testRealm"),
  Enabled:   gocloak.BoolP(true),
 }

 realm, err := client.CreateRealm(ctx, token.AccessToken, realmRepresentation)
 if err != nil {
  fmt.Println(err)
  panic("Oh no!, failed to create realm :(")
 } else {
  fmt.Println("Created new realm", realm)
 }

 newClient := gocloak.Client{
  ClientID: gocloak.StringP("testClient"),
  Enabled:   gocloak.BoolP(true),
  DirectAccessGrantsEnabled: gocloak.BoolP(true),
  BearerOnly: gocloak.BoolP(false),
  PublicClient: gocloak.BoolP(true),
 }
 clientId, err := client.CreateClient(ctx, token.AccessToken, realm, newClient)
 if err != nil {
  fmt.Println(err)
  panic("Oh no!, failed to create client :(")
 } else {
  fmt.Println("Created new client", clientId)
 }


 newUser := gocloak.User{
  FirstName: gocloak.StringP("Bob"),
  LastName:  gocloak.StringP("Uncle"),
  Email:     gocloak.StringP("something@really.wrong"),
  Enabled:   gocloak.BoolP(true),
  Username:  gocloak.StringP("testUser"),
 }

 userId, err := client.CreateUser(ctx, token.AccessToken, realm, newUser)
 if err != nil {
  fmt.Println(err)
  panic("Oh no!, failed to create user :(")
 } else {
  fmt.Println("Created new user", userId)
}

 err = client.SetPassword(ctx, token.AccessToken, userId, realm, "secret", false)
 if err != nil {
  fmt.Println(err)
  panic("Oh no!, failed to set password :(")
 } else {
  fmt.Println("Set password for user")
 }

 removeRoles := []gocloak.Role{}
 origRoles, err := client.GetRealmRoles(ctx, token.AccessToken, realm, gocloak.GetRoleParams{})
  if err != nil {
  fmt.Println(err)
  panic("Oh no!, failed to retreive roles :(")
 } else {
  fmt.Println("Retrieved roles")
 }
 for _, r := range origRoles {
   removeRoles = append(removeRoles, *r)
 }

 newRole := gocloak.Role{
  Name: gocloak.StringP("testRole"),
 }
 roleName, err := client.CreateRealmRole(ctx, token.AccessToken, realm, newRole)
 if err != nil {
  fmt.Println(err)
  panic("Oh no!, failed to create role :(")
 } else {
  fmt.Println("Created new role", roleName)
 }

 role, err := client.GetRealmRole(ctx, token.AccessToken, realm, roleName)
 if err != nil {
  fmt.Println(err)
  panic("Oh no!, failed to retrieve role :(")
 } else {
  fmt.Println("Retrieved role")
 }

 roles := []gocloak.Role{}
 roles = append(roles, *role)
 err = client.AddRealmRoleToUser(ctx, token.AccessToken, realm, userId, roles)
 if err != nil {
  fmt.Println(err)
  panic("Oh no!, failed to add role to user :(")
 } else {
  fmt.Println("Role added to user")
 }

 err = client.DeleteRealmRoleFromUser(ctx, token.AccessToken, realm, userId, removeRoles)
 if err != nil {
  fmt.Println(err)
  panic("Oh no!, failed to remove roles from user :(")
 } else {
  fmt.Println("Roles removed from user")
 }

 newMapper := gocloak.ProtocolMapperRepresentation{
   ID:             gocloak.StringP("testMapper"),
   Name:           gocloak.StringP("testMapper"),
   Protocol:       gocloak.StringP("openid-connect"),
   ProtocolMapper: gocloak.StringP("oidc-usermodel-realm-role-mapper"),
   Config: &map[string]string{
                                "access.token.claim":   "true",
                                "aggregate.attrs":      "",
                                "claim.name":           "role",
                                "id.token.claim":       "true",
                                "jsonType.label":       "String",
                                "multivalued":          "",
                                "userinfo.token.claim": "true",
                        },
  }
 _, err = client.CreateClientProtocolMapper(ctx, token.AccessToken, realm, clientId, newMapper)
 if err != nil {
  fmt.Println(err)
  panic("Oh no!, failed to add roleampper to client :(")
 } else {
  fmt.Println("Rolemapper added to client")
 }

}
|
If you want to create a confidential client you can use these settings instead:
newClient := gocloak.Client{
ClientID: gocloak.StringP("testClient"),
Enabled: gocloak.BoolP(true),
DirectAccessGrantsEnabled: gocloak.BoolP(true),
BearerOnly: gocloak.BoolP(false),
PublicClient: gocloak.BoolP(false),
ServiceAccountsEnabled: gocloak.BoolP(true),
ClientAuthenticatorType: gocloak.StringP("client-secret"),
Secret: gocloak.StringP("secret"),
}
You can then access the token with the following URL: curl -X POST http://<keycloak host ip>:<keycloak port>/auth/realms/testRealm/protocol/openid-connect/token "Content-Type: application/x-www-form-urlencoded" -d client_id=testClient -d client_secret=secret -d 'grant_type=client_credentials'
using client credentials instead of user credentials
You will also need to create a client role and use the "Hardcoded role" mapper to include the client role in the JWT.
This can be done in gocloak like this:
| Code Block | ||||
|---|---|---|---|---|
| ||||
 clientRole := gocloak.Role{
  Name: gocloak.StringP("icsClientRole"),
 }
 clientRoleName, err := client.CreateClientRole(ctx, token.AccessToken, realm, clientId, clientRole)
 if err != nil {
  fmt.Println(err)
  panic("Oh no!, failed to create client role :(")
 } else {
  fmt.Println("Created new client role", clientRoleName)
 }

 clientRole := *newClient.ClientID + "." + clientRoleName
 fmt.Println("clientRole", clientRole)

 hardcodedMapper := gocloak.ProtocolMapperRepresentation{
   ID:             gocloak.StringP("testMapper2"),
   Name:           gocloak.StringP("testMapper2"),
   Protocol:       gocloak.StringP("openid-connect"),
   ProtocolMapper: gocloak.StringP("oidc-hardcoded-role-mapper"),
   Config: &map[string]string{
                                  "role": clientRole,
                        },
  }
 _, err = client.CreateClientProtocolMapper(ctx, token.AccessToken, realm, clientId, hardcodedMapper)
 if err != nil {
  fmt.Println(err)
  panic("Oh no!, failed to add hardcoded roleampper to client :(")
 } else {
  fmt.Println("Hardcoded rolemapper added to client")
} |
This will produce a JWT token with the client role nested inside "resource_access"
| Code Block | ||||
|---|---|---|---|---|
| ||||
{
  "exp": 1645458971,
  "iat": 1645458671,
  "jti": "54fd719a-bf5b-4638-afd5-828ff10b7537",
  "iss": "http://192.168.49.2:31560/auth/realms/icsrealm",
  "aud": "account",
  "sub": "e9ebe72f-3729-4cd5-88da-79f9bfb23cfb",
  "typ": "Bearer",
  "azp": "icsclient",
  "acr": "1",
  "realm_access": {
    "roles": [
      "offline_access",
      "uma_authorization",
      "default-roles-icsrealm"
    ]
  },
  "resource_access": {
    "icsclient": {
      "roles": [
        "icsclientrole"
      ]
}, |
You can then setup your AuthorizationPolicy like this:
| Code Block | ||||
|---|---|---|---|---|
| ||||
apiVersion: "security.istio.io/v1beta1"
kind: "AuthorizationPolicy"
metadata:
  name: "ics-policy"
  namespace: istio-nonrtric
spec:
  selector:
    matchLabels:
      apptype: nonrtric-ics
  action: ALLOW
  rules:
  - from:
    - source:
        requestPrincipals: ["http://192.168.49.2:31560/auth/realms/icsrealm/"]
    - source:
        requestPrincipals: ["http://keycloak.default:8080/auth/realms/icsrealm/"]
  - to:
    - operation:
        methods: ["GET", "POST", "PUT", "DELETE"]
        paths: ["/data-*"]
    when:
    - key: request.auth.claims[resource_access][icsclient][roles]
values: ["icsclientrole"] |
You don't ned to include the userId with the requestPrincipals.
keycloak secrets can be (re)generated and retrieved using the following code:
| Code Block | ||||
|---|---|---|---|---|
| ||||
 _, err = client.RegenerateClientSecret(ctx, token.AccessToken, realm, clientId)
  if err != nil {
  fmt.Println(err)
  panic("Oh no!, failed to regenerate client secret :(")
 } else {
  fmt.Println("Regenerated Secret")
 }

 cred, err := client.GetClientSecret(ctx, token.AccessToken, realm, clientId)
  if err != nil {
  fmt.Println(err)
  panic("Oh no!, failed to get client secret :(")
 } else {
  fmt.Println("Client Secret", *cred.Value)
} |
Instead of using the hardcoded mapper you can call the GetClientServiceAccount method to get the service a/c user.
You can then add the client role to the service account user with the AddClientRoleToUser method.
Instead of using the hardcoded mapper you can use a client role mapper to include the client role in the JWT.
Finally you can set the default client scpe to "email" to mininmize the size of you token.
| Code Block | ||||
|---|---|---|---|---|
| ||||
  "iat": 1646152642,
  "jti": "e55fd625-d3e5-476f-aeb7-5a0189380151",
  "iss": "http://192.168.49.2:31560/auth/realms/hwrealm",
  "sub": "d2f705d1-ca27-437d-979f-4d0b80d500d7",
  "typ": "Bearer",
  "azp": "hwclient",
  "acr": "1",
  "scope": "email",
  "email_verified": false,
  "clientHost": "127.0.0.6",
  "clientId": "hwclient",
  "clientRole": [
    "hwclientrole"
  ],
  "clientAddress": "127.0.0.6"
} |
In your Istio AuthorizationPolicy use the following when clause :
| Code Block | ||||
|---|---|---|---|---|
| ||||
    when:
    - key: request.auth.claims[clientRole]
values: ["hwclientrole"] |
Keycloak Client Authenticator
Using X509 certificates
Create the server side certificates using the following script
| Code Block | ||||
|---|---|---|---|---|
| ||||
#!/bin/sh


CA_SUBJECT="/C=IE/ST=/L=/O=/OU=EST/CN=est.tech/emailAddress=ca@mail.com"
SERVER_SUBJECT="/C=IE/ST=/L=/O=/OU=EST/CN=est.tech/emailAddress=server@mail.com"
PW=changeit
IP=$(minikube ip)

echo $PW > secretfile.txt

openssl req -x509 -sha256 -days 3650 -newkey rsa:4096 -keyout rootCA.key -subj "$CA_SUBJECT" -passout file:secretfile.txt -out rootCA.crt

openssl req -new -newkey rsa:4096 -keyout tls.key -subj "$SERVER_SUBJECT" -out tls.csr -nodes

echo "subjectKeyIdentifier   = hash" > x509.ext
echo "authorityKeyIdentifier = keyid:always,issuer:always" >> x509.ext
echo "basicConstraints       = CA:TRUE" >> x509.ext
echo "keyUsage               = digitalSignature, nonRepudiation, keyEncipherment, dataEncipherment, keyAgreement, keyCertSign" >> x509.ext
echo "subjectAltName         = DNS.1:localhost, IP.1:127.0.0.1, DNS.2:minikube, IP.2:${IP}, DNS.3:keycloak.default, DNS.4:keycloak.est.tech" >> x509.ext
echo "issuerAltName          = issuer:copy" >> x509.ext
echo "[ ca ]" >> x509.ext
echo "# X509 extensions for a ca" >> x509.ext
echo "keyUsage                = critical, cRLSign, keyCertSign" >> x509.ext
echo "basicConstraints        = CA:TRUE, pathlen:0" >> x509.ext
echo "subjectKeyIdentifier    = hash" >> x509.ext
echo "authorityKeyIdentifier  = keyid:always,issuer:always" >> x509.ext
echo "" >> x509.ext
echo "[ server ]" >> x509.ext
echo "# X509 extensions for a server" >> x509.ext
echo "keyUsage                = critical,digitalSignature,keyEncipherment" >> x509.ext
echo "extendedKeyUsage        = serverAuth,clientAuth" >> x509.ext
echo "basicConstraints        = critical,CA:FALSE" >> x509.ext
echo "subjectKeyIdentifier    = hash" >> x509.ext
echo "authorityKeyIdentifier  = keyid,issuer:always" >> x509.ext

openssl x509 -req -CA rootCA.crt -CAkey rootCA.key -in tls.csr -passin file:secretfile.txt -out tls.crt -days 365 -CAcreateserial -extfile x509.ext

rm secretfile.txt x509.ext 2>/dev/null |
This will produce the following files: tls.key, tls.crt and rootCA.crt.
These need to be copied to a location where keycloak can pick them up when starting.
Add a PersistentVolume and PersistentVolumeClaim to map the hostPath on your localhost to the /etc/x509/https directory on the keycloak server.
This will automatically pick up the tls.key, tls.crt files and convert them into https-keystore files in the /opt/jboss/keycloak/standalone/configuration/keystores directory.
You will need to map the rootCA.crt file using an environment variable like this:
env:
- name : X509_CA_BUNDLE
value: /etc/x509/https/rootCA.crt
You'll also need to create a port mapping for the keycloak https port in your deployment:
env:
- name: KEYCLOAK_HTTPS_PORT
value: "8443"
ports:
- name: http
containerPort: 8080
- name: https
containerPort: 8443
and include the https port in your service:
ports:
- name: https
port: 8443
targetPort: 8443
nodePort: 31561
keycloak is now ready to accept https connections.
You can generate your client certificates using the following code:
| Code Block | ||||
|---|---|---|---|---|
| ||||
#!/bin/sh

CLIENT_SUBJECT="/C=IE/ST=/L=/O=/OU=EST/CN=est.tech/emailAddress=client@mail.com"
PW=changeit
CERTNAME=client
IP=$(minikube ip)

echo $PW > secretfile.txt

echo "subjectKeyIdentifier   = hash" > x509.ext
echo "authorityKeyIdentifier = keyid:always,issuer:always" >> x509.ext
echo "basicConstraints       = CA:TRUE" >> x509.ext
echo "keyUsage               = digitalSignature, nonRepudiation, keyEncipherment, dataEncipherment, keyAgreement, keyCertSign" >> x509.ext
echo "subjectAltName         = DNS.1:localhost, IP.1:127.0.0.1, DNS.2:minikube, IP.2:${IP}, DNS.3:keycloak.default, DNS.4:keycloak.est.tech" >> x509.ext
echo "issuerAltName          = issuer:copy" >> x509.ext

openssl req -new -newkey rsa:4096 -nodes -keyout ${CERTNAME}.key -subj "$CLIENT_SUBJECT" -out ${CERTNAME}.csr

openssl x509 -req -CA rootCA.crt -CAkey rootCA.key -in ${CERTNAME}.csr -passin file:secretfile.txt -out ${CERTNAME}.crt -days 365 -CAcreateserial -extfile x509.ext


openssl pkcs12 -export -clcerts -in ${CERTNAME}.crt -inkey ${CERTNAME}.key -passout file:secretfile.txt -out ${CERTNAME}.p12

openssl pkcs12 -in ${CERTNAME}.p12 -password pass:$PW -passout file:secretfile.txt -out ${CERTNAME}.pem -clcerts -nodes

rm secretfile.txt x509.ext 2>/dev/null
|
This will generate a client.crt and a client.key which you can use separtley, it also generates client.pem which combined the certificate and key into 1 file.
If you use this as your cert file then you don't need to specifiy a key file parameter.
You now need to setup your realm and add an X.509 Direct Grant Flow.
See this link on how to do that https://wjw465150.gitbooks.io/keycloak-documentation/content/server_admin/topics/authentication/x509.html
Next setup a client with access type of public.
Change Direct Grant Flow in the "Authentication Flow Overrides" section of your client settings to "x509 direct grant".
Last add a new user with an email address which is the same as the one given the the certificate subject i.e. client@mail.com
Note: The subjectAltName contains a list of DNS and IP entries, you must use one of these in your URL when using the cert.
Note: The CN will be used later on when specifying an SNI host name.
You can test your setup using the following script:
| Code Block | ||||
|---|---|---|---|---|
| ||||
#!/bin/sh
HOST=$(minikube ip)
KEYCLOAK_PORT=$(kubectl -n default get service keycloak -o jsonpath='{.spec.ports[?(@.name=="https")].nodePort}')
REALM="x509"
CLIENT="x509client"
curl -k -X POST https://$HOST:$KEYCLOAK_PORT/auth/realms/$REALM/protocol/openid-connect/token  \
        --data "grant_type=password&scope=openid profile&username=&password=&client_id=$CLIENT" \
        --cert client.crt --key client.key


echo "" |
This will retrieve a JWT token without the need to use a password.
If you are using a confidential client, include the client_secret:
curl -k -X POST https://$HOST:$KEYCLOAK_PORT/auth/realms/$REALM/protocol/openid-connect/token \
--data "grant_type=password&scope=openid profile&client_id=$CLIENT" \
-d client_secret=<client secret> \
--cert client.crt --key client.key
For confidential clients you can also set the Client Authenticator to "X509 certificate" in the credentials tab.
You can then set your subject DN to something like: .*client@mail.com.* and turn on "Allow Regex Pattern Comparison"
The JWT can then be retrieved using a call like the following:
curl -k -X POST https://$HOST:$KEYCLOAK_PORT/auth/realms/$REALM/protocol/openid-connect/token \
--data "grant_type=password&scope=openid profile&client_id=$CLIENT" \
--cert client.pem
Alternatively you can use the -E option to entrypt the pem file
curl -k -X POST https://$HOST:$KEYCLOAK_PORT/auth/realms/$REALM/protocol/openid-connect/token \
--data "grant_type=password&scope=openid profile&client_id=$CLIENT" \
-E client.pem
For more informtion see: X.509 Client Certificate User Authentication
It is not possible to connect to a TLS server with curl using only a client certificate, without the client private key. https://stackoverflow.com/questions/36431179/using-curl-with-cert
Token can also be retrieved using go:
| Code Block | ||||
|---|---|---|---|---|
| ||||
package main

import (
        "crypto/tls"
        "crypto/x509"
        "fmt"
        "io/ioutil"
        "net/http"
        "net/url"
)

func main() {
        caCert, _ := ioutil.ReadFile("/mnt/c/Users/ktimoney/keycloak-certs/rootCA.crt")
        caCertPool := x509.NewCertPool()
        caCertPool.AppendCertsFromPEM(caCert)

        cert, _ := tls.LoadX509KeyPair("/mnt/c/Users/ktimoney/keycloak-certs/client.crt", "/mnt/c/Users/ktimoney/keycloak-certs/client.key")

        client := &http.Client{
                Transport: &http.Transport{
                        TLSClientConfig: &tls.Config{
                                RootCAs:      caCertPool,
                                Certificates: []tls.Certificate{cert},
                        },
                },
        }

        keycloakHost := "192.168.49.2"
        keycloakPort := "31561"
        realmName := "x509"
        keycloakUrl := "https://" + keycloakHost + ":" + keycloakPort + "/auth/realms/" + realmName + "/protocol/openid-connect/token"

        clientId := "x509client"
        scope := "openid profile"
        resp, err := client.PostForm(keycloakUrl,
                url.Values{"username": {""}, "password": {""}, "grant_type": {"password"}, "client_id": {clientId}, "scope": {scope}})
        if err != nil {
                panic(err)
        }
        defer resp.Body.Close()

        fmt.Println("response Status:", resp.Status)
        fmt.Println("response Headers:", resp.Header)
        body, _ := ioutil.ReadAll(resp.Body)
        fmt.Println("response Body:", string(body))
} |
Java example available here: X.509 Authentication in Spring Security
Istio CA Certs
To allow istio to work with keycloak you must add your certificate to the istio certs when you're installing.
An istio operator file is used for this: istio.yaml
istioctl install --set profile=demo -f istio.yaml
Further instruction are available here: Custom CA Integration using Kubernetes CSR
Using istio-gateway to obtain JWT tokens.
You may want to avoid connecting directly to the keycloak server for security reasons.
You can connect to it through the istio ingress gateway instead if you wish.
You will need to setup a gateway in PASSTROUGH mode and virtual service that maps the keycloak host to the keycloak SNI host.
The following file can be used to do this for the CN used when creating certificates above: keycloak-gateway.yaml
You can test this using curl:
| Code Block | ||||
|---|---|---|---|---|
| ||||
#!/bin/sh
INGRESS_HOST=$(minikube ip)
SECURE_INGRESS_PORT=$(kubectl -n default get service istio-ingressgateway -n istio-system -o jsonpath='{.spec.ports[?(@.name=="https")].nodePort}')

curl -v --resolve "keycloak.est.tech:$SECURE_INGRESS_PORT:$INGRESS_HOST" --cacert rootCA.crt "https://keycloak.est.tech:$SECURE_INGRESS_PORT"

CLIENT="myclient"
REALM="x509"
curl --resolve "keycloak.est.tech:$SECURE_INGRESS_PORT:$INGRESS_HOST" --cacert rootCA.crt \
        -X POST https://keycloak.est.tech:$SECURE_INGRESS_PORT/auth/realms/$REALM/protocol/openid-connect/token  \
        --data "grant_type=password&scope=openid profile&client_id=$CLIENT" \
        -E client.pem
echo "" |
The following go code can be used to achieve the same result:
| Code Block | ||||
|---|---|---|---|---|
| ||||
package main

import (
        "context"
        "crypto/tls"
        "crypto/x509"
        "fmt"
        "io/ioutil"
        "net"
        "net/http"
        "net/url"
        "os/exec"
        "strings"
        "time"
)

func main() {
        caCert, _ := ioutil.ReadFile("/mnt/c/Users/ktimoney/keycloak-certs/rootCA.crt")
        caCertPool := x509.NewCertPool()
        caCertPool.AppendCertsFromPEM(caCert)

        cert, _ := tls.LoadX509KeyPair("/mnt/c/Users/ktimoney/keycloak-certs/client.crt",
                                       "/mnt/c/Users/ktimoney/keycloak-certs/client.key")

        dialer := &net.Dialer{
                Timeout:   30 * time.Second,
                KeepAlive: 30 * time.Second,
                DualStack: true,
        }

        keycloakAlias := "keycloak.est.tech"
        cmd := exec.Command("minikube", "ip")
        stdout, err := cmd.Output()
        ingressHost := strings.TrimSpace(string(stdout))
        cmd = exec.Command("kubectl", "get", "service", "istio-ingressgateway", "-n", "istio-system",
                           "-o", "jsonpath={.spec.ports[?(@.name==\"https\")].nodePort}")
        stdout, err = cmd.Output()
        secureIngressPort := strings.TrimSpace(string(stdout))
        fmt.Println("secureIngressPort = " + secureIngressPort)

        client := &http.Client{
                Transport: &http.Transport{
                        DialContext: func(ctx context.Context, network, addr string) (net.Conn, error) {
                                fmt.Println("address original =", addr)
                                if addr == keycloakAlias+":"+secureIngressPort {
                                        addr = ingressHost + ":" + secureIngressPort
                                        fmt.Println("address modified =", addr)
                                }
                                return dialer.DialContext(ctx, network, addr)
                        },
                        TLSClientConfig: &tls.Config{
                                RootCAs:      caCertPool,
                                Certificates: []tls.Certificate{cert},
                        },
                },
        }

        realmName := "x509provider"
        keycloakUrl := "https://" + keycloakAlias + ":" + secureIngressPort + "/auth/realms/" +
                        realmName + "/protocol/openid-connect/token"

        clientId := "x509provider-cli"
        clientId = "myclient"
        scope := "email openid"
        resp, err := client.PostForm(keycloakUrl,
                url.Values{"grant_type": {"password"}, "client_id": {clientId}, "scope": {scope}})
        if err != nil {
                panic(err)
        }
        defer resp.Body.Close()

        fmt.Println("response Status:", resp.Status)
        fmt.Println("response Headers:", resp.Header)
        body, _ := ioutil.ReadAll(resp.Body)
        fmt.Println("response Body:", string(body))
} |
Note: If run outside the cluster the ISS will be "https://keycloak.est.tech:30338/auth/realms/<realm>" (the port number will doffer depending on your setup).
Inside the cluster it will be: "https://keycloak.est.tech:443/auth/realms/<realm>"
Note: Your istio jwksUri won't be able to resolve the host alias so you should use the normal values for this e.g. "https://keycloak.default:8443/auth/realms/<realm>/protocol/openid-connect/certs"
Note: The file above also allows for http calls to keycloak through the gateway, the ISS in this case is: "http://istio-ingressgateway.istio-system:80/auth/realms/<realm>". In this case the jwksUri ahould be set to the default URI for in-cluster keycloak calls i.e. "http://keycloak.default:8080/auth/realms/<realm>/protocol/openid-connect/certs"
Client authentication with signed JWT
Another option for retrieving JWT tokens for confidentail clients is using client authentication with signed JWT.
Create a new confidential client and call it jwtclient.
In the credentials section choose "Signed JWT" from the Client Authenticator dropdown and choose RS256 as the Signature Algorithm.
Then in the Keys tab import the client.crt we generated earlier.
We need to create a self-signed JWT assertion to use this.
Create a public key from your private key with the following command: openssl rsa -in client.key -outform PEM -pubout -out client_pub.key
See the following link on how to do this: Creating and validating a JWT RSA token in Golang
We need to make some modifications to the token.go code to enable it to work for us.
The following fields need to be added to the claims map:
claims["jti"] = "myJWTId" + fmt.Sprint(now.UnixNano())
claims["sub"] = "jwtclient"
claims["iss"] = "jwtclient"
claims["aud"] = "http://192.168.49.2:31560/auth/realms/x509"
Also modify main.go so it uses you public and private keys and only outputs the token value.
Compile and run the code to produce the self-signed JWT assertion.
This can then be used to obtain a JWT access token with the following curl command:
| Code Block | ||||
|---|---|---|---|---|
| ||||
#!/bin/sh
HOST=$(minikube ip)
KEYCLOAK_PORT=$(kubectl -n default get service keycloak -o jsonpath='{.spec.ports[?(@.name=="http")].nodePort}')
REALM="x509"
CLIENT="jwtclient"


JWT=$(./main)

curl -k -X POST http://$HOST:$KEYCLOAK_PORT/auth/realms/$REALM/protocol/openid-connect/token  \
        -d "grant_type=client_credentials" -d "scope=openid profile" -d client_id=$CLIENT \
        -d "client_assertion_type=urn:ietf:params:oauth:client-assertion-type:jwt-bearer" \
        -d client_assertion=$JWT
echo "" |
No client secret is required for this authentication.
These self-signed JWT assertions are for one time use only, the jti claim value must have a unique id for every call.
Note: we can also call this using https with some small modifications.
Client authentication with signed JWT with client secret
This is similar to the option above except we sign with the client secret instead of the private key.
We also use a different algorithm.
The following code demonstrates this:
| Code Block | ||||
|---|---|---|---|---|
| ||||
        secret := "NKTh1bfR9HNwllMhdWrDMKhVJHTvwreC"

        token, err := jwt.NewWithClaims(jwt.SigningMethodHS256, claims).SignedString([]byte(secret))
        if err != nil {
                return "", fmt.Errorf("create: sign token: %w", err)
} |
Client keys tab
The client offer many different ways of configuring the authenticatio keys.
To use the JWKS option we need to create a jwks from our private key or public key.
The following code performs this operation:
| Code Block | ||||
|---|---|---|---|---|
| ||||
package main

import (
        "crypto/rsa"
        "crypto/sha1"
        "crypto/x509"
        "encoding/base64"
        "encoding/json"
        "encoding/pem"
        "flag"
        "fmt"
        "golang.org/x/crypto/ssh"
        "io/ioutil"
        "math/big"
)

type Jwks struct {
        Keys []Key `json:"keys"`
}
type Key struct {
        Kid string `json:"kid,omitempty"`
        Kty string `json:"kty"`
        Use string `json:"use"`
        N   string `json:"n"`
        E   string `json:"e"`
        X5c []string `json:"x5c"`
        X5t string `json:"x5t"`
}

var keyFile string
var keyType string
var certFile string

func getKeyFromPrivate(key []byte) (*rsa.PublicKey){
        parsed, err := ssh.ParseRawPrivateKey(key)
        if err != nil {
                fmt.Println(err)
        }

        // Convert back to an *rsa.PrivateKey
        privateKey := parsed.(*rsa.PrivateKey)

        publicKey := &privateKey.PublicKey
        return publicKey
}

func getKeyFromPublic(key []byte) (*rsa.PublicKey){
        pubPem, _ := pem.Decode(key)

        parsed, err := x509.ParsePKIXPublicKey(pubPem.Bytes)
        if err != nil {
                fmt.Println("Unable to parse RSA public key", err)
        }

        // Convert back to an *rsa.PublicKey
        publicKey := parsed.(*rsa.PublicKey)

        return publicKey
}

func getCert(cert []byte) *x509.Certificate {
        certPem, _ := pem.Decode(cert)
        if certPem == nil {
                panic("Failed to parse pem file")
        }

        // pass cert bytes
        certificate, err := x509.ParseCertificate(certPem.Bytes)
        if err != nil {
                fmt.Println("Unable to parse Certificate", err)
        }

        return certificate
}

func main() {
        flag.StringVar(&keyFile, "keyFile", "/mnt/c/Users/ktimoney/keycloak-certs/client_pub.key", "Location of key file")
        flag.StringVar(&keyType, "keyType", "public", "Type of key file")
        flag.StringVar(&certFile, "certFile", "/mnt/c/Users/ktimoney/keycloak-certs/client.crt", "Location of cert file")
        flag.Parse()

        key, err := ioutil.ReadFile(keyFile)
        if err != nil {
                fmt.Println(err)
        }

        var publicKey *rsa.PublicKey

        if keyType == "public" {
           publicKey = getKeyFromPublic(key)
        }else{
           publicKey = getKeyFromPrivate(key)
        }

        cert, err := ioutil.ReadFile(certFile)
        if err != nil {
                fmt.Println(err)
        }

        certificate := getCert(cert)
        // generate fingerprint with sha1
        // you can also use md5, sha256, etc.
        fingerprint := sha1.Sum(certificate.Raw)

        jwksKey := Key{
                Kid: "SIGNING_KEY",
                Kty: "RSA",
                Use: "sig",
                N: base64.RawStdEncoding.EncodeToString(publicKey.N.Bytes()),
                E: base64.RawStdEncoding.EncodeToString(big.NewInt(int64(publicKey.E)).Bytes()),
                X5c: []string{base64.RawStdEncoding.EncodeToString(certificate.Raw)},
                X5t: base64.RawStdEncoding.EncodeToString(fingerprint[:]),
        }
        jwksKeys := []Key{jwksKey}
        jwks := Jwks{jwksKeys}

        jwksJson, err := json.Marshal(jwks)
        if err != nil {
                fmt.Println(err)
                return
        }
        fmt.Println(string(jwksJson))

} |
The output will look like this:
{"keys":[{"kid":"SIGNING_KEY","kty":"RSA","use":"sig","n":"70XsremwRthZafooWzoDbpj1VnebGnHHLBOTT+A87SWv+WLYtnsDRAew/2XlHA8Q2c1sRU5xeEOtV6tNzk7qk8b4Kp6ZjDSeyUu7IjDEKhJUVaW2rJKj6Cyp9V8Iu82owvMdkyipWp2ZRs7GPtT0CDWSjQnu3nhQ2k0KKybZL9OQ7evpEid7q/pzFPZVU3lEUXiNJZAXTx4AIBZTgM2x74NgORg3WDCpxIPoHB1E2lOkOviAhTC6UmOpUBuLhQIrYTrVfpq0FtlgwCho0hf6uMN2fv60d0EOCEvb1a/8uBLZ2CX5oPvMZ1UfJiLwp/FaYOATmmdRF5CQoLO5AvV7CnOWdisISHIDwq+lMmO9qa8TFbgLZ0OcElgws/O1qJSHXISvWYiruT36XRuxRGg17ctTiI1Fb8qtyz1B7Rmpn0dG52aYfwJ+fZbhkKXwo4Q9SAUsAO8aPEotpCmHXPDeLbXVhgxzevr0WOE2bInU+yQYaF43e4AmzuCRPI2EruM4mAogxj8GkG/SCAVT7lWQeuIFyx3BD5wkOgPrniNVsnMeFq7VvXGpIEcbBz4KfVvlMOiNFh8XCP1YIKPtFqdEhx/NerNLVw0EMWx4iyFlTOr+TSVIi0NDr1GCMwu8SSz5gXHWnWTCZAo7lEFlZevYRV/YphJT310Q78CVyh/uPgE","e":"AQAB","x5c":["MIIGSjCCBDKgAwIBAgIUaSy+y5O7hsXcOj9lQB/nYygWXGMwDQYJKoZIhvcNAQELBQAwSjELMAkGA1UEBhMCSUUxDDAKBgNVBAsMA0VTVDERMA8GA1UEAwwIZXN0LnRlY2gxGjAYBgkqhkiG9w0BCQEWC2NhQG1haWwuY29tMB4XDTIyMDMyOTEyMjMyOFoXDTIzMDMyOTEyMjMyOFowTjELMAkGA1UEBhMCSUUxDDAKBgNVBAsMA0VTVDERMA8GA1UEAwwIZXN0LnRlY2gxHjAcBgkqhkiG9w0BCQEWD2NsaWVudEBtYWlsLmNvbTCCAiIwDQYJKoZIhvcNAQEBBQADggIPADCCAgoCggIBAO9F7K3psEbYWWn6KFs6A26Y9VZ3mxpxxywTk0/gPO0lr/li2LZ7A0QHsP9l5RwPENnNbEVOcXhDrVerTc5O6pPG+CqemYw0nslLuyIwxCoSVFWltqySo+gsqfVfCLvNqMLzHZMoqVqdmUbOxj7U9Ag1ko0J7t54UNpNCism2S/TkO3r6RIne6v6cxT2VVN5RFF4jSWQF08eACAWU4DNse+DYDkYN1gwqcSD6BwdRNpTpDr4gIUwulJjqVAbi4UCK2E61X6atBbZYMAoaNIX+rjDdn7+tHdBDghL29Wv/LgS2dgl+aD7zGdVHyYi8KfxWmDgE5pnUReQkKCzuQL1ewpzlnYrCEhyA8KvpTJjvamvExW4C2dDnBJYMLPztaiUh1yEr1mIq7k9+l0bsURoNe3LU4iNRW/Krcs9Qe0ZqZ9HRudmmH8Cfn2W4ZCl8KOEPUgFLADvGjxKLaQph1zw3i211YYMc3r69FjhNmyJ1PskGGheN3uAJs7gkTyNhK7jOJgKIMY/BpBv0ggFU+5VkHriBcsdwQ+cJDoD654jVbJzHhau1b1xqSBHGwc+Cn1b5TDojRYfFwj9WCCj7RanRIcfzXqzS1cNBDFseIshZUzq/k0lSItDQ69RgjMLvEks+YFx1p1kwmQKO5RBZWXr2EVf2KYSU99dEO/Alcof7j4BAgMBAAGjggEiMIIBHjAdBgNVHQ4EFgQUeo9WwYOqFPJ1B9cjg0WsxS28hnYwgYUGA1UdIwR+MHyAFHoCuHWgHsN1cS7TRuJgk1YvdeY7oU6kTDBKMQswCQYDVQQGEwJJRTEMMAoGA1UECwwDRVNUMREwDwYDVQQDDAhlc3QudGVjaDEaMBgGCSqGSIb3DQEJARYLY2FAbWFpbC5jb22CFG9pjLDcWd36XS7dJnpjRMErPsglMAwGA1UdEwQFMAMBAf8wCwYDVR0PBAQDAgL8ME8GA1UdEQRIMEaCCWxvY2FsaG9zdIcEfwAAAYIIbWluaWt1YmWHBMCoMQKCEGtleWNsb2FrLmRlZmF1bHSCEWtleWNsb2FrLmVzdC50ZWNoMAkGA1UdEgQCMAAwDQYJKoZIhvcNAQELBQADggIBABZhxM9RHGrKRZsuRWVGDfhjboMA4NcuE9E2GMiri1gqwnW+C2HlbN1dkmhnED9LFHM64tk1gPOVmvrE2V7nPp58uVCg0xqsQ/qQNWrDj8Gkv5JRKMCPmW3lCTlE/kOkhC9I4b+0+pD6kyqwCS7ThMff5g0tODbVHVvNhCqsPOMYCKBEdKvJ4jhZatpbO1fLXbhnbhAGnUpva3pl8taN/x+z4oAr+j+PkU3VCQBk08w30QwvFHSqJ9UTT3i4B8amIiBt61ZkwX0Xr8z+w4avqtOzcH61UgGtz2LrRlDlz0D1QacGh2/0kGcWUkBT4AU7Fb2RzCaMFB8eiM5bnXXomMTTMLHQSahKig2H6+c/jSJFVLfL9/5i8q1OoPHWBxU6h+OAFF2qWhCuScIvwv+J/RyOd2JwYeIgU8LJ1cWth2/msCQK2S7UO6myzexlevldmXSjRdvHH/cDHlNnjYWNVF5FsVyTj4tgRYpUVWAPTuRR22LoT5+gAW42DTsOa56IoI6NclDm0F4U29qekl2Ktf9zCYZf+PLi8dgf0hwb0TisDbXr2kwURw0m0YiEFsffmL1mtvsptJOlRhBXEcPHn/jLwUGF0odooeC6YY9H3BNYu8sXn2ykAO4AabjBMcoUUh+FGhWXrMjpnG+PSNacPXW/MDijiM30X42YrqcU9zdk"],"x5t":"IIj3g74+BJHIkUZxKWb4zwZeFuw"}]}
We can paste this into the "JWKS" test box.
Alternativley we can run a web server to produce this output and use the server url in the "JWKS URI" text box instead.
Note: There is also a nodejs utility available for this, running ssh-keygen -e -m pkcs8 -f /tmp/client.key | pem-jwk | jq '{ "keys":[{kid: "something", kty: .kty , use: "sig", n: .n , e: .e }]}'
will produce the same result as above.
You can also upload your private key and certificate to the realm you are using.
Go to Relam Settings → Keys - > Providers → Add Keystore → RSA
Upload both you private key and it's correspoding certificate.
Go to Relam Settings → General and click on "OpenID Endpoint configuration"
Search for jwks_url and you should see somthing like the following :
"jwks_uri":"http://127.0.0.1:33409/auth/realms/x509/protocol/openid-connect/certs"
Go to this URL, your jwks should be on the bottom.
For this to work with you JWT code you'll need to copy the "kid" value and update you code so this is included in the header: This is necessary when the JWKS has multiple keys.
| Code Block | ||||
|---|---|---|---|---|
| ||||
        claims["iss"] = "jwtclient3"
        claims["aud"] = "https://192.168.49.2:31561/auth/realms/x509"

        token := jwt.NewWithClaims(jwt.SigningMethodRS256, claims)
        token.Header["kid"] = "AKAwbsKtqu9OmIwIsPOUf5zTJkIC73hzY9Myv4srjTs"
        tokenString, err := token.SignedString(key)
        if err != nil {
                return "", fmt.Errorf("create: sign token: %w", err)
        }


        return tokenString, nil
} |
Keycloak Authorization code grant
The OAuth Authorization Code Grant flow is recommended if your application support redirects.
e.g. your application is a Web application or a mobile application.
See this link to see how to setup your client - Keycloak: Authorization Code Grant Example
Here is a sample shell script to retrieve an authorization code:
| Code Block | ||||
|---|---|---|---|---|
| ||||
#!/bin/sh
HOST=$(minikube ip)
KEYCLOAK_PORT=$(kubectl -n default get service keycloak -o jsonpath='{.spec.ports[?(@.name=="http")].nodePort}')
REALM="jwtrealm"
CLIENT="jwtsecret"
AUTH_USERNAME="jwtuser"
AUTH_PASSWORD="secret"
STATE=$(uuidgen)

URL="http://$HOST:$KEYCLOAK_PORT/auth/realms/$REALM/protocol/openid-connect/auth?client_id=$CLIENT&response_type=code&state=$STATE"
STDOUT=$(curl -s -X GET $URL --insecure -D headers.out)
COOKIES=$(cat headers.out | grep set-cookie | cut -f2 -d' ' | tr -d '\n')
LOGIN_URL=$(echo $STDOUT | sed s'/.* action=//g' | cut -f1 -d' ' | sed s'/\"//g' | sed s'/amp;//g')

CURL_OUTPUT=$(curl -s --cookie $COOKIES -X POST "${LOGIN_URL}" -d "username=${AUTH_USERNAME}&password=${AUTH_PASSWORD}" --insecure -D headers.out)
CODE=$(cat headers.out | grep -i location | sed s'/.*code=//g')
echo CODE=$CODE
echo ACCESS_CODE=$CURL_OUTPUT
rm headers.out 2>/dev/null |
To set this up so it retrieves the JWT access token once logged in we must configure the keycloak client with a "Valid Redirect URI", in this case it will be "http://192.168.49.2:31233/callback"
The following go sever is running at this URI:
| Code Block | ||||
|---|---|---|---|---|
| ||||
package main

import (
        "encoding/json"
        "fmt"
        "io/ioutil"
        "net/http"
        "net/url"
)

type Jwttoken struct {
        Access_token       string
        Expires_in         int
        Refresh_expires_in int
        Refresh_token      string
        Token_type         string
        Not_before_policy  int
        Session_state      string
        Scope              string
}

var jwt Jwttoken

func getToken(auth_code string) string {
        clientSecret := "Ctz6aBahmjQvAt7Lwgg8qDNsniuPkNCC"
        clientId := "jwtsecret"
        realmName := "jwtrealm"
        keycloakHost := "keycloak"
        keycloakPort := "8080"
        keycloakUrl := "http://" + keycloakHost + ":" + keycloakPort + "/auth/realms/" + realmName + "/protocol/openid-connect/token"
        resp, err := http.PostForm(keycloakUrl,
                     url.Values{"code": {auth_code}, "grant_type": {"authorization_code"},
                                "client_id": {clientId}, "client_secret": {clientSecret}})
        if err != nil {
                fmt.Println(err)
                panic("Something wrong with the credentials or url ")
        }
        defer resp.Body.Close()
        body, err := ioutil.ReadAll(resp.Body)
        fmt.Println(string(body))
        json.Unmarshal([]byte(body), &jwt)
        return jwt.Access_token
}

func noprefix(res http.ResponseWriter, req *http.Request) {
        // create response binary data
        data := []byte("Authorization code default") // slice of bytes
        // write `data` to response
        res.Write(data)
}

func callback(res http.ResponseWriter, req *http.Request) {
        query := req.URL.Query()
        code := query.Get("code")
        token := getToken(code)
                res.WriteHeader(http.StatusOK)
                res.Write([]byte(token))
}

func main() {
        // create a new handler
        callbackHandler := http.HandlerFunc(callback)
        http.Handle("/callback", callbackHandler)
        noPrefixHandler := http.HandlerFunc(noprefix)
        http.Handle("/", noPrefixHandler)
        http.ListenAndServe(":9000", nil)
}
|
Login will trigger a call to the /callback endpoint whcih in turn gets the JWT token and returns it to the user.
PKCE
PKCE stands for Proof Key for Code Exchange and the PKCE-enhanced Authorization Code Flow builds upon the standard Authorization Code Flow and it provides an additional level of security for OAuth clients.
For setting up the keycloak realm, client and user please see : PKCE Verification in Authorization Code Grant
In this example I will use a confidential client called oauth2-pkce in the OAuth2Realm.
I have also added an audience mapper to map the client to the the token.
You will need to copy the client secret into the cod for this to work.
Download the go code: oauth2.go
Update the code to match your keycloak setup.
Once the code has compiled create your docker image using: Dockerfile_oauth2
Start the service using: oauth2.yaml
This program uses PKCE code_challenge and code_challenge_method parameters when making the authorization code request and the PKCE code_verifier parameter when exchanging the authorization code for a token.
If running on windows you may need to start a tunnel so your services are accessible from your windows browser (see Accessing apps)
You may also need to update your hosts file to add an alias of keycloak for your local ip. (e.g. 127.0.0.1 keycloak)
This is important because the iss of the token needs to match the keycloak url you provide.
If everything has been setup correctly when you hit the endpoint http://localhost:9000/ you should be redirected to the keycloak login screen.
Enter a username and password for your realm.
The authorization code will be sent to your call back URL (redirect_uri) where it can be exchanged for a token.
The token will be printed on the screen.
It should look something like this:
| Code Block | ||||
|---|---|---|---|---|
| ||||
{
    "TokenResponse": {
        "access_token": "eyJhbGciOiJSUzI1NiIsInR5cCIgOiAiSldUIiwia2lkIiA6ICJic0J4Z0lKd0dxS3B2YmROdjd0WHd2ZnUxSVFRNDZQb0M4SHFrdEYxTjVjIn0.eyJleHAiOjE2NTE3NTkzMDIsImlhdCI6MTY1MTc1OTAwMiwiYXV0aF90aW1lIjoxNjUxNzU5MDAyLCJqdGkiOiI1ODU2YWNlYi01NWY1LTQ5MjgtYWM2YS1kOWE1NGNkY2QxZTgiLCJpc3MiOiJodHRwOi8va2V5Y2xvYWs6ODA4MC9hdXRoL3JlYWxtcy9PQXV0aDJSZWFsbSIsImF1ZCI6ImFjY291bnQiLCJzdWIiOiJjYzkwNDUxMy0wY2I3LTRiY2QtOTIyZS0xMTc2MDkzYzk0YTEiLCJ0eXAiOiJCZWFyZXIiLCJhenAiOiJvYXV0aDItcGtjZSIsInNlc3Npb25fc3RhdGUiOiIxNzRlMTBhZi1kZTRiLTQzZTgtOTE3Zi1mYzQ4ZTE4ODg5Y2EiLCJhY3IiOiIxIiwicmVhbG1fYWNjZXNzIjp7InJvbGVzIjpbImRlZmF1bHQtcm9sZXMtb2F1dGhyZWFsbSIsIm9mZmxpbmVfYWNjZXNzIiwidW1hX2F1dGhvcml6YXRpb24iXX0sInJlc291cmNlX2FjY2VzcyI6eyJhY2NvdW50Ijp7InJvbGVzIjpbIm1hbmFnZS1hY2NvdW50IiwibWFuYWdlLWFjY291bnQtbGlua3MiLCJ2aWV3LXByb2ZpbGUiXX19LCJzY29wZSI6Im9wZW5pZCBlbWFpbCBwcm9maWxlIiwic2lkIjoiMTc0ZTEwYWYtZGU0Yi00M2U4LTkxN2YtZmM0OGUxODg4OWNhIiwiZW1haWxfdmVyaWZpZWQiOmZhbHNlLCJwcmVmZXJyZWRfdXNlcm5hbWUiOiJvYXV0aDJ1c2VyIn0.VRBWjMUqnVgtQJ5PaYjcOnNt-9PvFkhbLnRw3qBF62N7eJPFexsnPVbB7Hy34TWYy9RKnJIwnIDcgmGAB0mw6XF9iVgQ_3uI0RDa-qbnpOmR9wImzKBFe1DV-KeQQQJTlZ4vsoJJzpdxWJNRwPCUqU9DCMAYVaVKoSfuAapL8v4Rp4H5zT7fjA-LXnvJ4rhypZBjQxu7vOb69_UD98f98av8b0ewg1nJxjkNB7gJRLrgA4CnBuCk5K-zLUWzZU7zub5Am5kjjEf7pBLWw3zsqD9ApBcWe44ySLurB_TRSFHgfL4T9BONG2Y4O1924HxMNlkQ2TaepGXfAuRu4ckuSw",
        "token_type": "Bearer",
        "refresh_token": "eyJhbGciOiJIUzI1NiIsInR5cCIgOiAiSldUIiwia2lkIiA6ICIyNGE3MzY3Zi1hNzJhLTRhMmYtYjI1OC1lNGZjMDJmNWMzZmIifQ.eyJleHAiOjE2NTE3NjA4MDIsImlhdCI6MTY1MTc1OTAwMiwianRpIjoiZDZkOGIyYzMtZWJmMS00OGEyLTgyZDUtNWE5YTcwNTUwZDdlIiwiaXNzIjoiaHR0cDovL2tleWNsb2FrOjgwODAvYXV0aC9yZWFsbXMvT0F1dGgyUmVhbG0iLCJhdWQiOiJodHRwOi8va2V5Y2xvYWs6ODA4MC9hdXRoL3JlYWxtcy9PQXV0aDJSZWFsbSIsInN1YiI6ImNjOTA0NTEzLTBjYjctNGJjZC05MjJlLTExNzYwOTNjOTRhMSIsInR5cCI6IlJlZnJlc2giLCJhenAiOiJvYXV0aDItcGtjZSIsInNlc3Npb25fc3RhdGUiOiIxNzRlMTBhZi1kZTRiLTQzZTgtOTE3Zi1mYzQ4ZTE4ODg5Y2EiLCJzY29wZSI6Im9wZW5pZCBlbWFpbCBwcm9maWxlIiwic2lkIjoiMTc0ZTEwYWYtZGU0Yi00M2U4LTkxN2YtZmM0OGUxODg4OWNhIn0.VFH5KZwtWHLbQyJIHMR0389azqcxKh7Reh6ze52UXsA",
        "expiry": "2022-05-05T14:01:42.0439809Z"
    },
    "IDToken": {
        "exp": 1651759302,
        "iat": 1651759002,
        "auth_time": 1651759002,
        "jti": "4318be76-d806-43a3-bb18-2e2c4b5cf601",
        "iss": "http://keycloak:8080/auth/realms/OAuth2Realm",
        "aud": "oauth2-pkce",
        "sub": "cc904513-0cb7-4bcd-922e-1176093c94a1",
        "typ": "ID",
        "azp": "oauth2-pkce",
        "session_state": "174e10af-de4b-43e8-917f-fc48e18889ca",
        "at_hash": "q0PPpL9nMeJupmHABtdOEw",
        "acr": "1",
        "sid": "174e10af-de4b-43e8-917f-fc48e18889ca",
        "email_verified": false,
        "preferred_username": "oauth2user"
    }
} |
Copy the access token from the output and paste into an environment variable caled TOKEN
curl -H "Authorization: Bearer $TOKEN" localhost:9000
Hello World OAuth2!
See also: golang oauth2
Keycloak Rest API
Documentation for the keycloak Rest API is available here: Keycloak Admin REST API
Below is some sample code that calls the clients rest api to create a new client:
| Code Block | ||||
|---|---|---|---|---|
| ||||
export ADMIN_TKN=$(curl -s -X POST --insecure https://$HOST:$KEYCLOAK_PORT/auth/realms/master/protocol/openid-connect/token \
 -H "Content-Type: application/x-www-form-urlencoded" \
 -d "username=admin" \
 -d 'password=admin' \
 -d 'grant_type=password' \
 -d 'client_id=admin-cli' | jq -r '.access_token')
echo "ADMIN CLIENT TOKEN = $ADMIN_TKN"

curl -X POST --insecure https://$HOST:$KEYCLOAK_PORT/auth/admin/realms/x509provider/clients \
 -H "authorization: Bearer $ADMIN_TKN" \
 -H "Content-Type: application/json" \
 --data \
 '
  {
    "id": "x509Client",
    "name": "x509Client",
    "enabled": "true",
    "defaultClientScopes": ["email"],
    "redirectUris": ["*"],
    "attributes": {"use.refresh.tokens": "true", "client_credentials.use_refresh_token": "true"}
  }
' |
Keycloak SSO & User management
Identity Providers
You can use keycloak for single-sign so users don't have to login to each application individually.
You can also use external identiity providers such as google or github if required.
See the "Identity Providers" menu in the keycloak UI.
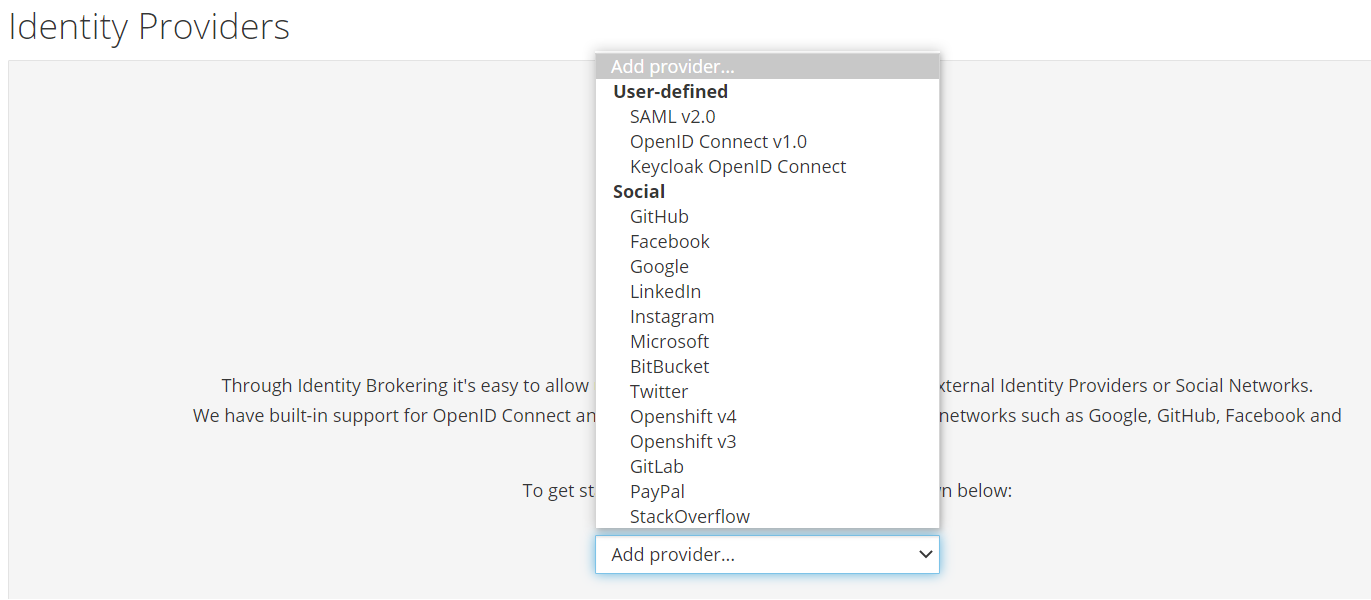
User Federation
You can also use existing LDAP, active directory servers or relational databases for user management if this is required.
Open Source Identity and Access Management
See the "User Federation" menu in the keycloak UI.
Keycloak Authorization services
Keycloak Quickstarts Code Repository
REST Service Protected Using Keycloak Authorization Services
Easily secure your Spring Boot applications with Keycloak
A Quick Guide to Using Keycloak with Spring Boot
Sample External Authorization Server with Istio
Working example
- To use keycloak authoriztion services start by creating a confidential client.
- Set "Authoriztion Enabled" to on.
- Create 2 roles rapp_admin and rapp_user and assigned them to the service account.
- Click on the authoriztion tab for the client to setup your authoriztion policies.
- Start by creating 4 scopes (create,edit, delete and view) in the "Authoriztion scopes" section
- Next create a resource "Rapp resource", set the URI to /api/resources/* and set the scopes to create,edit, delete and view.
- Next create a policy "View Policy", select the "rapp_user" role and set required to on.
- Create an "Admin policy", select the "rapp_admin" role and set required to on.
- In the permission section, create a "Scope Based" permission - for resouce choose the "Rapp resource" created earlier, scope should be set to view and select the "View Policy" for policy.
- Create another "Scope Based" permission - for resouce choose the "Rapp resource" created earlier, scope should be set to create, edit and delete and select the "Admin Policy" for policy.
Create a spring-boot application to work with this "resouce server"
The following 4 files are all that is required:
Use mvn clean package spring-boot:repackage to create the jar file
Use mvn spring-boot:run to run the application from the comand line.
Alternatively you can package the jar into a docker file and run the app as part of your cluster
To test use the following script:
You should see the following output:
GET request using service account access token
GET resources 1
PUT request using service account access token
PUT resources 1
POST request using service account access token
POST resources id=1
GET request using service account requesting party token
GET resources 1
POST request using service account requesting party token
POST resources id=1
PUT request using service account requesting party token
PUT resources 1
OPA
The Open Policy Agent (OPA) is an open source, general-purpose policy engine that unifies policy enforcement across the stack. OPA provides a high-level declarative language that lets you specify policy as code and simple APIs to offload policy decision-making from your software.
OPA policies are expressed in a high-level declarative language called Rego. Rego is purpose-built for expressing policies over complex hierarchical data structures.
It even has a VSCode plugin that lets you highlight and evaluate rules and query policies right within the IDE.
Policy-based control for cloud native environments
Introducing Policy As Code: The Open Policy Agent (OPA)
Istio External Authorization with OPA
Dynamic Policy Composition for OPA
GO
Go provides a library for opa.
| Code Block | ||||
|---|---|---|---|---|
| ||||
package main

import (
        "context"
        "encoding/json"
        "fmt"
        "github.com/open-policy-agent/opa/rego"
        "io/ioutil"
        "net/http"
        "net/url"
        "os"
)

type Jwttoken struct {
        Access_token       string
        Expires_in         int
        Refresh_expires_in int
        Refresh_token      string
        Token_type         string
        Not_before_policy  int
        Session_state      string
        Scope              string
}

var token Jwttoken

var opaPolicy string = `
package authz

import future.keywords.in

default allow = false

jwks := jwks_request("http://keycloak:8080/auth/realms/opa/protocol/openid-connect/certs").body
filtered_jwks := [ key |
      some key in jwks.keys
      key.use == "sig"
    ]
token_cert := json.marshal({"keys": filtered_jwks})

token = { "isValid": isValid, "header": header, "payload": payload } {
        [isValid, header, payload] := io.jwt.decode_verify(input, { "cert": token_cert, "aud": "account", "iss": "http://keycloak:808
0/auth/realms/opa"})
}

allow {
    is_token_valid
}

is_token_valid {
        token.isValid
        now := time.now_ns() / 1000000000
        token.payload.iat <= now
        now < token.payload.exp
        token.payload.clientRole = "[opa-client-role]"
}

jwks_request(url) = http.send({
      "url": url,
      "method": "GET",
      "force_cache": true,
      "force_json_decode": true,
      "force_cache_duration_seconds": 3600 # Cache response for an hour
})
`

func getToken() string {
        clientSecret := "63wkv0RUXkp01pbqtNTSwghhTxeMW55I"
        clientId := "opacli"
        realmName := "opa"
        keycloakHost := "keycloak"
        keycloakPort := "8080"
        keycloakUrl := "http://" + keycloakHost + ":" + keycloakPort + "/auth/realms/" + realmName + "/protocol/openid-connect/token"        resp, err := http.PostForm(keycloakUrl,
                url.Values{"client_secret": {clientSecret}, "grant_type": {"client_credentials"}, "client_id": {clientId}})
        if err != nil {
                fmt.Println(err)
                panic("Something wrong with the credentials or url ")
        }
        defer resp.Body.Close()
        body, err := ioutil.ReadAll(resp.Body)
        json.Unmarshal([]byte(body), &token)
        return token.Access_token
}

func traceOpa(input string) {
        ctx := context.TODO()

        test := rego.New(
                rego.Query("x = data.authz.allow"),
                rego.Trace(true),
                rego.Module("example.rego", opaPolicy),
                rego.Input(input),
        )

        test.Eval(ctx)
        rego.PrintTraceWithLocation(os.Stdout, test)
}

func evaluateOpa(input string) {
        ctx := context.TODO()

        query, err := rego.New(
                rego.Query("x = data.authz.allow"),
                rego.Module("example.rego", opaPolicy),
        ).PrepareForEval(ctx)
        if err != nil {
                // Handle error.
                fmt.Println(err.Error())
        }

        results, err := query.Eval(ctx, rego.EvalInput(input))
        // Inspect results.
        if err != nil {
                // Handle evaluation error.
                fmt.Println("Error: " + err.Error())
        } else if len(results) == 0 {
                // Handle undefined result.
                fmt.Println("Results are empty")
        } else {
                // Handle result/decision.
                fmt.Printf("Results = %+v\n", results) //=> [{Expressions:[true] Bindings:map[x:true]}]
        }
  }

func main() {
        tokenStr := getToken()
        traceOpa(tokenStr)
        evaluateOpa(tokenStr)

}
|
OPA bundles and dynamic composition
Method 1
We can combined OPA bundles with dynamic composition to provide different policies for differect services.
In the root directory of your bundle create main.rego
| Code Block | ||||
|---|---|---|---|---|
| ||||
package main

import input.attributes.request.http as http_request

default allow = false

name := trim_prefix(replace(http_request.path, "-", ""), "/")

router[policy] = data.policies[name][policy].deny

deny[msg] {
    policy := router[_]
    msg := policy[_]
}

allow {
count(deny) == 0
}
|
This main policy will use the request path to determine which policy to apply. (We remove the forward slash and and "-" characters)
Create a directory policies/<app name> off the main directory.
In here create a policy called policy.rego
| Code Block | ||||
|---|---|---|---|---|
| ||||
package policies.rappopaprovider.policy

import input.attributes.request.http as http_request
import future.keywords.in

realm_name := "opa"
realm_url := sprintf("http://keycloak:8080/auth/realms/%v", [realm_name])
certs_url := sprintf("%v/protocol/openid-connect/certs", [realm_url])


jwks := jwks_request(certs_url).body
filtered_jwks := [ key |
      some key in jwks.keys
      key.use == "sig"
    ]
token_cert := json.marshal({"keys": filtered_jwks})

token = { "isValid": isValid, "header": header, "payload": payload } {
        [_, encoded] := split(http_request.headers.authorization, " ")
        [isValid, header, payload] := io.jwt.decode_verify(encoded, { "cert": token_cert, "aud": "account", "iss": realm_url})
 }

deny[msg] {
    not is_token_valid
    msg = "denied by rappopaprovider.policy: not a valid token"
}

is_token_valid {
  token.isValid
  now := time.now_ns() / 1000000000
  token.payload.iat <= now
  now < token.payload.exp
  token.payload.clientRole = "[opa-client-role]"
}

jwks_request(url) = http.send({
      "url": url,
      "method": "GET",
      "force_cache": true,
      "force_json_decode": true,
      "force_cache_duration_seconds": 3600 # Cache response for an hour
}) |
This policy will verify the jwt token, check the token issue time and expiration time against the current time and also ensure the token contains the correct role.
If all these condtions are met the user will be granted access to the resource.
NGINX can be used for the bundles server: nginx.yaml
OPA server: opa.yaml
rapp-opa-provider: rapp-opa-provider.yaml
To test retrieve the access token from keycloak and run the curl command for the rapp-opa-provider url
| Code Block | ||||
|---|---|---|---|---|
| ||||
#!/bin/bash
INGRESS_HOST=$(minikube ip)
INGRESS_PORT=$(kubectl -n istio-system get service istio-ingressgateway -o jsonpath='{.spec.ports[?(@.name=="http2")].nodePort}')
TESTS=0
PASSED=0
FAILED=0
TEST_TS=$(date +%F-%T)
TOKEN=""
ACCESS_TOKEN=""
REFRESH_TOKEN=""

function get_token
{
    local prefix="${1}"
    url="http://${KEYCLOAK_HOST}:${KEYCLOAK_PORT}/auth/realms"
         TOKEN=$(curl -s -X POST $url/opa/protocol/openid-connect/token -H \
                 "Content-Type: application/x-www-form-urlencoded" -d client_secret=63wkv0RUXkp01pbqtNTSwghhTxeMW55I \
                 -d 'grant_type=client_credentials' -d client_id=opacli)
        ACCESS_TOKEN=$(echo $TOKEN | jq -r '.access_token')
}

function run_test
{
    local prefix="${1}" type=${2} msg="${3}" data=${4}
    TESTS=$((TESTS+1))
    echo "Test ${TESTS}: Testing $type /${prefix}"
    get_token $prefix
    url=$INGRESS_HOST:$INGRESS_PORT"/"$prefix
    result=$(curl -s -X ${type} -H "Content-type: application/json" -H "Authorization: Bearer $ACCESS_TOKEN" $url)
    echo $result
    if [ "$result" != "$msg" ]; then
            echo "FAIL"
            FAILED=$((FAILED+1))
    else
            echo "PASS"
            PASSED=$((PASSED+1))
    fi
    echo ""
}


run_test "rapp-opa-provider" "GET" "Hello OPA World!" ""

echo
echo "-----------------------------------------------------------------------"
echo "Number of Tests: $TESTS, Tests Passed: $PASSED, Tests Failed: $FAILED"
echo "Date: $TEST_TS"
echo "-----------------------------------------------------------------------" |
Method 2
We can also organize the policies in the following way.
Create a new file in your bundle to do the common processing:
| Code Block | ||||
|---|---|---|---|---|
| ||||
package policy.common.request

import input.attributes.request.http as http_request
import future.keywords.in

policy_realms := {
    "rappopaprovider": "opa"
}

method = http_request.method
path = input.parsed_path
policy = trim_prefix(replace(http_request.path, "-", ""), "/")

realm_name := policy_realms[policy]
realm_url := sprintf("http://keycloak:8080/auth/realms/%v", [realm_name])
certs_url := sprintf("%v/protocol/openid-connect/certs", [realm_url])

jwks := jwks_request(certs_url).body
filtered_jwks := [ key |
      some key in jwks.keys
      key.use == "sig"
    ]
token_cert := json.marshal({"keys": filtered_jwks})

token = { "isValid": isValid, "header": header, "payload": payload } {
        [_, encoded] := split(http_request.headers.authorization, " ")
        [isValid, header, payload] := io.jwt.decode_verify(encoded, { "cert": token_cert, "aud": "account", "iss": realm_url})
 }

jwks_request(url) = http.send({
      "url": url,
      "method": "GET",
      "force_cache": true,
      "force_json_decode": true,
      "force_cache_duration_seconds": 3600 # Cache response for an hour
})

user = token.payload.sub
clientRole = token.payload.clientRole
audience = token.payload.aud
exp = token.payload.exp
iat = token.payload.iat |
Create another rules.rego file for you application e.g. policy/services/rappopaprovider/ingress/rules.rego
| Code Block | ||||
|---|---|---|---|---|
| ||||
package policy.services.rappopaprovider.ingress

import data.policy.common.request

allow = true {
request.token.isValid
request.method == "GET"
request.path = [ "rapp-opa-provider" ]
now := time.now_ns() / 1000000000
request.iat <= now
now < request.exp
request.clientRole = "[opa-client-role]"
} |
Lastly create the parent rules file that will call the appropiates policy based on the http request path
| Code Block | ||||
|---|---|---|---|---|
| ||||
package policy.ingress

import data.policy.common.request
import data.policy.services

allow = true {
 services[request.policy].ingress.allow
} |
To use this set of rules make sure opa is pointing to the parent rules file : "–set=plugins.envoy_ext_authz_grpc.query=data.policy.ingress.allow"
Note If you do not wish to validate the jet you can use this code instead:
token = { "isValid": isValid, "payload": payload } {
authorization_header := input.attributes.request.http.headers.authorization
encoded_token := trim_prefix(authorization_header, "Bearer ")
payload := io.jwt.decode(encoded_token)[1]
isValid := true
}
OPA with prometheus and grafana
Add the following job to your prometheus.yaml file in the scrape_configs section:
- job_name: opa
scrape_interval: 10s
metrics_path: /metrics
static_configs:
- targets:
- opa.default:8181
This will enable metric collection from the opa /metrics endpoint:
The full ist is available here: Open Policy Agent Monitoring
Download the OPA metrics dashboard from grafana and import it into your grafance instance Open Policy Agent Metrics Dashboard
In the instance dropdown, type opa.default:8181 (assuming opa is running in the default namespace and metrics are being served on port 8181)
You should see a dashboard similar to the following:
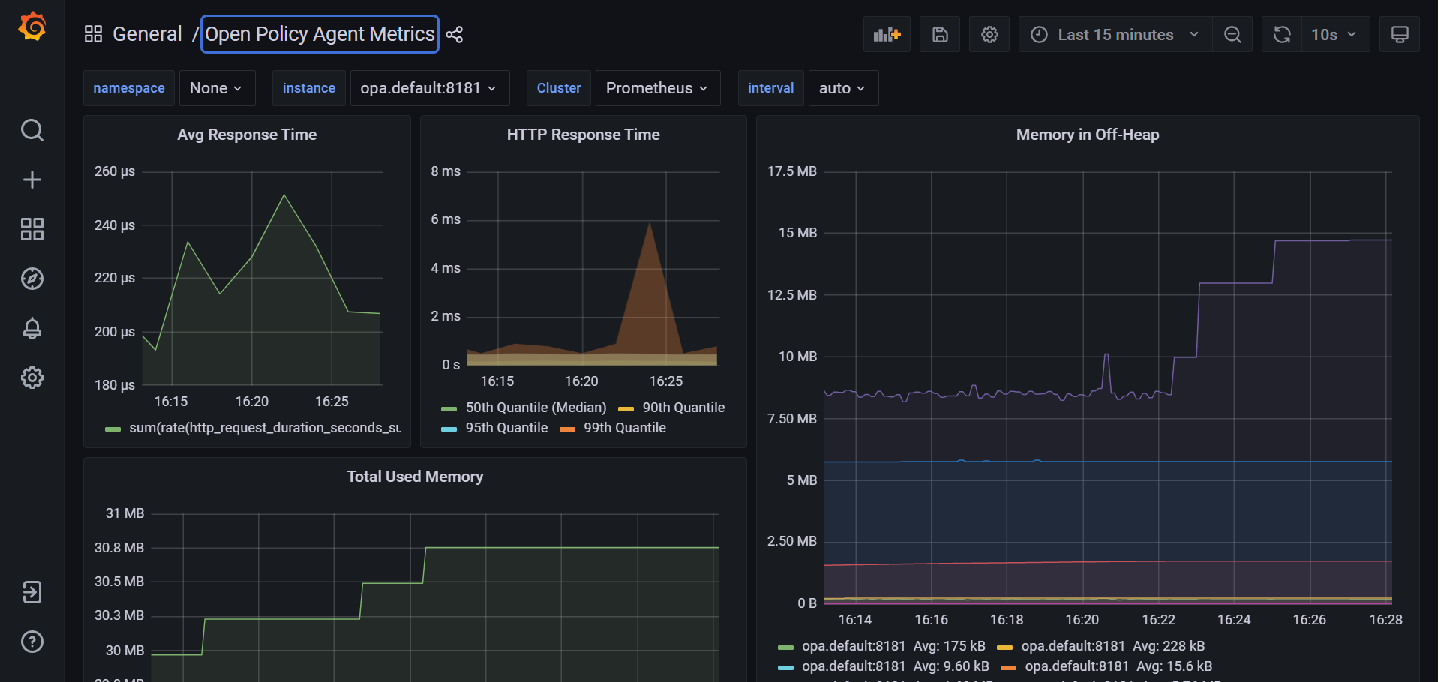
OPA Profiling and Bench Marking
Below is a sample file we can use for profiling/benchmarking
| Code Block | ||||
|---|---|---|---|---|
| ||||
package rbactest

import data.policy.common.request
import data.policy.services

input =  {
    "attributes": {
      "destination": {
        "address": {
          "socketAddress": {
            "address": "172.17.0.15",
            "portValue": 9000
          }
        },
        "principal": "spiffe://cluster.local/ns/istio-nonrtric/sa/default"
      },
      "metadataContext": {},
      "request": {
        "http": {
          "headers": {
            ":authority": "192.168.49.2:31000",
            ":method": "GET",
            ":path": "/rapp-opa-provider",
            ":scheme": "http",
            "accept": "*/*",
            "authorization": "Bearer eyJhbGciOiJSUzI1NiIsInR5cCIgOiAiSldUIiwia2lkIiA6ICJDamJ4a2FONjRVcUdYNThWU2R3WjBxQTdWRmN1TGdEQWhnUWJTVG55UE9JIn0.eyJleHAiOjE2NTY0MDYwMTYsImlhdCI6MTY1NjQwNTcxNiwianRpIjoiOWE0MzAxODMtZjYzZS00MzY1LTg4NTMtYjc0ZTY2MmFhYTUwIiwiaXNzIjoiaHR0cDovL2tleWNsb2FrOjgwODAvYXV0aC9yZWFsbXMvb3BhIiwiYXVkIjoiYWNjb3VudCIsInN1YiI6IjU3NGMxODQzLTZiMWEtNGMwZC04M2U0LTljMDkwYjM5ZjIyZiIsInR5cCI6IkJlYXJlciIsImF6cCI6Im9wYWNsaSIsImFjciI6IjEiLCJyZWFsbV9hY2Nlc3MiOnsicm9sZXMiOlsib2ZmbGluZV9hY2Nlc3MiLCJ1bWFfYXV0aG9yaXphdGlvbiIsImRlZmF1bHQtcm9sZXMtb3BhIl19LCJyZXNvdXJjZV9hY2Nlc3MiOnsib3BhY2xpIjp7InJvbGVzIjpbIm9wYS1jbGllbnQtcm9sZSJdfSwiYWNjb3VudCI6eyJyb2xlcyI6WyJtYW5hZ2UtYWNjb3VudCIsIm1hbmFnZS1hY2NvdW50LWxpbmtzIiwidmlldy1wcm9maWxlIl19fSwic2NvcGUiOiJwcm9maWxlIGVtYWlsIiwiY2xpZW50SWQiOiJvcGFjbGkiLCJjbGllbnRIb3N0IjoiMTI3LjAuMC42IiwiZW1haWxfdmVyaWZpZWQiOmZhbHNlLCJjbGllbnRSb2xlIjoiW29wYS1jbGllbnQtcm9sZV0iLCJwcmVmZXJyZWRfdXNlcm5hbWUiOiJzZXJ2aWNlLWFjY291bnQtb3BhY2xpIiwiY2xpZW50QWRkcmVzcyI6IjEyNy4wLjAuNiJ9.k_NtngXgWyTPB2z8IArnxqvx3iYP18xc-1fWQoZ0Az2BOK3kfWrdSmIngn_ilwLXrTSdX-n_Tx_o2NLlwQ13RMRXN5zoJaCnU2iSXvel7hjYA_PSDZbv3MW1boqOZmqzuTA5ugRXuVAGQ42k0PIPNWqSm6JujUGfVzB_mrc43I3jXNuHuqwx6miat4NmJo2MCxM_Y1s39ixxREfQIovqFz1ky69IKfz8QcxyFhSsCmydjk4T6HufC3_SJO0XaBKWAoJpdcgdom1kYcIeoGxWWn3lX5E0kQ3eL4TH0F6IfCtjLZwFlzlhtDJItD6ddglJpEsc6rcuLw-06_VyjeqzSg",
            "content-type": "application/json",
            "user-agent": "curl/7.68.0",
          },
          "host": "192.168.49.2:31000",
          "id": "15472195549358141958",
          "method": "GET",
          "path": "/rapp-opa-provider",
          "protocol": "HTTP/1.1",
          "scheme": "http"
        },
        "time": "2022-06-28T07:07:47.099076Z"
      },
      "source": {
        "address": {
          "socketAddress": {
            "address": "172.17.0.4",
            "portValue": 54862
          }
        },
        "principal": "spiffe://cluster.local/ns/istio-system/sa/istio-ingressgateway-service-account"
      }
    },
    "parsed_body": null,
    "parsed_path": [
      "rapp-opa-provider"
    ],
    "parsed_query": {},
    "truncated_body": false,
    "version": {
      "encoding": "protojson",
      "ext_authz": "v3"
    }
  }


default allow = false


allow = true {
 services[request.policy].ingress.allow
} |
opa eval --data rbactest.rego --profile --count=100 --format=pretty 'data.rbactest.allow'
false
+--------------------------------+---------+---------+--------------+-------------------+------------------------+
| METRIC | MIN | MAX | MEAN | 90% | 99% |
+--------------------------------+---------+---------+--------------+-------------------+------------------------+
| timer_rego_external_resolve_ns | 300 | 2400 | 461 | 600 | 2382.9999999999914 |
| timer_rego_load_files_ns | 3069300 | 6160300 | 4.024052e+06 | 4.82397e+06 | 6.152662999999996e+06 |
| timer_rego_module_compile_ns | 690400 | 2288700 | 983743 | 1.42366e+06 | 2.2863819999999986e+06 |
| timer_rego_module_parse_ns | 439300 | 1834400 | 613517 | 882270.0000000001 | 1.832610999999999e+06 |
| timer_rego_query_compile_ns | 49500 | 190100 | 68390 | 93410 | 189761.99999999983 |
| timer_rego_query_eval_ns | 25600 | 423300 | 40197 | 42630.00000000001 | 421415.99999999907 |
| timer_rego_query_parse_ns | 44700 | 674500 | 70035 | 81690 | 671625.9999999986 |
+--------------------------------+---------+---------+--------------+-------------------+------------------------+
+--------+--------+----------+---------+-----------+----------+----------+---------------------+
| MIN | MAX | MEAN | 90% | 99% | NUM EVAL | NUM REDO | LOCATION |
+--------+--------+----------+---------+-----------+----------+----------+---------------------+
| 14.1µs | 404µs | 25.251µs | 28.82µs | 402.438µs | 1 | 1 | data.rbactest.allow |
| 9.8µs | 27.8µs | 12.843µs | 16.48µs | 27.756µs | 1 | 1 | rbactest.rego:62 |
+--------+--------+----------+---------+-----------+----------+----------+---------------------+
opa bench --data rbactest.rego 'data.rbactest.allow'
+-------------------------------------------------+------------+
| samples | 22605 |
| ns/op | 47760 |
| B/op | 6269 |
| allocs/op | 112 |
| histogram_timer_rego_external_resolve_ns_75% | 400 |
| histogram_timer_rego_external_resolve_ns_90% | 500 |
| histogram_timer_rego_external_resolve_ns_95% | 500 |
| histogram_timer_rego_external_resolve_ns_99% | 871 |
| histogram_timer_rego_external_resolve_ns_99.9% | 29394 |
| histogram_timer_rego_external_resolve_ns_99.99% | 29800 |
| histogram_timer_rego_external_resolve_ns_count | 22605 |
| histogram_timer_rego_external_resolve_ns_max | 29800 |
| histogram_timer_rego_external_resolve_ns_mean | 434 |
| histogram_timer_rego_external_resolve_ns_median | 400 |
| histogram_timer_rego_external_resolve_ns_min | 200 |
| histogram_timer_rego_external_resolve_ns_stddev | 1045 |
| histogram_timer_rego_query_eval_ns_75% | 31100 |
| histogram_timer_rego_query_eval_ns_90% | 37210 |
| histogram_timer_rego_query_eval_ns_95% | 47160 |
| histogram_timer_rego_query_eval_ns_99% | 91606 |
| histogram_timer_rego_query_eval_ns_99.9% | 630561 |
| histogram_timer_rego_query_eval_ns_99.99% | 631300 |
| histogram_timer_rego_query_eval_ns_count | 22605 |
| histogram_timer_rego_query_eval_ns_max | 631300 |
| histogram_timer_rego_query_eval_ns_mean | 29182 |
| histogram_timer_rego_query_eval_ns_median | 25300 |
| histogram_timer_rego_query_eval_ns_min | 15200 |
| histogram_timer_rego_query_eval_ns_stddev | 32411 |
+-------------------------------------------------+------------+
OPA Sidecar injection
First create a namespace for your apps and enable istio and opa
kubectl create ns opa
kubectl label namespace opa opa-istio-injection="enabled"
kubectl label namespace opa istio-injection="enabled"
Create the opa injection obects using:
kubectl create -f opa_inject.yaml
Ensure your istio mesh config has been setup to include grcp local authorizer
kubectl edit configmap istio -n istio-system
| Code Block | ||||
|---|---|---|---|---|
| ||||
    extensionProviders:
    - envoyExtAuthzGrpc:
        port: "9191"
        service: local-opa-grpc.local
name: opa-local |
Update your rapp-provider authorization policy to use this provider:
| Code Block | ||||
|---|---|---|---|---|
| ||||
apiVersion: security.istio.io/v1beta1
kind: AuthorizationPolicy
metadata:
  name: rapp-opa-provider-opa
  namespace: opa
spec:
  selector:
    matchLabels:
      app: rapp-opa-provider
  action: CUSTOM
  provider:
    name: "opa-local"
  rules:
  - to:
    - operation:
        paths: ["/rapp-opa-provider"]
notPaths: ["/health"] |
Run the opa_test.sh script above and you should see a message confirming your connection to the service.
Note: References to keycloak need to be updated to include the keycloak schema i.e keycloak.default
Basic Authentication
We can add basic authentication to our NGINX bubdle server by following these steps:
Create a password file using the following command: sudo htpasswd -c .htpasswd <user>, you will be prompted to input the password.
This will produce a file called .htpasswd containing the username and encrypted password
e.g. admin:$apr1$tPQCjrVW$sokcSj4QVkncEDna0Fc2o/
Add the following configmap definitions to your nginx.yaml
| Code Block | ||||
|---|---|---|---|---|
| ||||
apiVersion: v1
kind: ConfigMap
metadata:
  name: nginx-pwd-config
  namespace: default
data:
  .htpasswd: |
    admin:$apr1$tPQCjrVW$sokcSj4QVkncEDna0Fc2o/
---
apiVersion: v1
kind: ConfigMap
metadata:
  name: nginx-conf-config
  namespace: default
data:
  default.conf: |
   server {
           server_name localhost;

           location ~ ^/bundles/(.*)$ {
           root /usr/share/nginx/html/bundles;
           try_files /$1 =404;
           auth_basic "Restricted";
           auth_basic_user_file /etc/nginx/conf.d/conf/.htpasswd;
           }
   }
--- |
Then update your volumes and volume mounts to include these files with your deployment
| Code Block | ||||
|---|---|---|---|---|
| ||||
        volumeMounts:
        - name: bundlesdir
          mountPath: /usr/share/nginx/html/bundles
          readOnly: true
        - name: nginx-conf
          mountPath: /etc/nginx/conf.d/default.conf
          subPath: default.conf
        - name: nginx-pwd
          mountPath: /etc/nginx/conf.d/conf/.htpasswd
          subPath: .htpasswd
      volumes:
      - name: bundlesdir
        hostPath:
# Ensure the file directory is created. |
...
We can use elasticsearch, kibana and fluentd to aggregate and visualize the kubernetes logs.
You can use the following files to setup a single node ELK stack on minikube
- elastic.yaml includes a persistence volume that mounts the /usr/share/elasticsearch/data directory to a host path. This prevents loss of data when the pod is restarted. (You may ned to change the hostPath path value to a directory on your own host)
- Both elastic.yaml and kibana.yaml contain a config map for configuring the component on start up.
- xpack.security.enabled is set to true to enable security.
- This is a single-node minkube setup, you may want to alter this for your own installation.
Please ensure to create the logging namespace before applying these files.
Once elasticsearch is up and running, log into kibana and create a new index for the logstash-* pipeline.
Once this is done use the discover tab to create a query against your logs:
Select the timeStamp, kubernetes.container_image, log and kuberentes.label.app for you fields
Use the filters input textbox to only show the logs you want → log : Received and kubernetes.container_image : nonrtric-server-go
Change the date field to the last 15 minutes.
Save your query.
This will produce a report like the following:
This shows the number of requests made to the nonrtric-server-go.
Go to the visualize tab.
Here you can create different charts to display your data and then add them to a dashboard.
Here you can see 3 graphs, the first one shows the number of requests received by each NONRTRIC componet in he last 60 minutes.
The second one is a histogram showing the total number of requests broken down by timeStamp.
The last one is a pie chart showing the distribution of requests across components.
Click the Dev tools tab to use the elasticsearch console
Run GET /_cat/indices?v to see the list of indices currently in use
You can delete indices that are no longer required by running the following command:
DELETE /<index name> e.g. DELETE /logstash-2022.01.18
You can create a policy to remove logstash indices older than 1 day
| Code Block | ||||
|---|---|---|---|---|
| ||||
PUT /_ilm/policy/cleanup_policy { "policy": { "phases": { "hot": { "actions"path: {} /var/opa/bundles },type: DirectoryOrCreate - name: nginx-conf "delete": { configMap: "min_age": "1d",name: nginx-conf-config defaultMode: 0644 - name: nginx-pwd "actions": { "delete": {} } configMap: }name: nginx-pwd-config } defaultMode: 0644 |
This will add basic authentication to your bundles directory.
Run echo -n <username>:<password> | base64 to encrpt your usename and password
e.g. echo -n admin:admin | base64
YWRtaW46YWRtaW4=
Update the opa-istio-config ConfigMap in the opa_inject.yaml file to include the encrypted string as a token in the cedentials section:
| Code Block | ||||
|---|---|---|---|---|
| ||||
apiVersion: } } PUT /logstash-*/_settings { "lifecycle.name": "cleanup_policy" } PUT /_template/logging_policy_template { "index_patterns": ["logstash-*"], v1 kind: ConfigMap metadata: name: opa-istio-config namespace: opa data: config.yaml: | plugins: envoy_ext_authz_grpc: addr: :9191 "settings": { "index.lifecycle.name" path: "cleanup_policy" } } |
Quick Installation Guide
- Download and install istio: istioctl install --set profile=demo
- cd to the samples/addons/ directory and install the dashboards e.g. kubectl create -f kiali.yaml
- Install postgres: istioctl kube-inject -f postgres.yaml | kubectl apply -f - (change the hostPath path value to a path on your host)
- Install keycloak: istioctl kube-inject -f keycloak.yaml | kubectl apply -f -
- Open the keycloak admin console and setup the required realms, users and clients
- Setup the "pms_admin" and "pms_viewer" roles for pmsuser and pmsuser2 respectively.
- Install Release E: Coordinated Service Exposure: docker build -t nonrtric-server-go:latest .
- Create the istio-nonrtric namespace: kubectl create namespace istio-nonrtric
- Enable istio for the istio-nonrtric namespace: kubectl label namespace istio-nonrtric istio-injection=enabled
- Edit the istio-test.yaml so the host ip specified matches yours.
- Also change the userid in the requestPrincipals field to match yours
- Install istio-test.yaml : kubectl create -f istio-test.yaml
- Install Release E: Coordinated Service Exposure: docker build -t nonrtric-client-go:latest .
- Install the test client: istioctl kube-inject -f client.yaml | kubectl apply -f -
- Open the kiali dashboard to check your services are up and running
- Open the grafana to view the istio dashboard
- Optionally install Release E: Coordinated Service Exposure
ONAP
/ingress/allow
    decision_logs:
      console: true
    services:
      - name: bundle-server
        url: http://bundle-server.default
        credentials:
          bearer:
            token: YWRtaW46YWRtaW4=
            scheme: Basic

    bundles:
      authz:
        service: bundle-server
        resource: bundles/opa-bundle.tar.gz
        persist: true
        polling:
          min_delay_seconds: 10
          max_delay_seconds: 20
--- |
Your bundle is now protected with basic authentication.ONAP Next Generation Security & Logging Architecture