...
| Code Block | ||||
|---|---|---|---|---|
| ||||
import requests
import jwt
from datetime import datetime, timedelta, timezone

def get_jwt(username, secret, algorithm):
   payload_data = {
       "username": username,
       "exp": datetime.now(tz=timezone.utc) + timedelta(minutes=15)
   }

   encoded = jwt.encode(
       payload=payload_data,
       key=secret,
       algorithm=algorithm
   )
   return encoded

url = "http://localhost:8085/query"
username = "influxadmin"
secret = 'my super secret pass phrase'
algorithm="HS256"
jwt = get_jwt(username, secret, algorithm)

headers = { "Authorization": "Bearer "+jwt.decode('utf-8') }

querystring = {"pretty": "true", "db": "ts_pms_metrics",
               "q": "SELECT \"eventName\", \"domain\", \"sourceName\", \"measuredEntityUserName\", \"startEpochMicrosec\", \"startEpochDate\", \"lastEpochMicrosec\", \"lastEpochDate\", \"measuredEntityDn\", \"measObjInstId\", \"sMeasType\" ,\"sValue\", \"suspectFlag\" FROM \"pms_data\" WHERE \"time\" > now()-20s"}

response = requests.request("GET", url=url, headers=headers, params=querystring)

print(response.text) |
Note: JWT authorization is no longer supported in Influxdb v. 2
Client Libraries
There are a number of client libraries available for interacting with influxdb, the full list can be seen here: InfluxDB client libraries
Here is an example of the python client libraryTo create a new user in influxdb v1 use the following commands:
| Code Block | ||||||
|---|---|---|---|---|---|---|
| from influxdb_client import InfluxDBClient, Point, PermissionResource, Permission
from influxdb_client.domain import Authorization
my_org = "iot"
my_url = "http://localhost:8086"
my_username = "influxdb"
my_password = "influxdb"
my_bucket_name = "iot-bucket"
client = InfluxDBClient(url=my_url, username=my_username, password=my_password, org=my_org)
my_org_id = ""
organizations_api = client.organizations_api()
orgs = organizations_api.find_organizations()
# Check if org already exists
my_org_list = [o for o in orgs if o.name == my_org]
if len(my_org_list):
org = my_org_list[0]
my_org_id=org.id
print("Found " + org.name + ", " + my_org_id)
else:
print("Creating " + my_org)
org = organizations_api.create_organization(name=my_org)
my_org_id=org.id
buckets_api = client.buckets_api()
# Check if bucket already exists
bucket = buckets_api.find_bucket_by_name(bucket_name=my_bucket_name);
if not bucket is None:
print("Found " + bucket.name)
else:
print("Creating " + my_bucket_name)
bucket = buckets_api.create_bucket(bucket_name=my_bucket_name)
# Create a new Authorization token for the bucket
bucket_resource = PermissionResource(org_id=my_org_id, id=bucket.id, type="buckets")
read_bucket = Permission(resource=bucket_resource, action="read")
write_bucket = Permission(resource=bucket_resource, action="write")
auth = Authorization()
auth.org_id=my_org_id
auth.permissions=[read_bucket, write_bucket]
auth.description=bucket.name+' Token'
authorizations_api = client.authorizations_api()
authorizations_api.create_authorization(authorization=auth)
# Find available authorizations
authorizations = authorizations_api.find_authorizations()
for auth in authorizations:
print(auth.description + " - " + auth.token + " - " + auth.status + " - " + auth.org_id)
| |||||
/ # influx  -username influxadmin -password influxadmin -execute 'SHOW DATABASES'
name: databases
name
----
_internal
ts_db
ts_db1
ts_test
ts_host_metrics
ts_pms_metrics
ts_pms_metrics2
null
ts_pms_bucket
ts_pms_bucket2
ts_pms_bucket3
ts_pms_bucket4
ts_pms_metrics3
telegraf
ts_pms_metrics_v1
/ # influx  -username influxadmin -password influxadmin -database ts_pms_metrics
Connected to http://localhost:8086 version 1.7.11
InfluxDB shell version: 1.7.11
> CREATE USER influxweb WITH PASSWORD 'influxweb' WITH ALL PRIVILEGES |
The first command shows the available databases
The second one logs into the ts_pms_metrics database using the admin user.
The last command creates a new user "influxweb"
Note: If you restart influxdb you'll need to remove these variables otherwise it will get stuck in a loop trying to create the admin user again
INFLUXDB_ADMIN_USER: influxadmin
INFLUXDB_ADMIN_PASSWORD: influxadmin
Note: JWT authorization is no longer supported in Influxdb v. 2
Client Libraries
There are a number of client libraries available for interacting with influxdb, the full list can be seen here: InfluxDB client libraries
Here is an example of the python client library:
| Code Block | ||||
|---|---|---|---|---|
| ||||
from influxdb_client import InfluxDBClient, Point, PermissionResource, Permission
from influxdb_client.domain import Authorization

my_org = "iot"
my_url = "http://localhost:8086"
my_username = "influxdb"
my_password = "influxdb"
my_bucket_name = "iot-bucket"
client = InfluxDBClient(url=my_url, username=my_username, password=my_password, org=my_org)
my_org_id = ""

organizations_api = client.organizations_api()
orgs = organizations_api.find_organizations()

# Check if org already exists
my_org_list = [o for o in orgs if o.name == my_org]
if len(my_org_list):
   org = my_org_list[0]
   my_org_id=org.id
   print("Found " + org.name + ", " + my_org_id)
else:
   print("Creating " + my_org)
   org = organizations_api.create_organization(name=my_org)
   my_org_id=org.id

buckets_api = client.buckets_api()
# Check if bucket already exists
bucket = buckets_api.find_bucket_by_name(bucket_name=my_bucket_name);
if not bucket is None:
   print("Found " + bucket.name)
else:
   print("Creating " + my_bucket_name)
   bucket = buckets_api.create_bucket(bucket_name=my_bucket_name)

# Create a new Authorization token for the bucket
bucket_resource = PermissionResource(org_id=my_org_id, id=bucket.id, type="buckets")
read_bucket = Permission(resource=bucket_resource, action="read")
write_bucket = Permission(resource=bucket_resource, action="write")
auth = Authorization()
auth.org_id=my_org_id
auth.permissions=[read_bucket, write_bucket]
auth.description=bucket.name+' Token'

authorizations_api = client.authorizations_api()
authorizations_api.create_authorization(authorization=auth)

# Find available authorizations
authorizations = authorizations_api.find_authorizations()
for auth in authorizations:
print(auth.description + " - " + auth.token + " - " + auth.status + " - " + auth.org_id) |
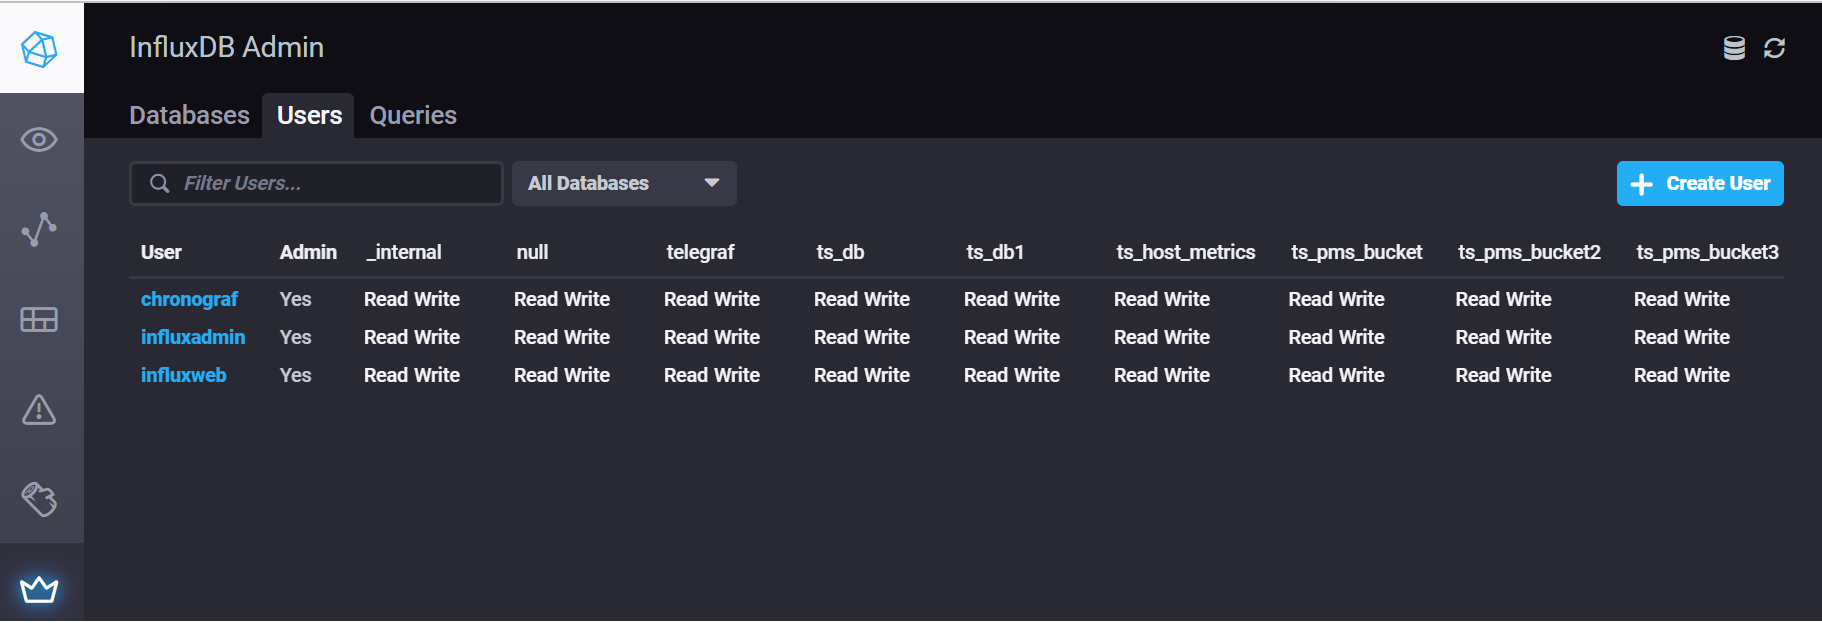
Chronograf
Chronograf can be used to visualize your data in either V1 or V2, although it's very similar to what comes out of the box with V2.
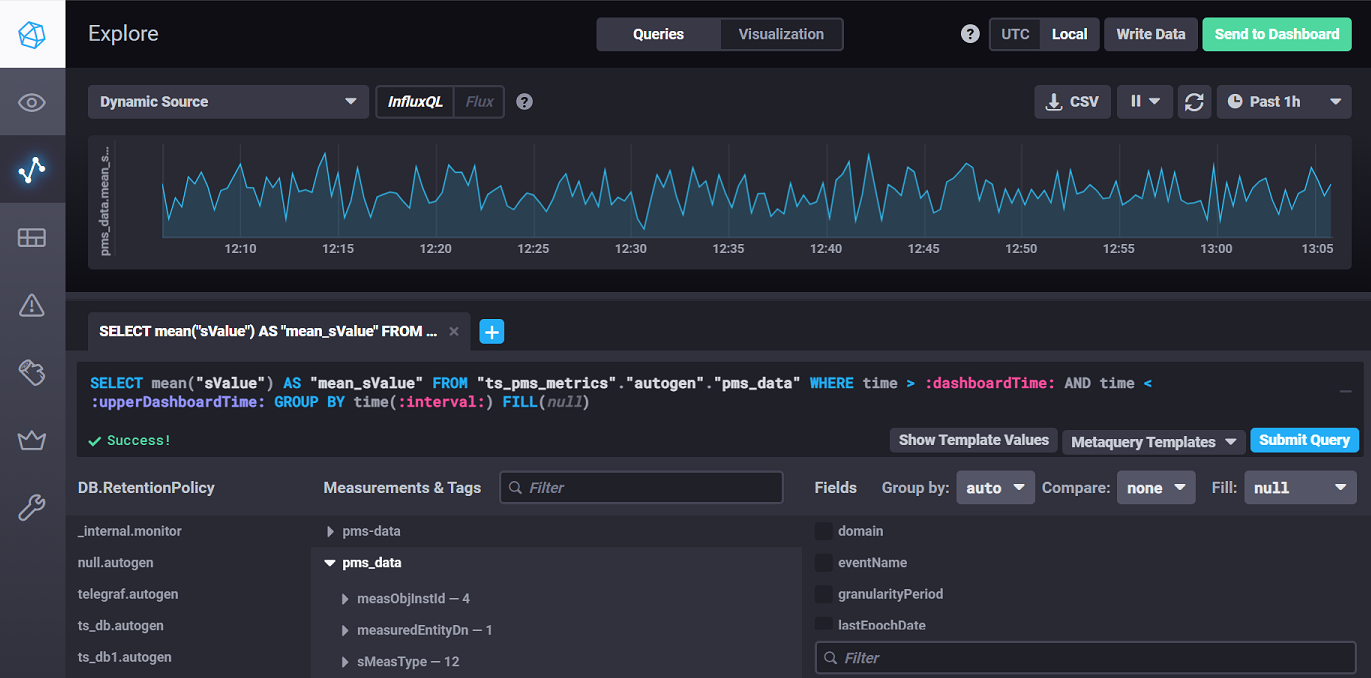
You can also use it to create users:
You can use the following yaml to run it in your cluster: chronograf.yaml
Links
Manage security and authorization
...
InfluxDB Tech Tips; Creating Tokens with the InfluxDB API
Write data with the InfluxDB API V1
Authentication and authorization in InfluxDB V1