This is a guide for software developers and testers about the continuous integration (CI) resources and processes used by the project and supported by the Linux Foundation.
Continuous Integration Network Resources
Most of these resources authenticate users via a Linux Foundation identity.
| URL | Description |
|---|---|
| https://identity.linuxfoundation.org | The Linux Foundation identity management web site. |
| https://gerrit.o-ran-sc.org | The Gerrit code review server hosts the Git repositories and supports the review and merge workflow. The review process basically requires all users to follow something like a git pull-request process, but restricts the publication (push) of private branches. |
| https://jenkins.o-ran-sc.org | Jenkins is the continuous-integration server aka the build server. All users can see the contents of the Jenkins; no users can directly modify the configuration nor start a job in this Jenkins. Jobs are configured by Jenkins Job Builder (JJB) files in the ci-management gerrit repository. |
| https://jenkins.o-ran-sc.org/sandbox | The Jenkins sandbox is a place for testing Jenkins job configurations. After requesting access, users can create jobs, reconfigure jobs, trigger builds etc. New JJB templates should be tested in the sandbox before submitting for review and use on the main Jenkins server. |
| https://jira.o-ran-sc.org | Jira is the web site that supports agile development with epics, user stories, and especially issues (bug reports). |
| https://nexus.o-ran-sc.org | Not heavily used by this project because Java is not a key technology, this Nexus 2 repository holds Maven (jar and pom) artifacts produced by builds. Snapshot and staging builds are all deployed to this repository. Release artifacts are created by promoting artifacts manually from the staging repository after suitable approval. Publicly accessible to users without credentials. All users should be able to access and browse artifacts through this URL. |
| https://nexus3.o-ran-sc.org/ | This Nexus 3 server stores project Docker images and also mirrors external registries. Supports the following:
These registries are open for anonymous read access. The Jenkins server has credentials to push images to the snapshot and staging registries, and to promote images to the release registry. Manual push of images is not supported. |
| https://packagecloud.io | This site hosts binary artifacts such as Debian (.deb) packages, Red Hat Package Manager (.rpm) packages and more in these repositories:
|
| https://sonarcloud.io | Sonar tools analyze Java and Python code for quality issues and code coverage achieved by unit tests (JUnit, tox) and publish results to this cloud-based server. |
Development Procedures and Policies
This section guides the developer in submitting code, reviewing code, tracking the status of builds and requesting creation of release versions. These recommended practices come from the Linux Foundation.
Always create a branch
When working with a git repository cloned from Gerrit you can create as many local branches as you like. None of the branches will be pushed to the remote Gerrit server, the branches remain forever private. Creating branches for each task will allow you to work on multiple independent tasks in parallel, let you recover gracefully from various situations, and generally save aggravation and time. Also see these instructions on tagging and branching for releases:
Tagging and Branching Steps Process
Write good git commit messages
The Linux Foundation strongly recommends (and eventually may enforce) Gerrit commit message content. A git commit message must meet these requirements:
- The first line should have a short change summary, up to 50 characters
- The second line must be blank
- The body of the commit message should have a detailed change description, wrap lines at 72 characters max
- The line before the footer must be blank
- The footer (last block of lines following a blank line) must consist of these lines:
- Issue-ID: line with a valid Jira issue number, composed and inserted manually by the committer
- Change-Id: line, which is automatically generated and inserted by git review
- Signed-off-by line, which is automatically generated and inserted by git commit
An example is shown below:
Null check for ClientResponse

NullPointerException might be thrown as cres is nullable here

Issue-Id: PROJECT-999
Change-Id: I14dc792fb67198ebcbabfe80d90c48389af6cc91
Signed-off-by: First Last <fl1234567890@my-company.com>
Using Gerrit
The project uses Gerrit to automate the process of reviewing all code changes before they are committed to the Git repository. For a tutorial on git you might start here:
Also see this guide published by the LF Release Engineering team about using Gerrit:
https://docs.releng.linuxfoundation.org/en/latest/gerrit.html
Prohibited Content
Gerrit is designed to host text files – source code. It enforces a size threshold on every commit, the default limit is 5MB. Further the Linux Foundation prohibits committing binary files such as compiled executables, jar files, zip archives and so on. An exception is made for binary picture (image) files in GIF, JPG and PNG formats, but the size limit must still be honored.
Quickstart Guides
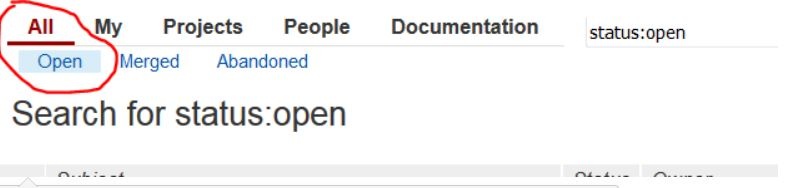
The quickstart guides below describe the command-line procedures for performing common tasks on Gerrit. The command-line tool "git review" is the most reliable and can be used on any platform. Windows users should install "Git Bash" to gain support for command-line git.
Quickstart: Create and submit a change for review
git checkout -b my-local-branch |
Quickstart: Submit a change to a branch other than "master"
git review other-branch |
Quickstart: Revise your open gerrit review
git checkout my-local-branch |
Quickstart: Revise any open gerrit review
# Look up the change number shown top-left in Gerrit web, here "999". |
Quickstart: Resolve a conflicted review
git checkout master |
Quickstart: Squash commits after you forgot the "--amend" flag
# |
Reviewing and merging changes
Submitted reviews with changes should appear in the Gerrit web interface. The Jenkins job builder will publish test results, giving "Verified +1" if the test succeeds and -1 if the test fails. A contributor or committer can review it with a -1/0/+1. A committer then must approve it with a +2 rating and merge the code to the master branch.
The committer may take any of several actions, such as clicking on the "Reply" button, adding reviewers, adding a review comment, and moving the flags to +2 and +1
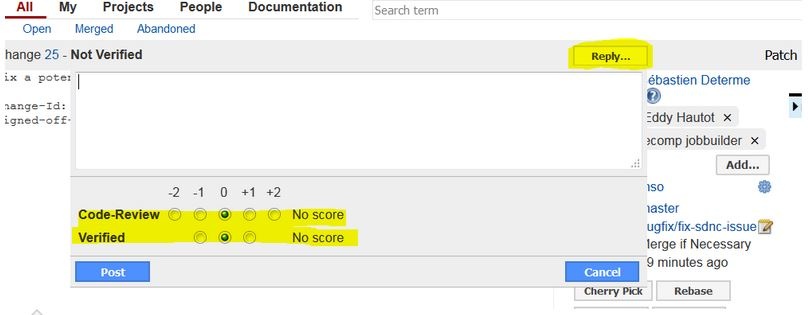
Once a committer/contributor approves it, the code can be merged to the master branch.
Once testing against the staging repo version has been completed (see above ![]() ) and the project has determined that the artifact in the staged repository is ready for release, the project team can use the new-for-2019 self-release process. For details on
) and the project has determined that the artifact in the staged repository is ready for release, the project team can use the new-for-2019 self-release process. For details on
Releasing a Java/maven artifact
- Find the Jenkins stage job that created the release candidate. Look among its output logs for the file with the name: staging-repo.txt.gz, it will have a URL like this:
- Create a new release yaml file in the directory "releases/" at the repo root.
- The file name should be anything, but most projects use a pattern like "release-maven.yaml". An example of the content appears below.
- The file content has the project name, the version to release, and the log directory you found above, altho in abbreviated form.
- Create a new change set with just the new file, commit to git locally and submit the change set to Gerrit.
- After the verify job succeeds, a project committer should merge the change set. This will tag the repository with the version string AND release the artifact.
Example release yaml file content:
--- |
After the release merge job runs to completion, the jar files should appear in the Nexus2 release repository.
Releasing a Docker artifact
For a Docker image the release yaml file must list the desired release tag and the existing container tags. Example release yaml file content:
--- distribution_type: container container_release_tag: 1.0.0 container_pull_registry: nexus.o-ran-sc.org:10003 container_push_registry: nexus.o-ran-sc.org:10002 project: test |
After the release merge job runs to completion, the container images should appear in the Nexus3 release registry.
Releasing a Python package
For a Python package the release yaml file must list the log directory, python version and more. Example release yaml file content:
--- |
If you use a valid decimal value anywhere (like 3.7 above), put it in single quotes so it can be parsed as a string, not a number.
After the release merge job runs to completion, the packages should appear in the https://pypi.org index.
Releasing a PackageCloud DEB/RPM package
The self-release process for PackageCloud is in active development as of December 2019. Until it is ready, write a ticket at https://jira.linuxfoundation.org/servicedesk
<plugin>
    <groupId>org.sonarsource.scanner.maven</groupId>
    <artifactId>sonar-maven-plugin</artifactId>
    <version>${sonar-maven-plugin.version}</version>
</plugin>
<plugin>
    <groupId>org.jacoco</groupId>
    <artifactId>jacoco-maven-plugin</artifactId>
    <version>0.8.4</version>
    <executions>
        <execution>
            <id>default-prepare-agent</id>
            <goals>
                <goal>prepare-agent</goal>
            </goals>
        </execution>
        <execution>
            <id>default-report</id>
            <phase>prepare-package</phase>
            <goals>
                <goal>report</goal>
            </goals>
        </execution>
    </executions>
</plugin>
Then the Jenkins job needs to be updated, see the following commit for an example: https://gerrit.o-ran-sc.org/r/c/ci-management/+/2446.
- In Eclipse, right click on the project and select "SonarLint → Bind to SonarQube or SonarCloud...".
- In the dialog, press the "New" button.
- Make sure the "sonarcloud" radio button is selected and press "Next".
- If you do not have a token generated in SonarCloud, press the "Generate token" button. Otherwise you can reuse yor token.
- Follow the instructions in the web page you are redirected to to generate the token.
- Paste the token in to the "Token:" box and press "Next".
- In the "Organization:" box, type "o-ran-sc" and press "Next".
- Press "Next".
- Press "Finish".
- Select "Window → Show View → Other..." and then "SonarLint bindings".
- In the view, doubleclick the new binding.
- In the dialog, Press "Add", select the project to bind, press "Ok", and press "Next".
- Type your project's name. When it show up in the result list, select it and press "Finish".
Now Sonar issues should show up in your code.
Note! At the moment there is a bug that show up if Lombok is used in the code. To see when a fix is released, follow this link Lombok issue.